
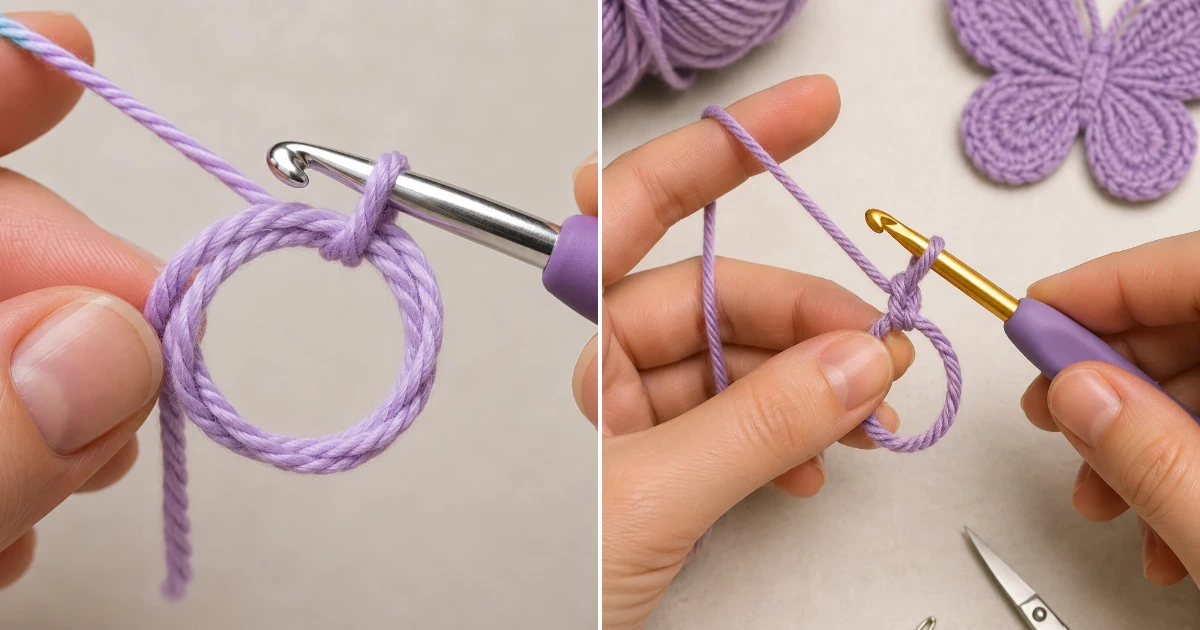
Easy Crochet Butterfly Applique Pattern That Flutters
crochet butterfly applique patterns free are one of my favorite little projects when I want something pretty, quick, and genuinely useful. I’m so excited to share this beginner-friendly butterfly applique because it takes only a small amount of yarn and turns into the sweetest little embellishment. According to The Spruce Crafts,The finished butterfly is flat enough for hats, bags, headbands, cards, and baby accessories, but its folded wings give it a lovely bit of dimension. Grab your supplies and let’s dive into this cheerful little make!
A Sweet Little Butterfly to Make This Weekend
This simple butterfly is quick to crochet, easy to customize in size, and perfect for adding a handmade touch almost anywhere.
Materials Needed
Medium-weight cotton yarn, approximately 8–10 yards, in one color
5 mm crochet hook (US H-8)
Yarn needle with a blunt tip
Sharp scissors
Small measuring tape or ruler
Optional stitch marker for marking the beginning of Round 1
Gauge (Approximate): Finished butterfly measures approximately 3½ inches (9 cm) wide by 2¾ inches (7 cm) tall when made with the listed yarn and hook; gauge is not critical for this applique
Quantity: 1 completed butterfly applique
Color: One solid lavender color throughout the entire butterfly
Abbreviations / Terms Used
MR: Magic ring
ch: Chain
sc: Single crochet
dc: Double crochet
tr: Treble crochet
sl st: Slip stitch
st/sts: Stitch/stitches
ch-sp: Chain space
FO: Fasten off
Picot: A decorative point made from 3 chains followed by a slip stitch into the first chain
Free Pattern: crochet butterfly applique patterns free
The butterfly is built in two crochet rounds, then folded and secured with a simple crocheted body and antennae.
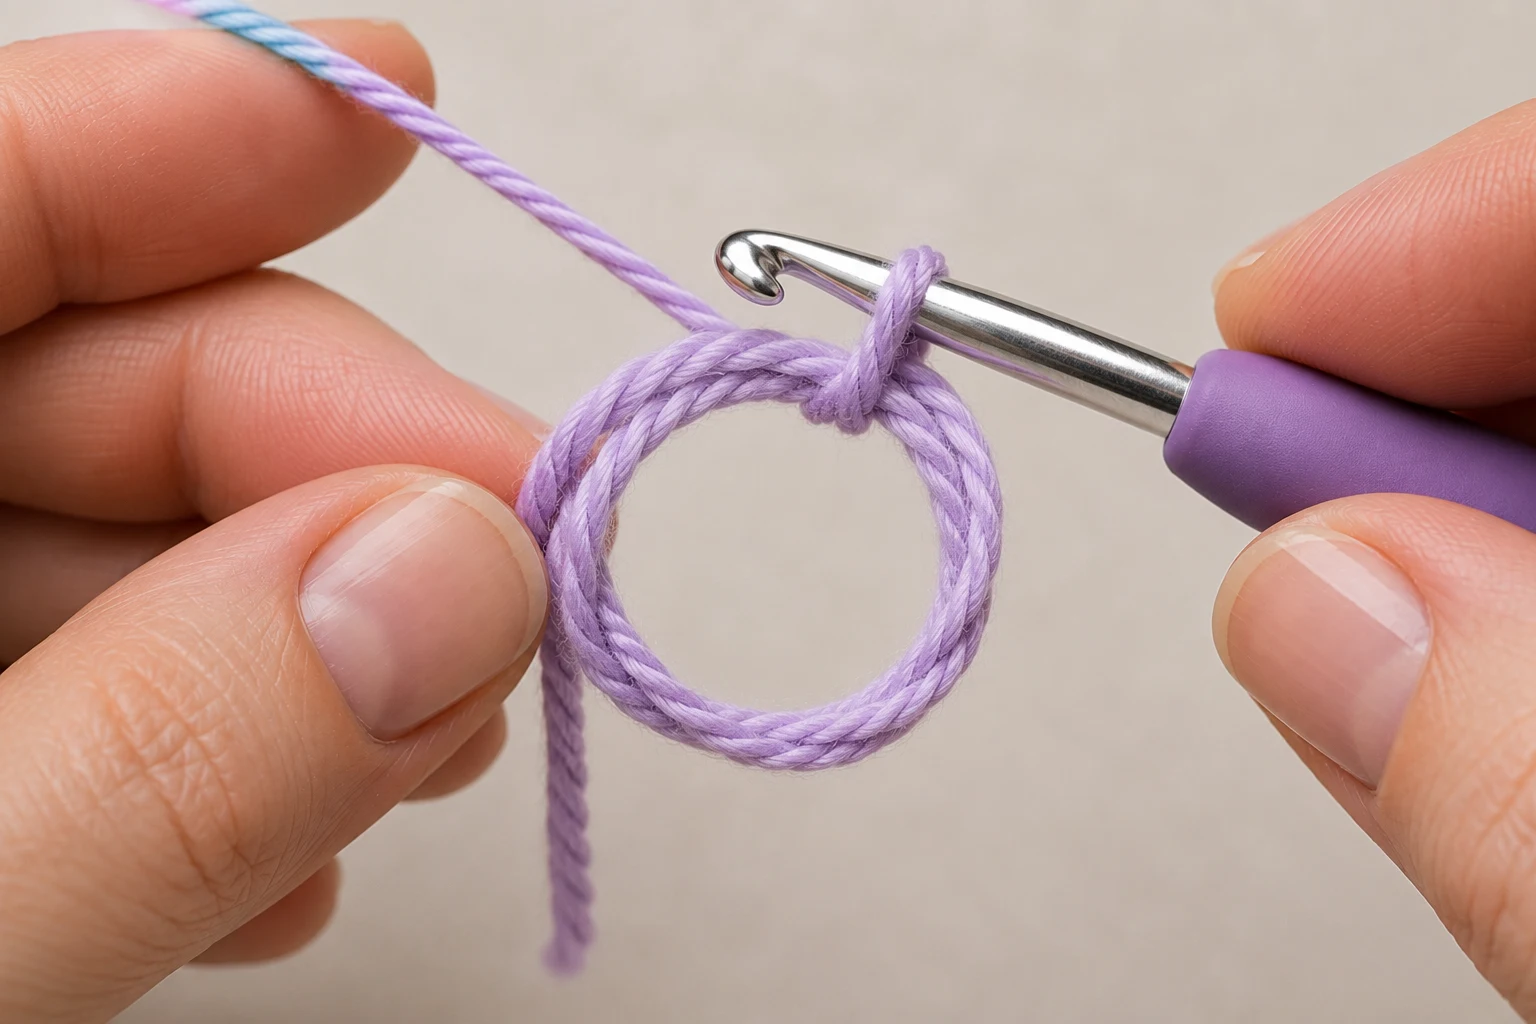
1. Form the magic ring — crochet
Action: Make a magic ring with the lavender yarn.
Detailed instructions: Hold the yarn tail in your non-working hand and wrap the working yarn around two fingers to form an adjustable loop. Insert the 5 mm hook under the first strand of the loop, catch the working yarn, and pull it through to create the starting loop on your hook. Keep the ring open rather than tightening it yet.
Expected result: You have one adjustable yarn ring with one active loop on your hook.
Check yourself: You should be able to slide the yarn tail and make the center ring larger or smaller.
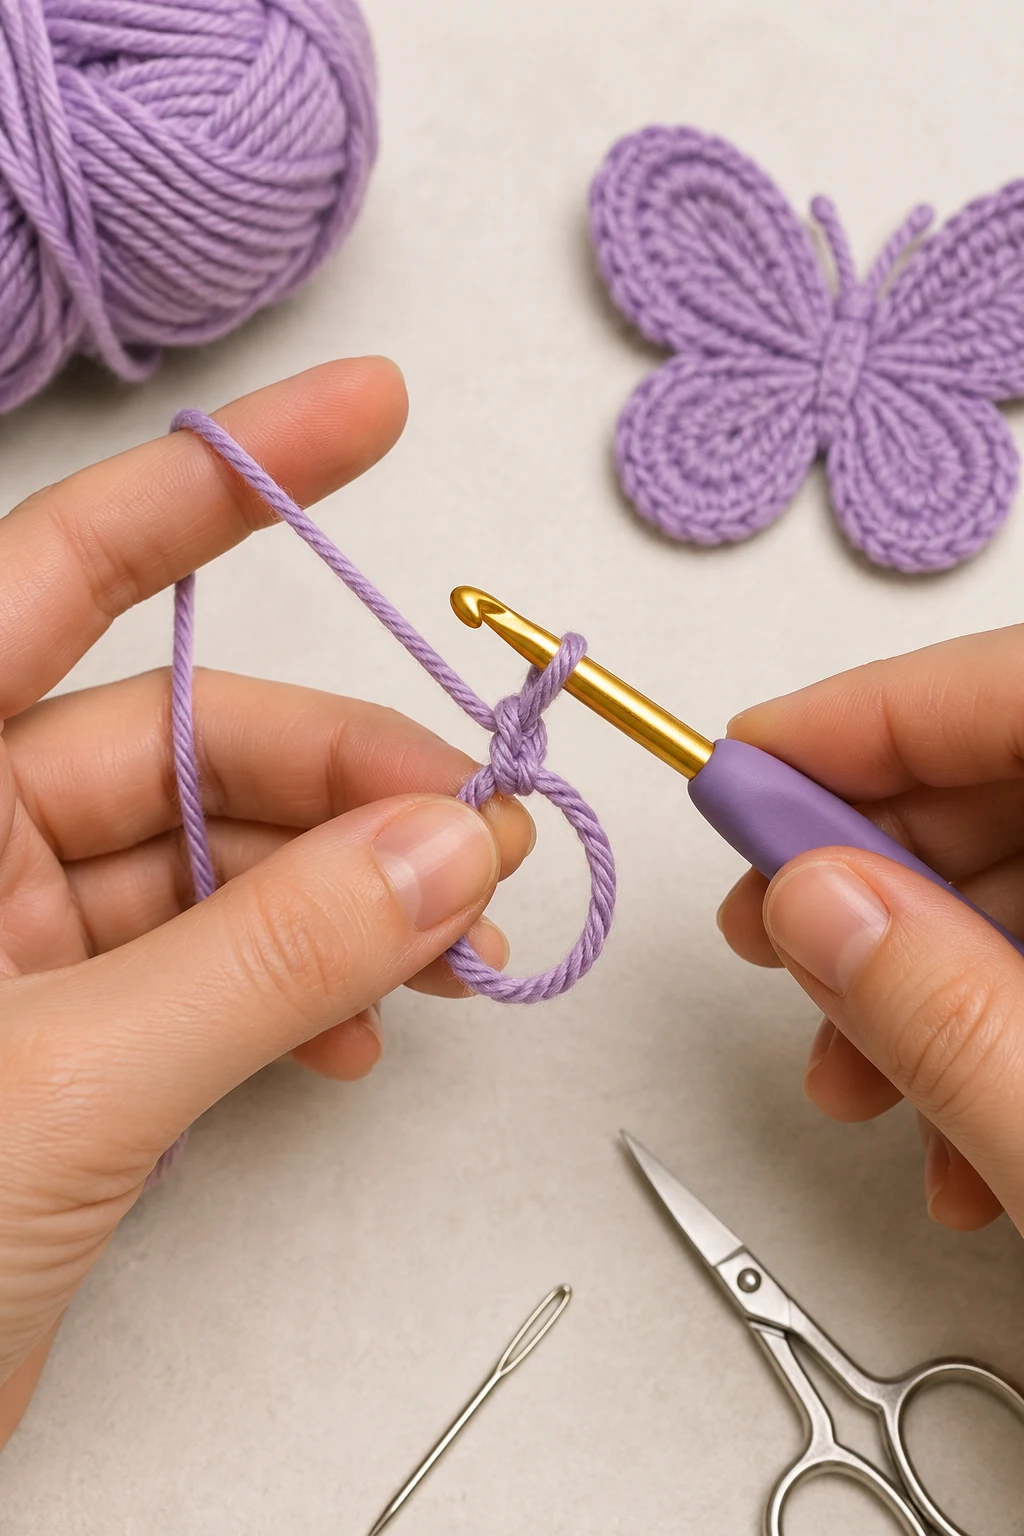
2. Secure the magic ring — crochet
Action: Chain 1 to secure the magic ring.
Detailed instructions: With the active loop already on the hook, yarn over once and pull the yarn through the active loop. This creates the securing chain above the ring without tightening the ring yet.
Expected result: One chain stitch sits directly above the magic ring.
Check yourself: You should see exactly 1 chain above the open ring.
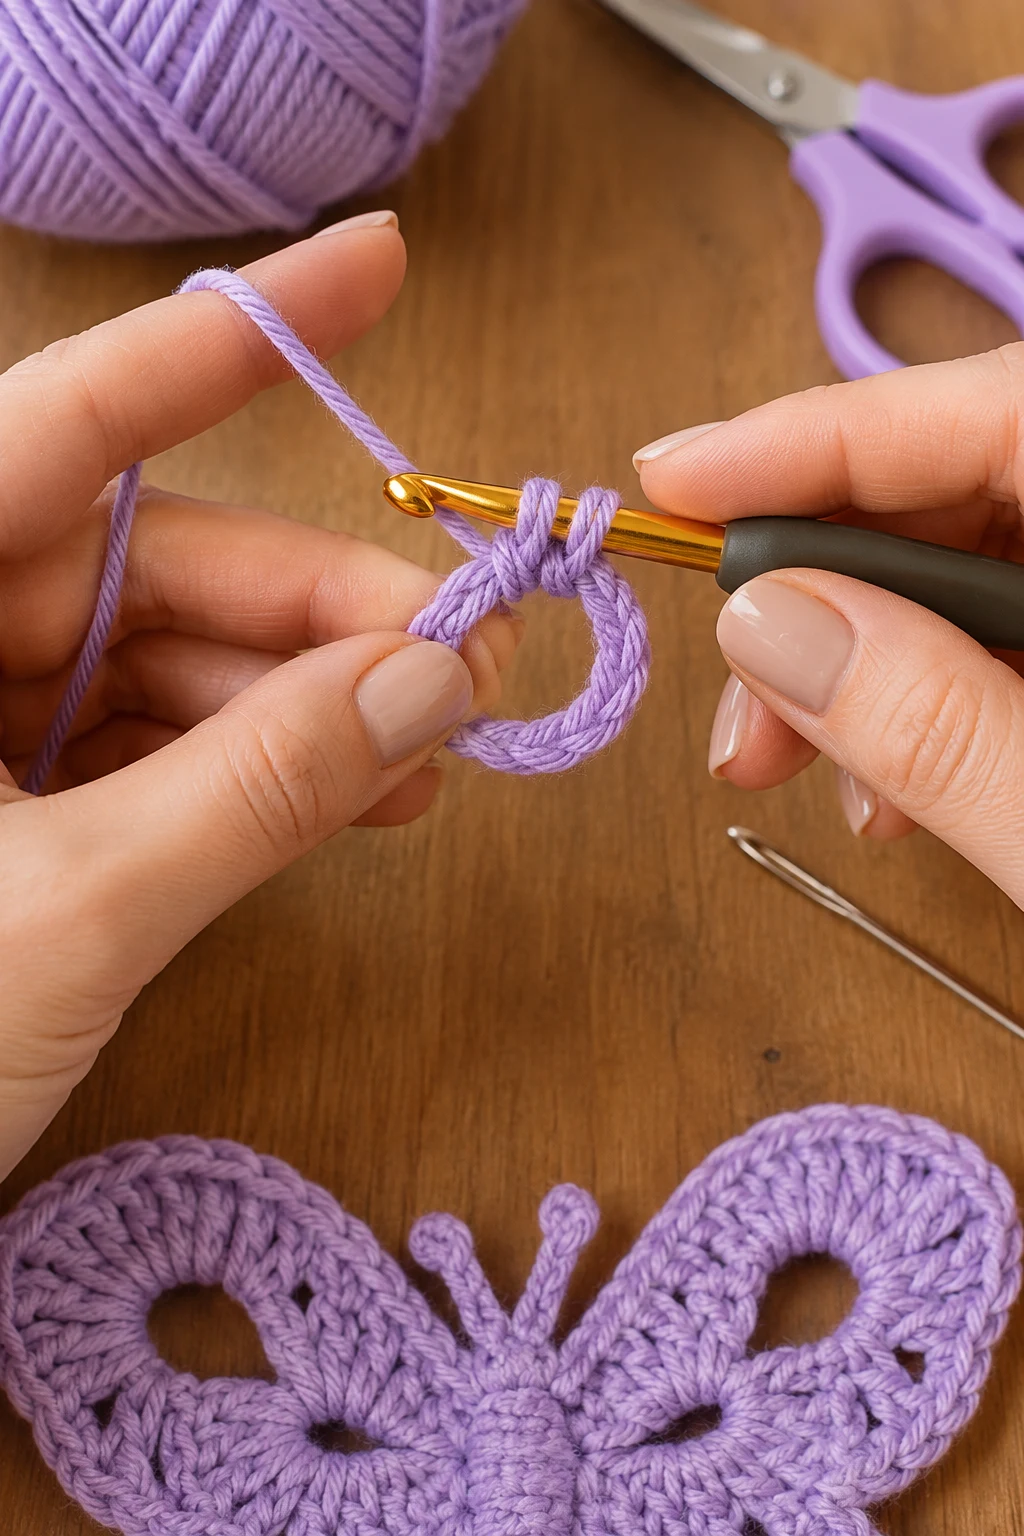
3. Make the first single crochet
Action: Work 1 single crochet into the magic ring.
Detailed instructions: Insert the hook through the center of the magic ring, yarn over once, and pull up a loop. You now have 2 loops on the hook. Yarn over once more and pull through both loops to complete the single crochet.
Expected result: One single crochet is anchored in the ring.
Check yourself: You should see 1 compact sc sitting inside the ring.
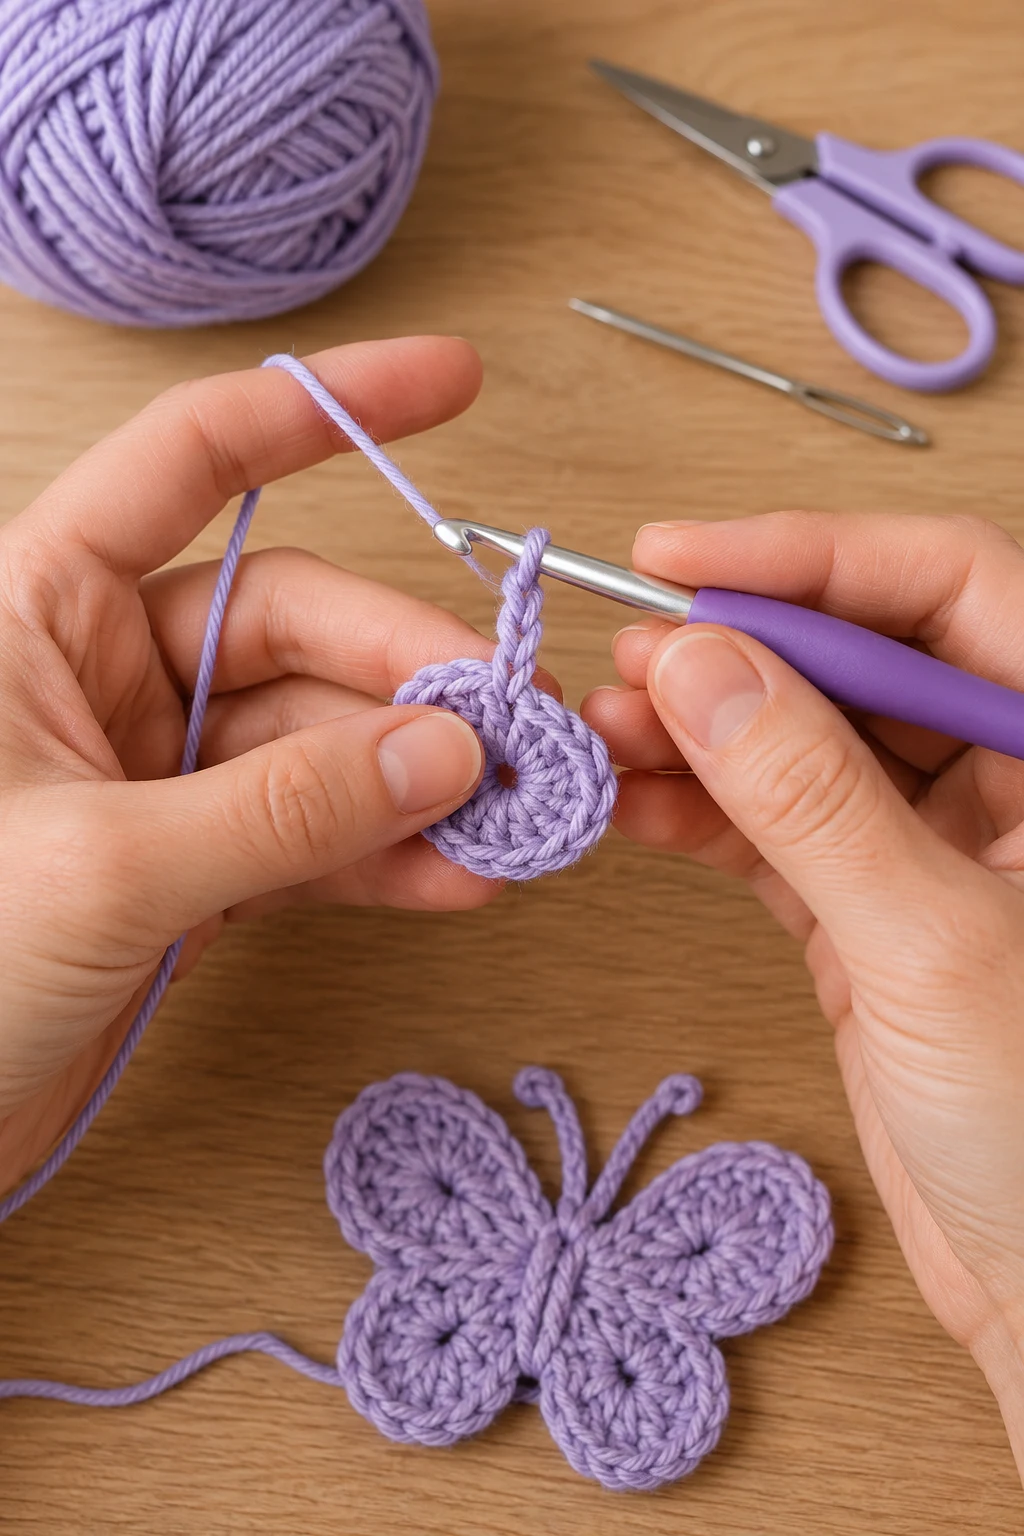
4. Create the first chain space
Action: Chain 1 after the first single crochet.
Detailed instructions: Yarn over once and pull the yarn through the active loop on the hook. Keep this chain slightly loose so the following double crochet can be worked comfortably around the ring.
Expected result: A 1-chain space appears beside the first sc.
Check yourself: The first sc and the new chain should look like a tiny open V.
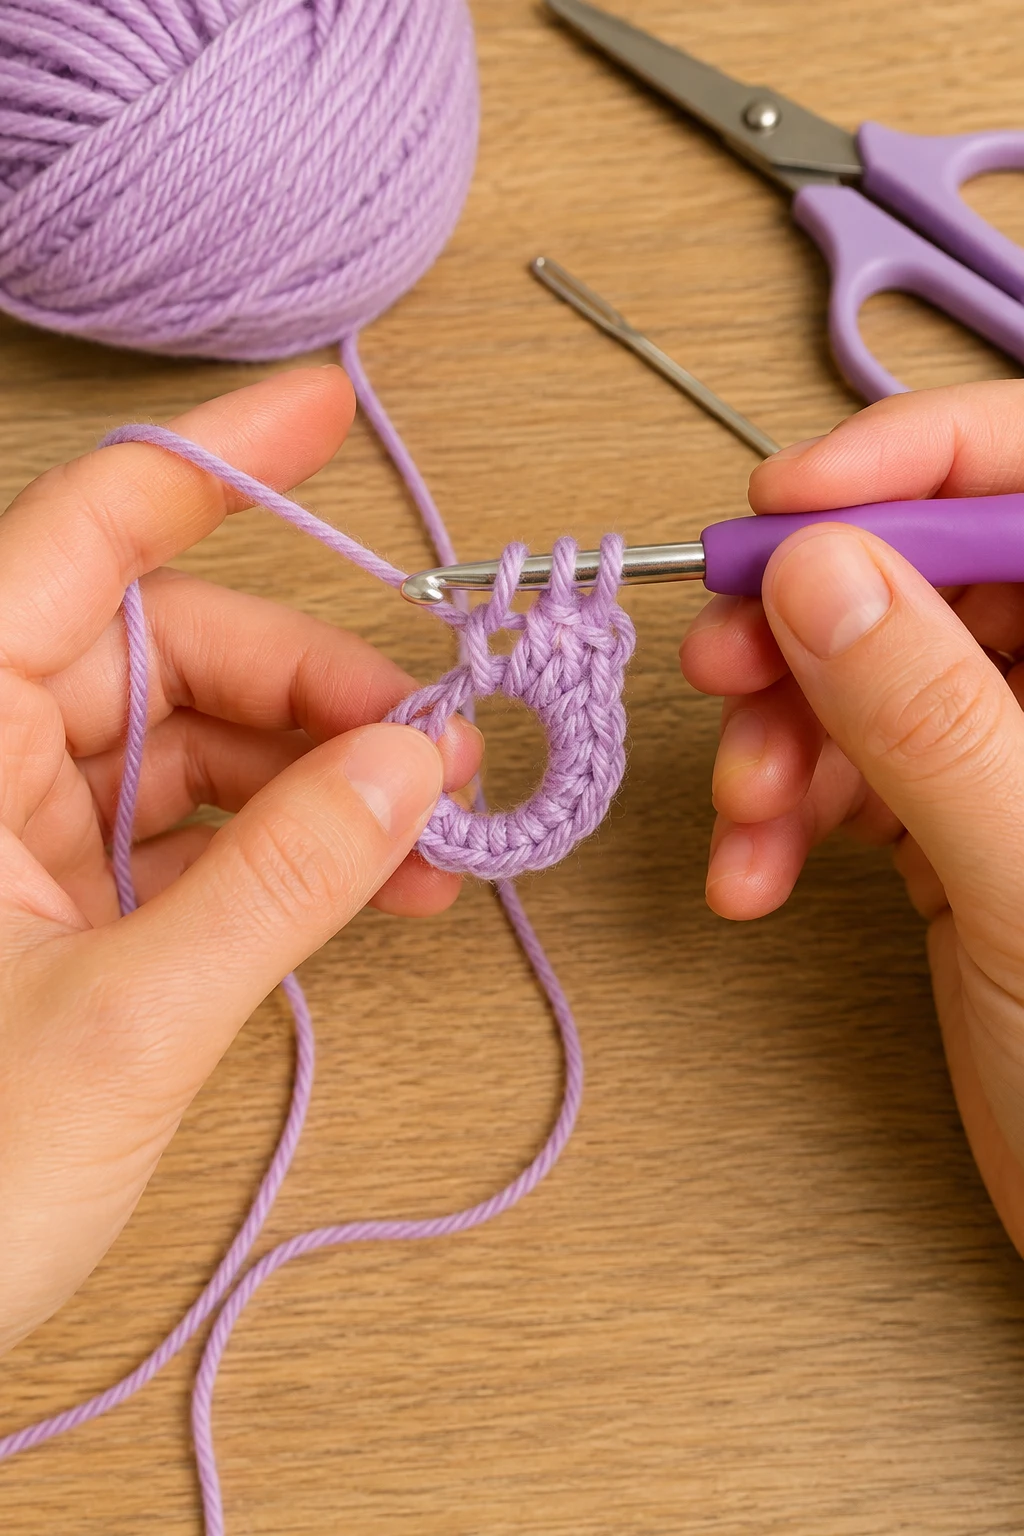
5. Work the first double crochet
Action: Work 1 double crochet into the magic ring.
Detailed instructions: Yarn over once. Insert the hook through the center of the magic ring, yarn over, and pull up a loop so 3 loops are on the hook. Yarn over and pull through the first 2 loops, leaving 2 loops on the hook. Yarn over again and pull through the remaining 2 loops.
Expected result: One double crochet stands beside the first chain space.
Check yourself: You should have 1 sc, 1 ch, and 1 dc visible.
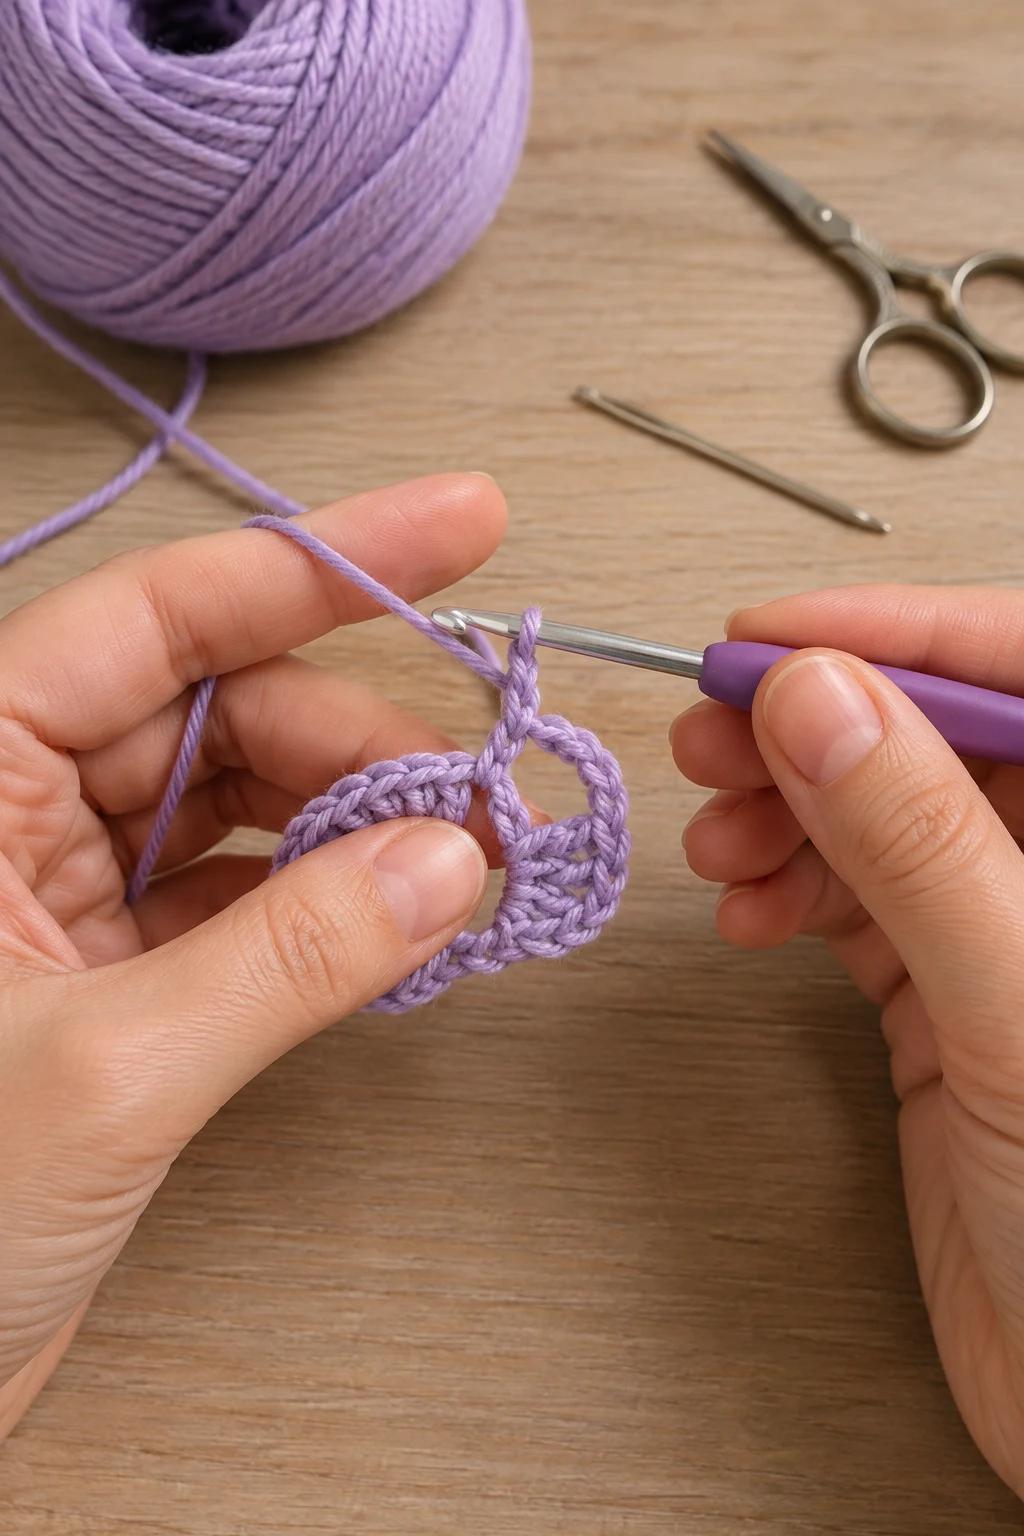
6. Create the second chain space
Action: Chain 1 after the first double crochet.
Detailed instructions: Yarn over once and pull through the active loop to create another chain. Keep the chain relaxed so the ring can continue to spread evenly.
Expected result: The first small stitch group is separated from the next stitch by a 1-chain space.
Check yourself: You should now have 1 sc, 1 ch, 1 dc, and another 1 ch.
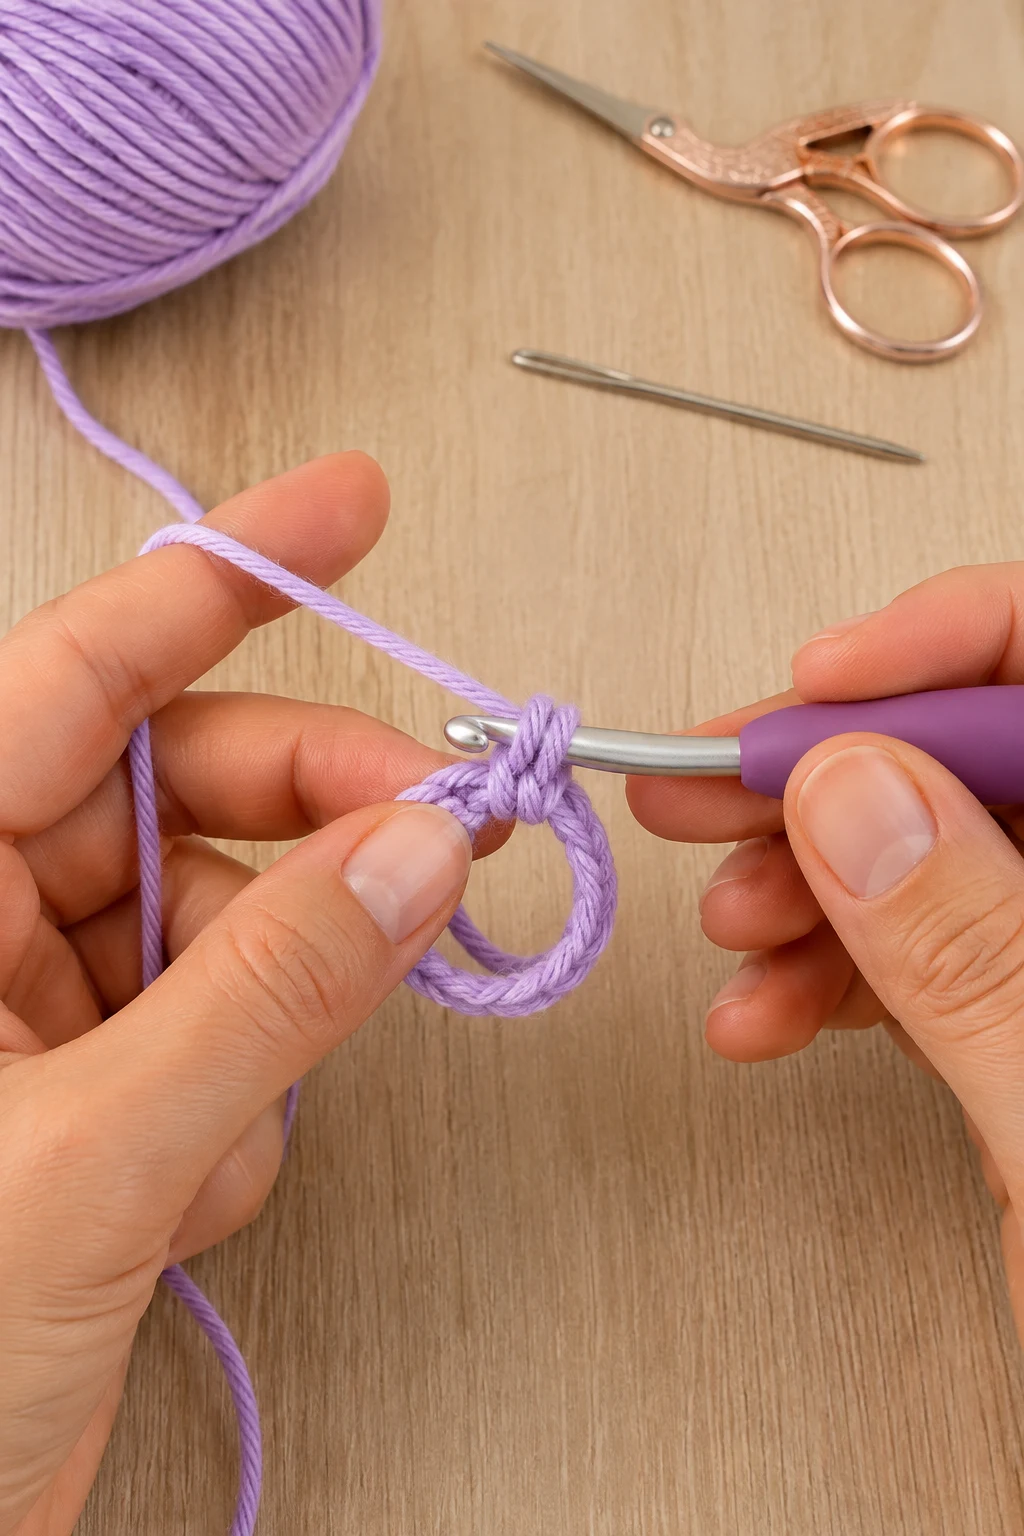
7. Make the second stitch group
Action: Work 1 single crochet into the ring.
Detailed instructions: Insert the hook into the center of the magic ring, yarn over, pull up a loop, yarn over again, and pull through both loops to complete the sc.
Expected result: A second single crochet is added to the ring.
Check yourself: Two single crochet stitches should now be visible around the ring.
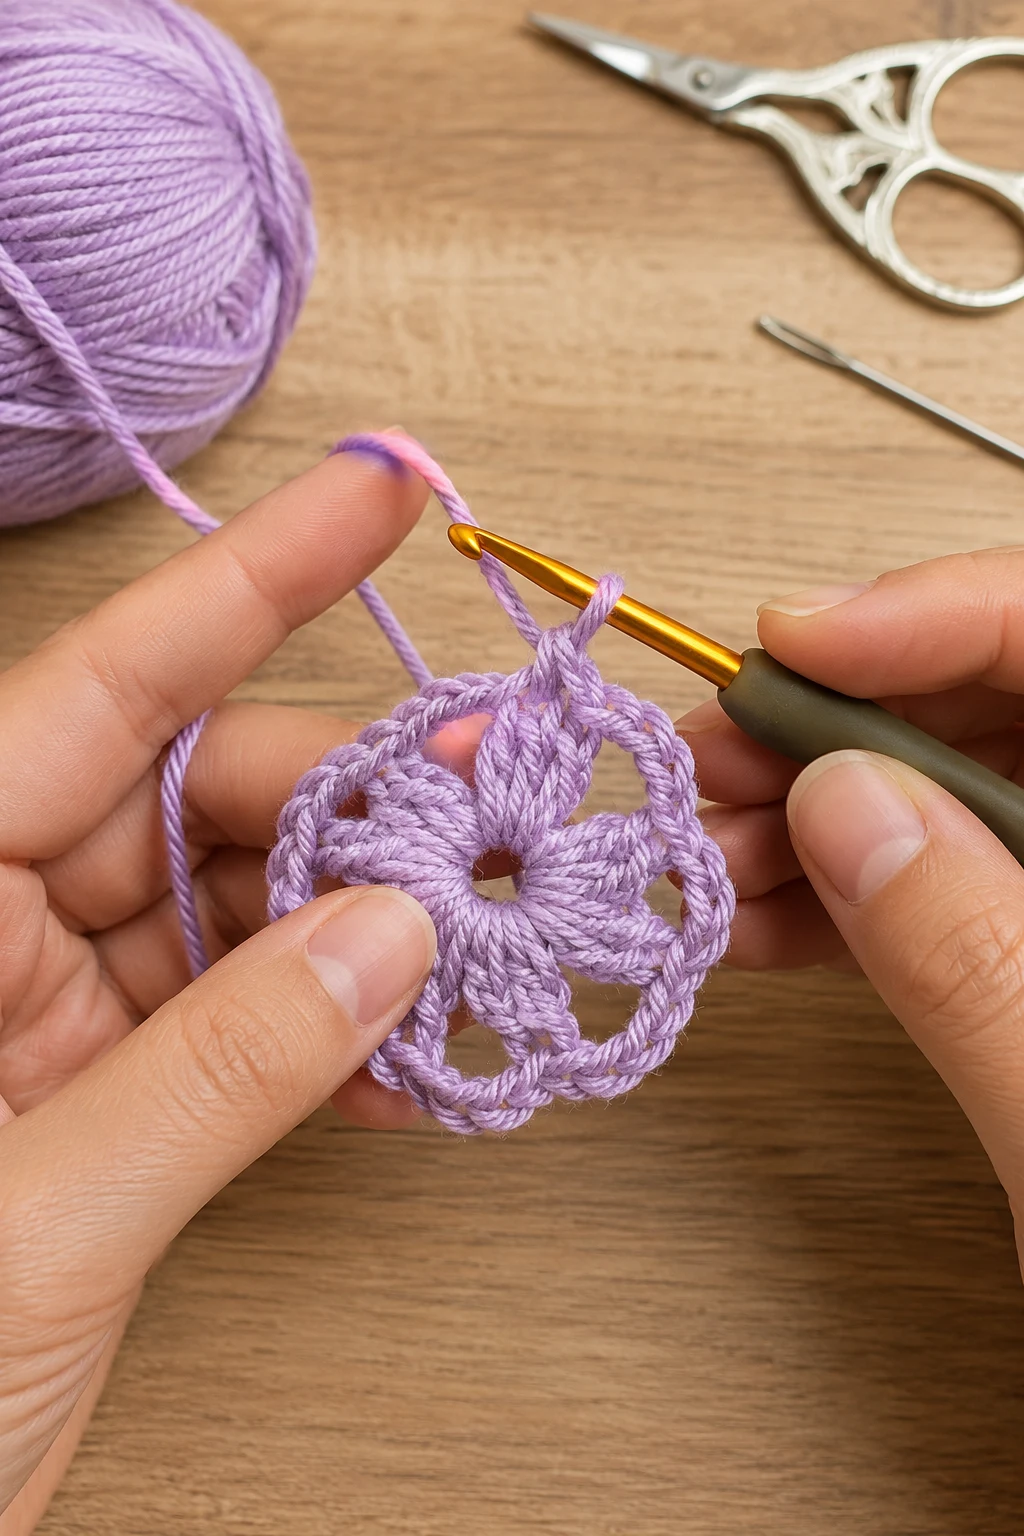
8. Complete the first wing base
Action: Repeat the 1-chain, 1-double-crochet, 1-chain sequence three more times around the ring.
Detailed instructions: Continue around the same magic ring, placing one chain, one dc into the ring, and one chain after it. Repeat that complete three-stitch sequence three times so the round contains 4 sc and 4 dc separated by 8 chain spaces. Do not tighten the center yet.
Expected result: Round 1 is complete with four evenly spaced stitch groups around the ring.
Check yourself: Count 4 sc, 4 dc, and 8 ch-spaces around the ring.
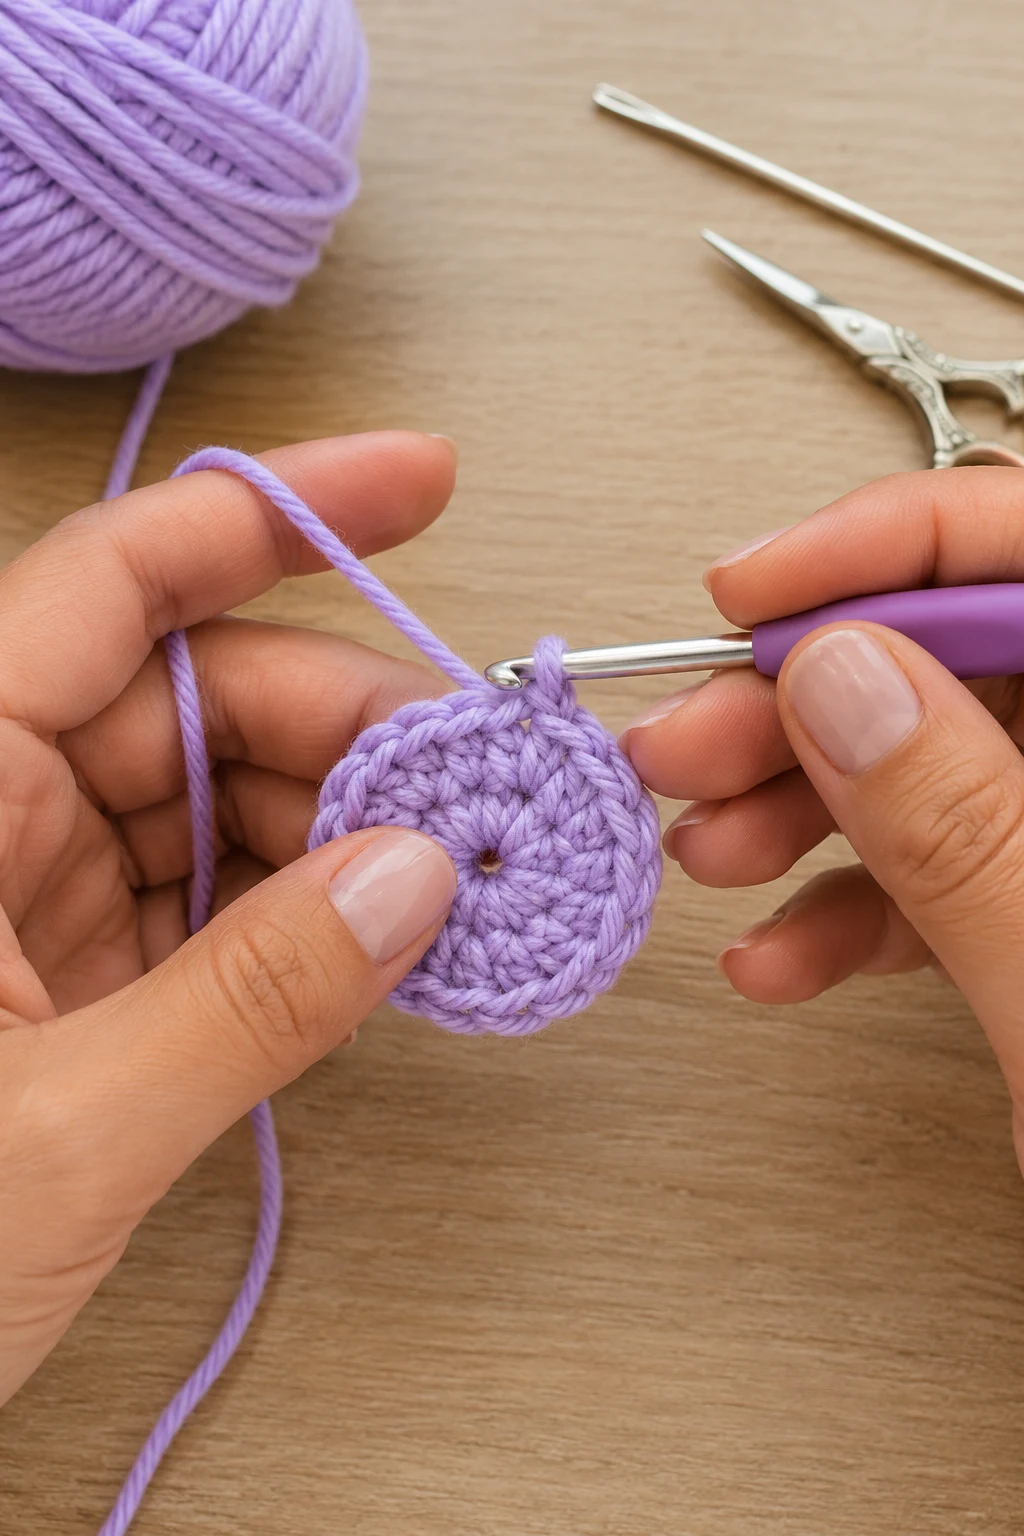
9. Join Round 1
Action: Slip stitch into the first single crochet to close Round 1.
Detailed instructions: Insert the hook into the top of the first sc, yarn over once, and pull the yarn directly through the stitch and through the active loop on the hook. Do not add another stitch.
Expected result: Round 1 closes into a small circular flower-like base.
Check yourself: The round should have exactly 4 sc, 4 dc, and 8 ch-spaces.
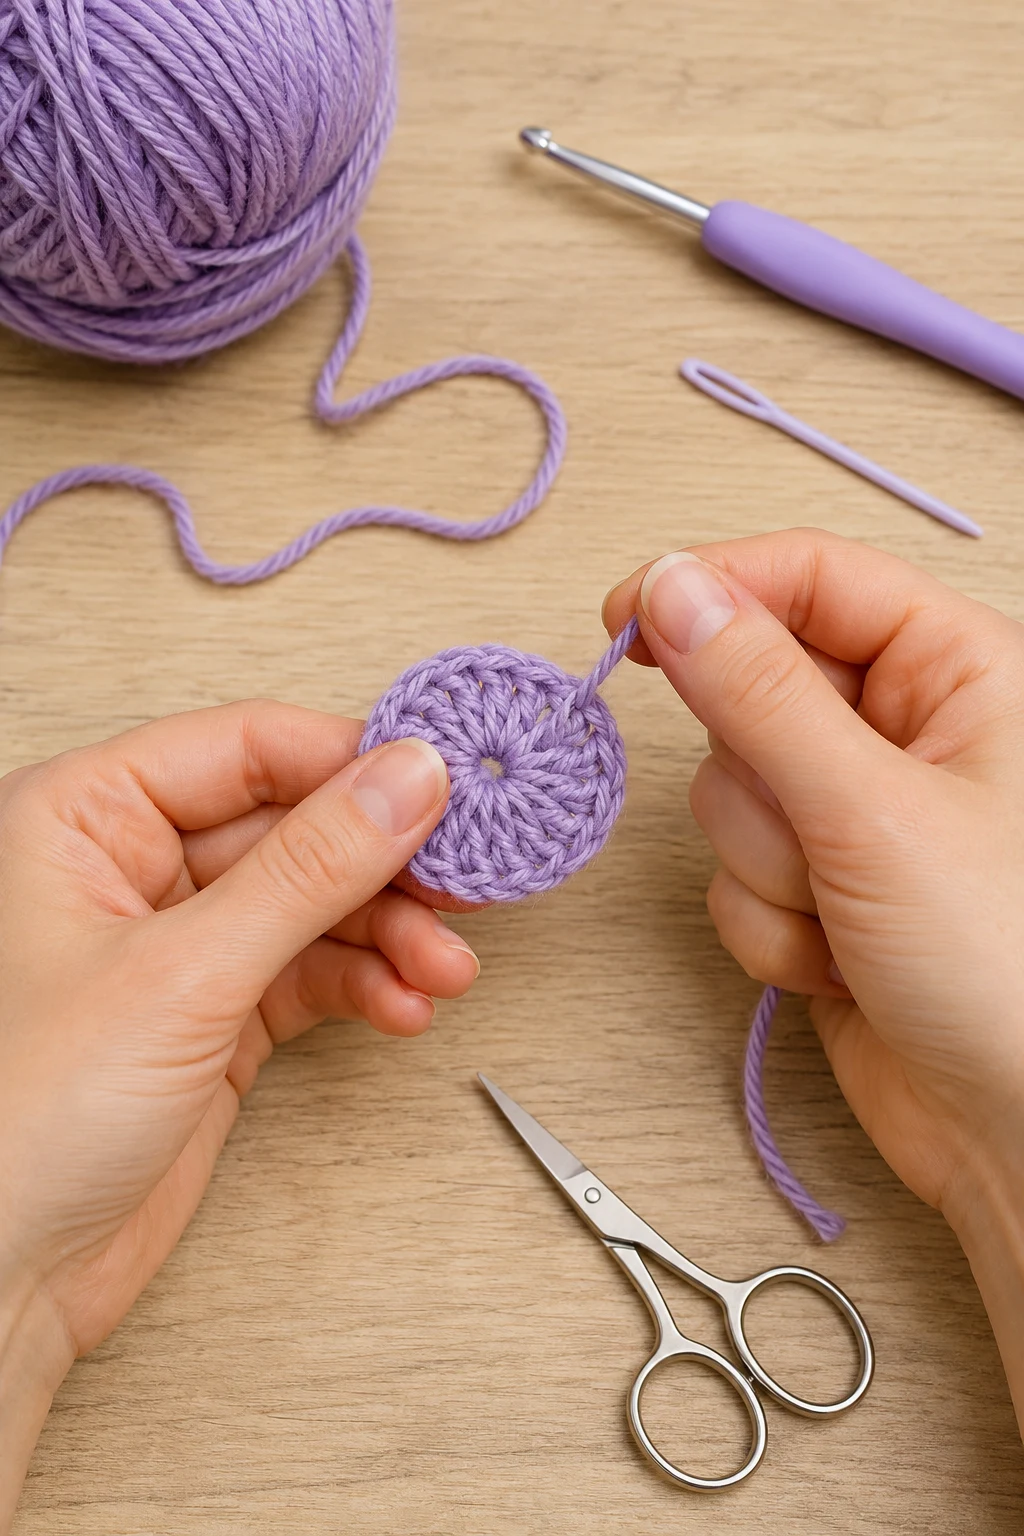
10. Tighten the center
Action: Pull the yarn tail to close the magic ring.
Detailed instructions: Hold the completed crochet circle flat and gently pull the starting yarn tail until the center hole closes. Pull firmly enough to remove the gap but not so hard that the stitches bunch together.
Expected result: The center of the crochet circle is closed and the eight chain spaces remain clearly defined around the edge.
Check yourself: There should be no visible hole in the center.
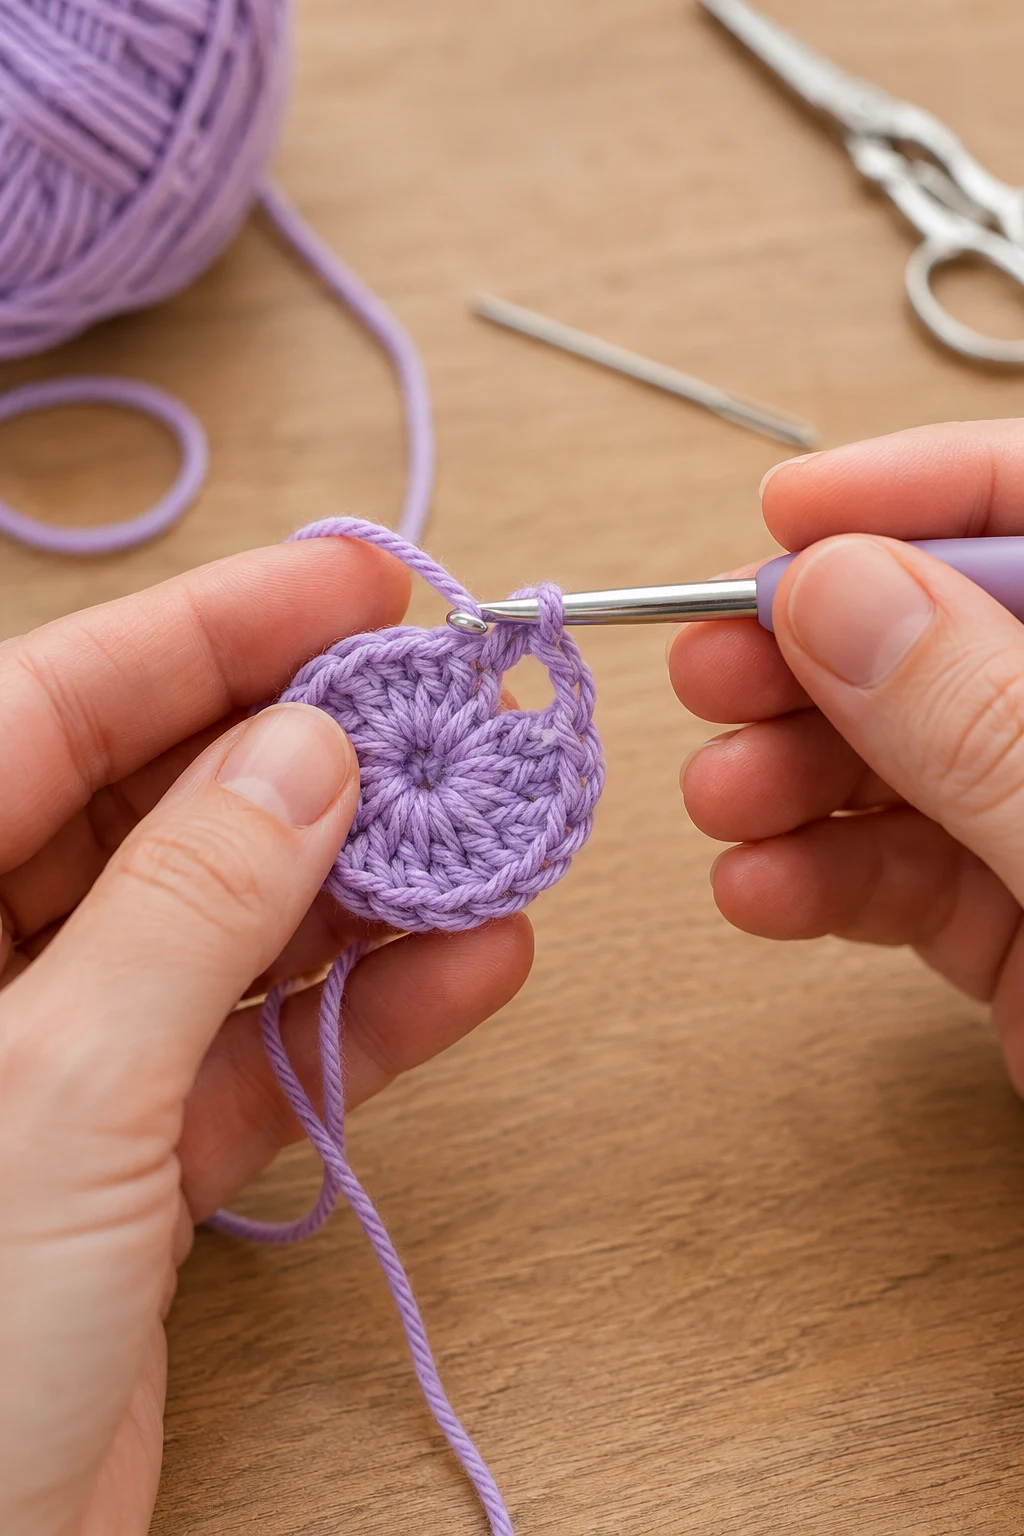
11. Begin the first upper wing
Action: Insert the hook into the first chain-1 space.
Detailed instructions: Locate the first open ch-space beside the first dc of Round 1. Insert the hook through the center of that space, keeping the completed circle flat.
Expected result: The hook is positioned correctly for building the first rounded wing section.
Check yourself: The hook should pass through the open space, not through the top loops of a stitch.
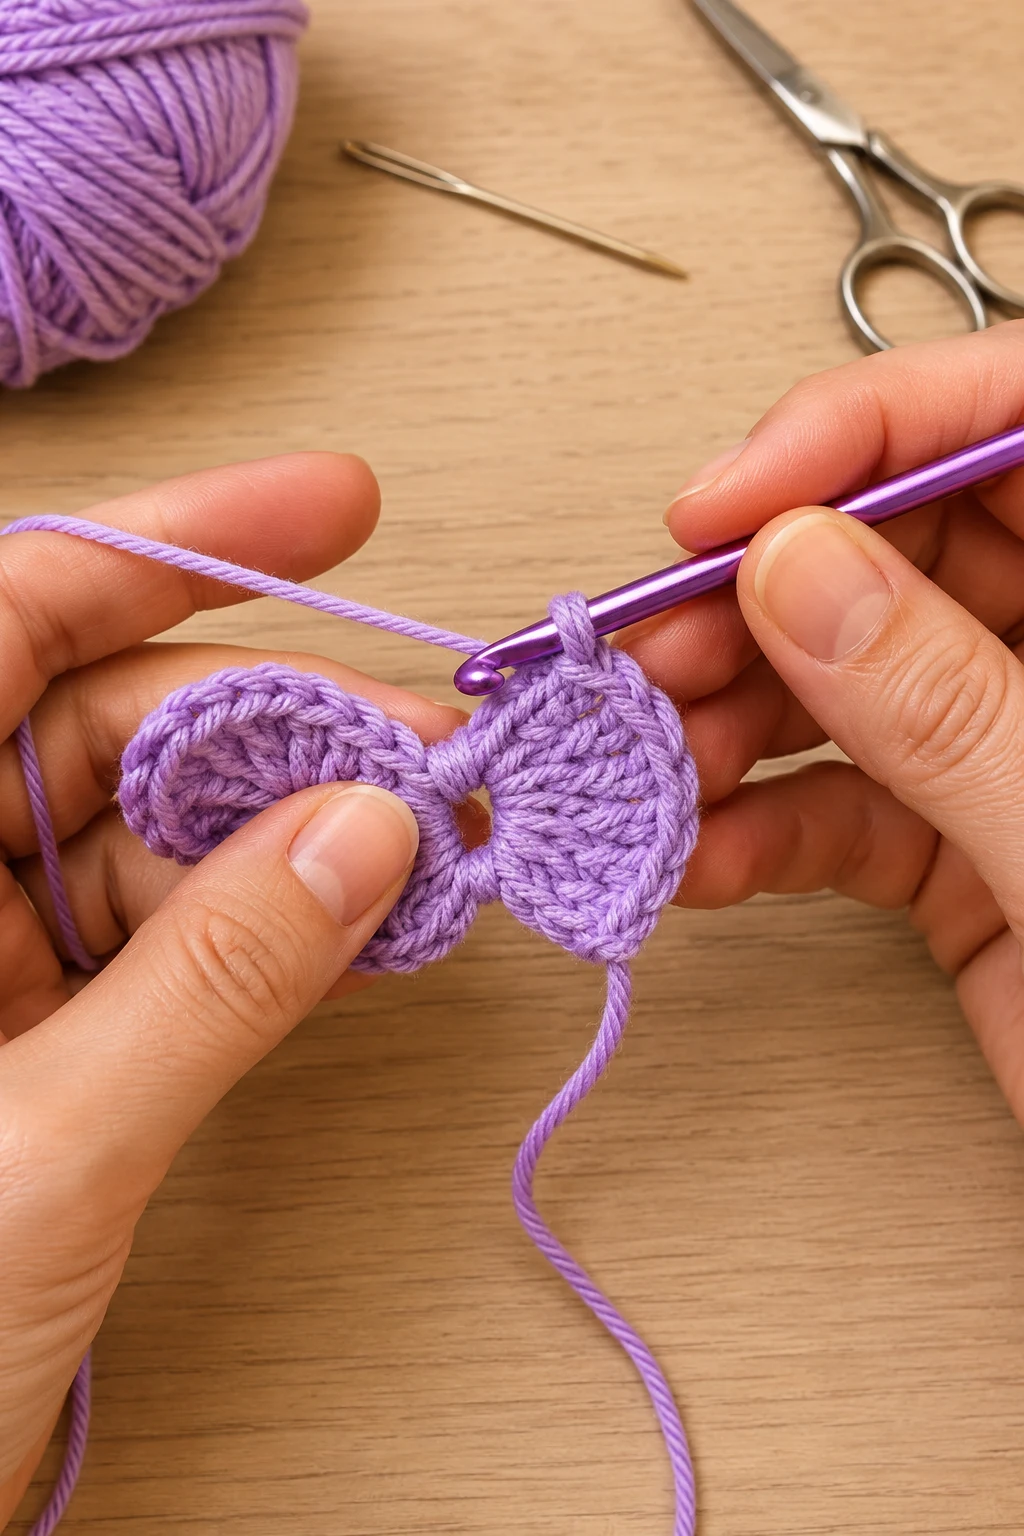
12. Work the first single crochet of the wing
Action: Work 1 single crochet into the first chain space.
Detailed instructions: Yarn over, pull up a loop through the ch-space, yarn over again, and pull through both loops. Keep the stitch snug against the edge of the circular base.
Expected result: One sc begins the first wing outline.
Check yourself: You should see 1 new sc sitting inside the first ch-space.
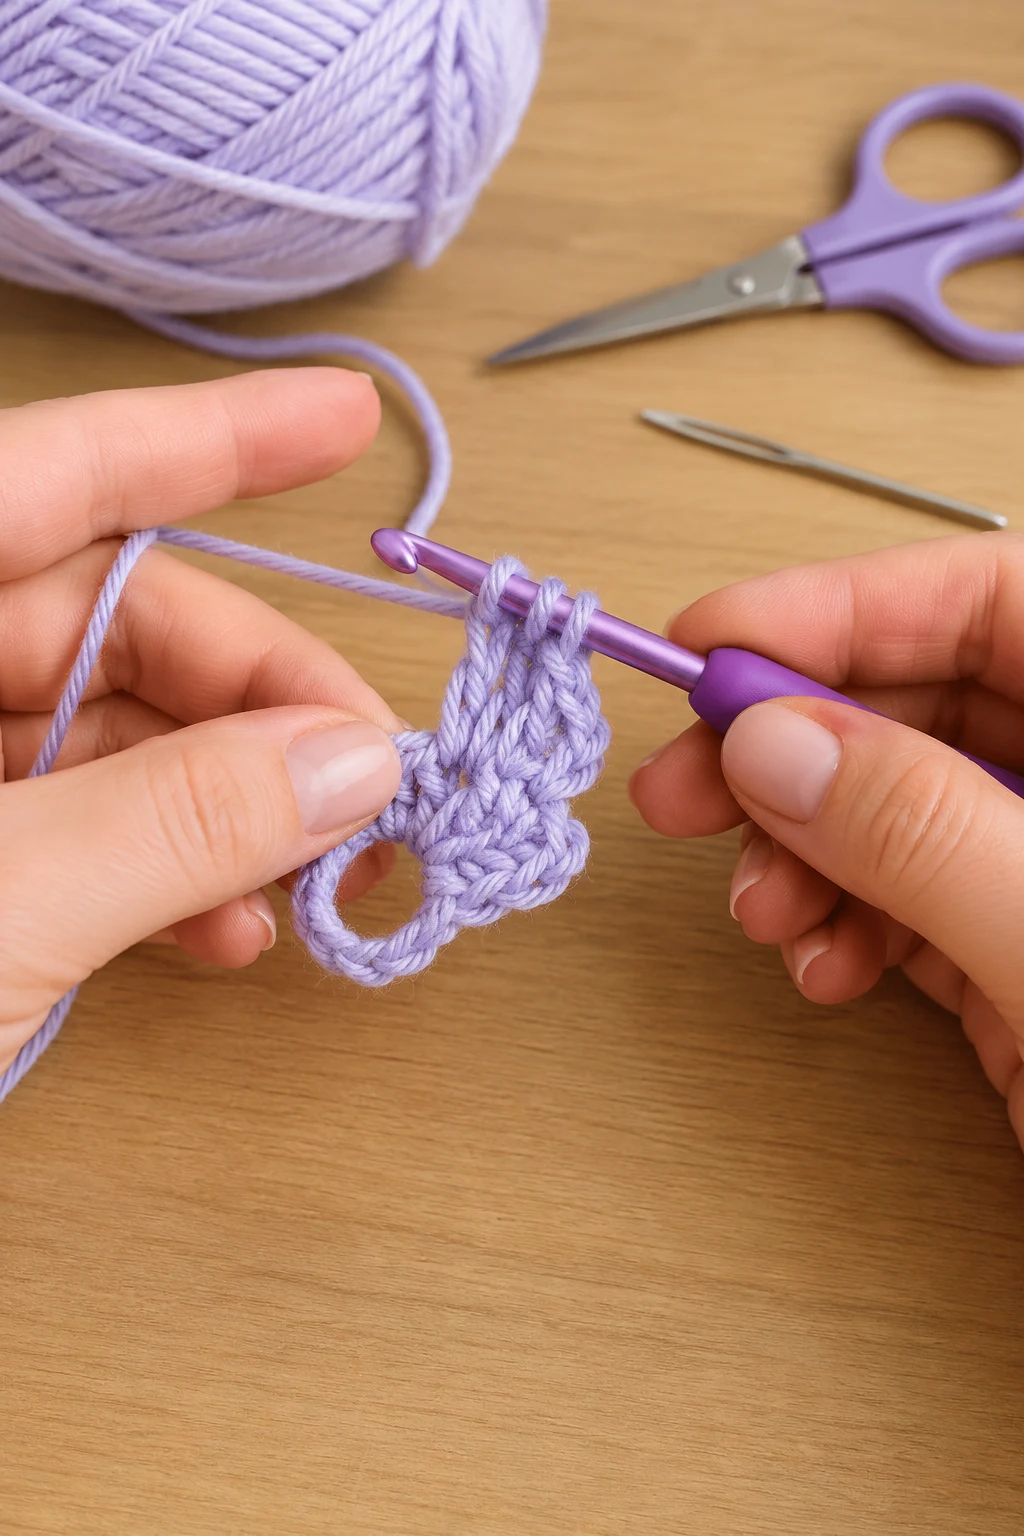
13. Add the first double crochet
Action: Work 1 double crochet into the same chain space.
Detailed instructions: Yarn over, insert into the same ch-space, yarn over and pull up a loop, then complete the dc by working through the loops two at a time until one loop remains.
Expected result: The first taller stitch rises beside the wing’s opening sc.
Check yourself: The new dc should be visibly taller than the sc.
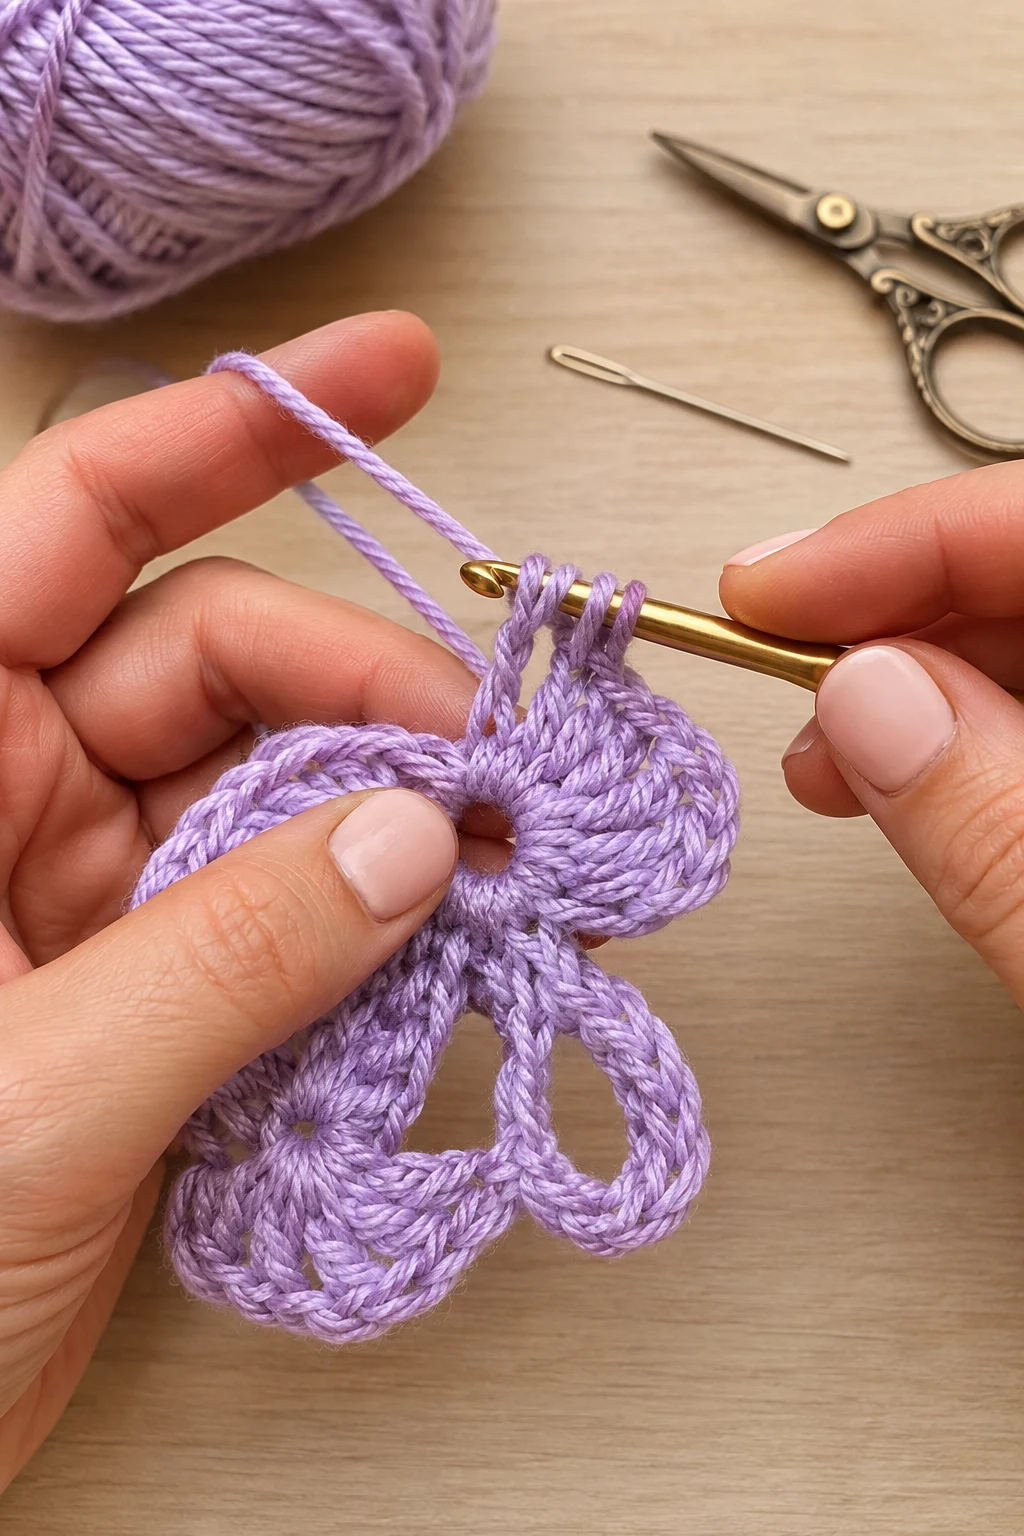
14. Add the second double crochet
Action: Work another double crochet into the same chain space.
Detailed instructions: Yarn over once, insert into the same ch-space, pull up a loop, then yarn over and pull through 2 loops twice to complete the second dc.
Expected result: Two dc stitches now sit beside the first sc.
Check yourself: Count 1 sc + 2 dc in the first chain space.
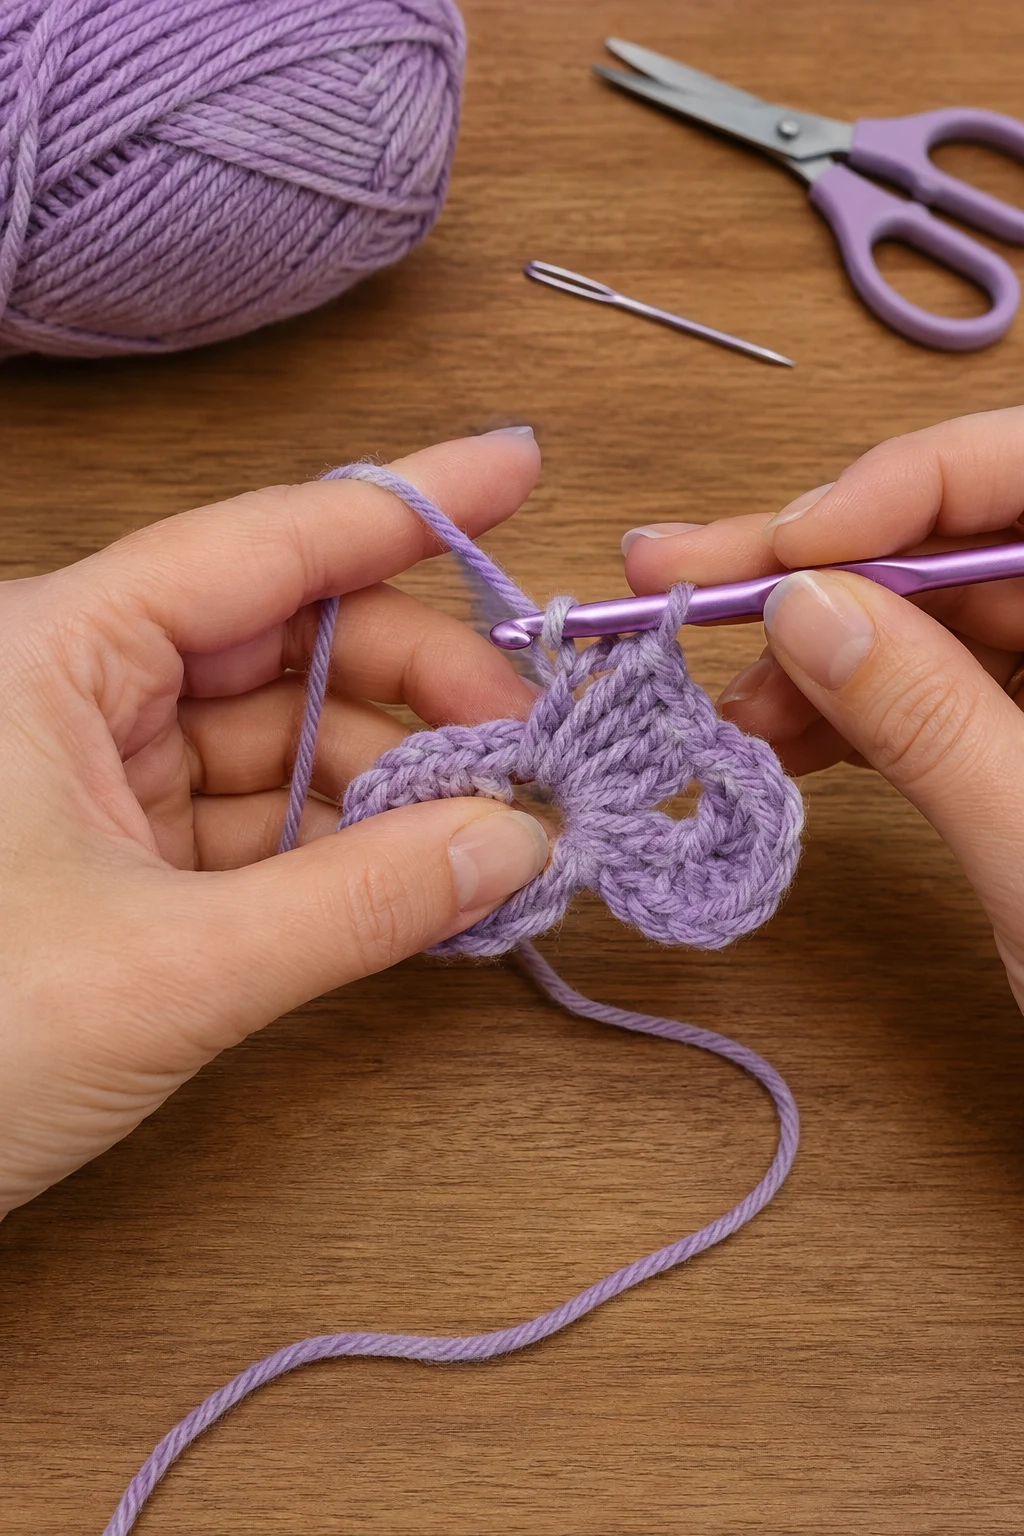
15. Add the first treble crochet
Action: Work 1 treble crochet into the same chain space.
Detailed instructions: Yarn over twice, insert into the same ch-space, yarn over and pull up a loop, then work the treble by pulling through 2 loops three separate times.
Expected result: The first tall treble creates the rising center of the wing.
Check yourself: The tr should be taller than both dc stitches.
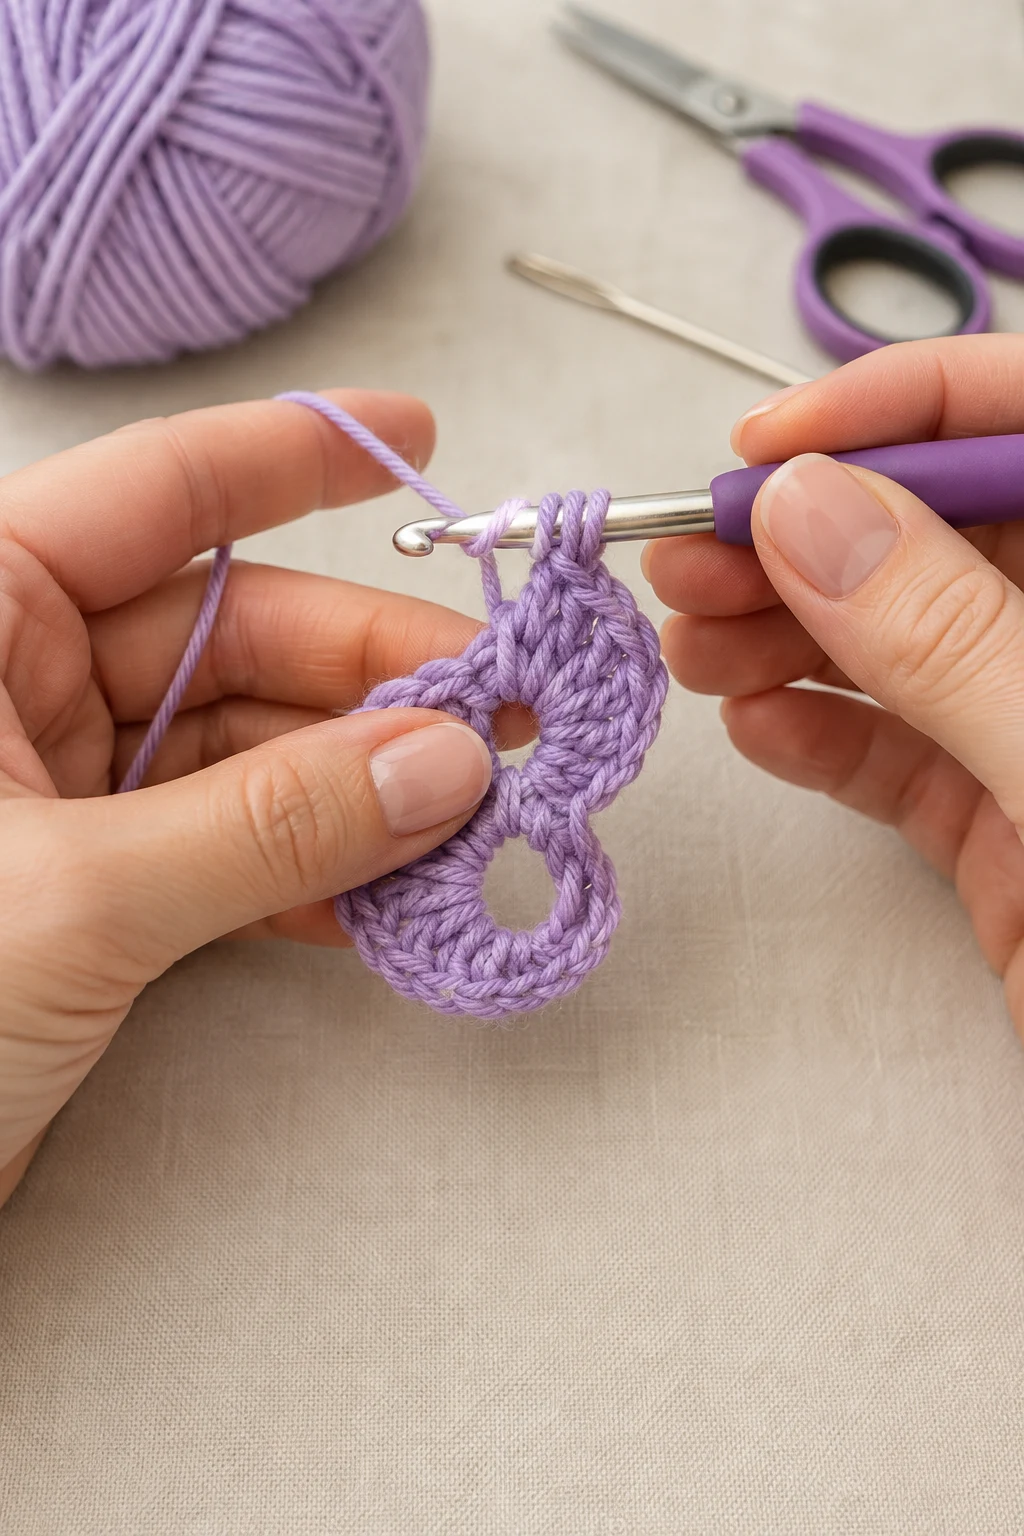
16. Work the second treble crochet
Action: Work a second treble crochet into the same chain space.
Detailed instructions: Yarn over twice, insert into the same ch-space, pull up a loop, and complete the treble with three yarn-over-and-pull-through-two-loop movements.
Expected result: The wing now has two tall center stitches.
Check yourself: You should count 1 sc, 2 dc, and 2 tr in the space.
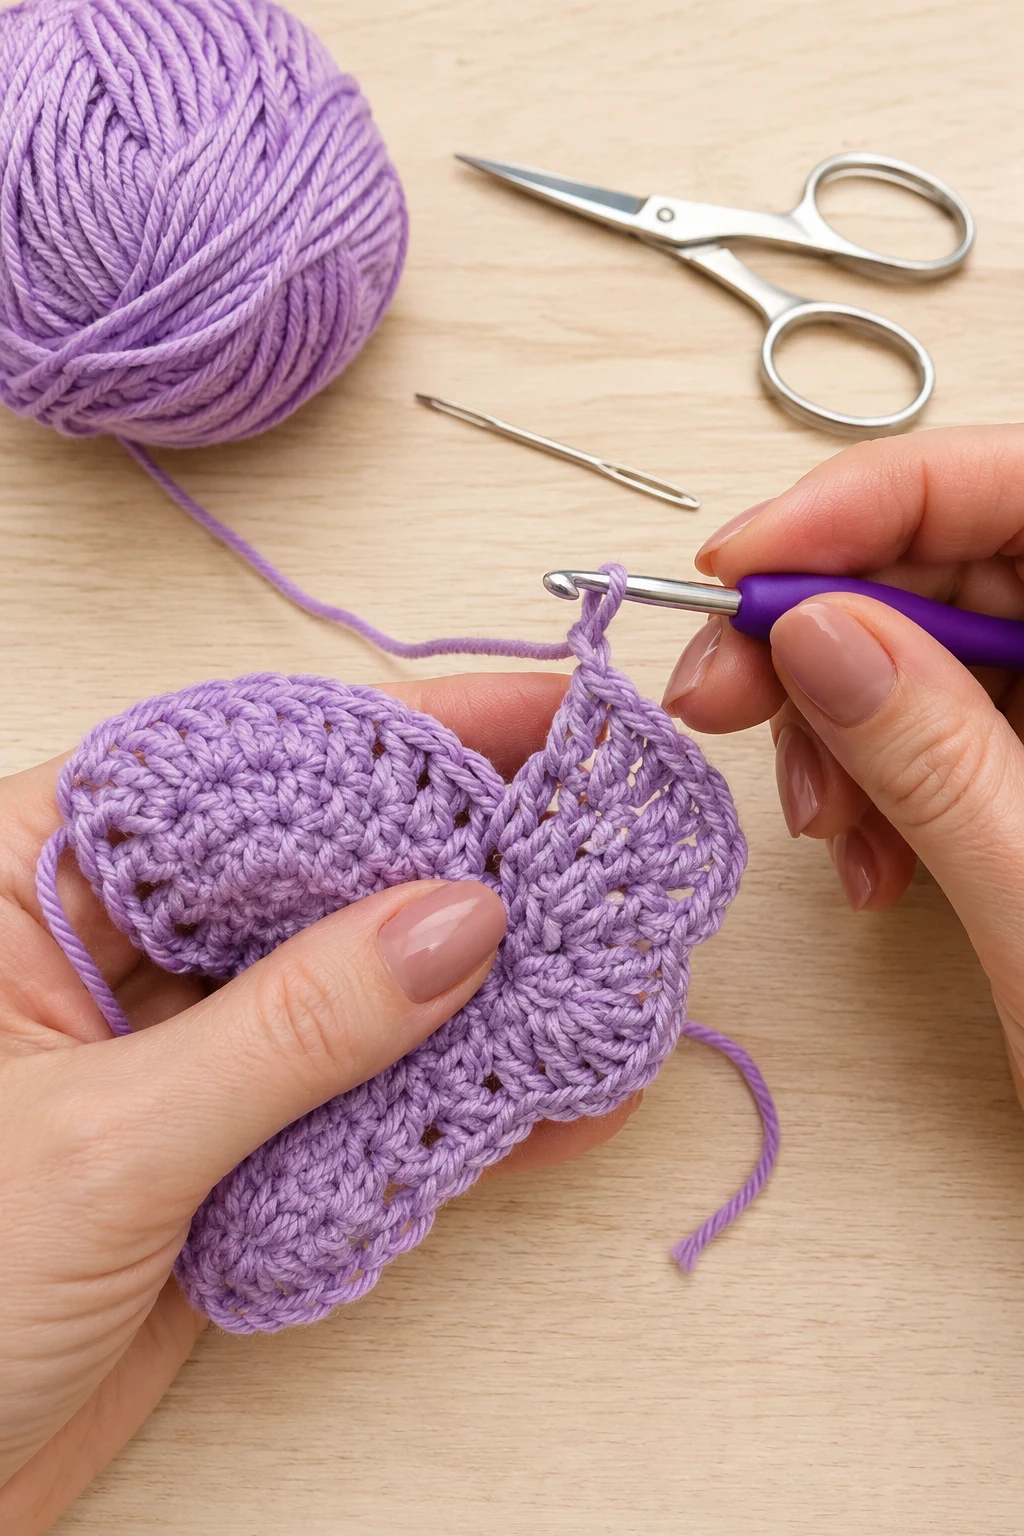
17. Make the wing picot
Action: Make a 3-chain picot at the top of the first wing.
Detailed instructions: Chain 3 from the active loop. Insert the hook into the first of those 3 new chains, yarn over, and pull through both the chain and active loop to make the picot point.
Expected result: A small pointed tip appears at the top of the wing.
Check yourself: You should see one tiny 3-chain point between the two treble stitches.
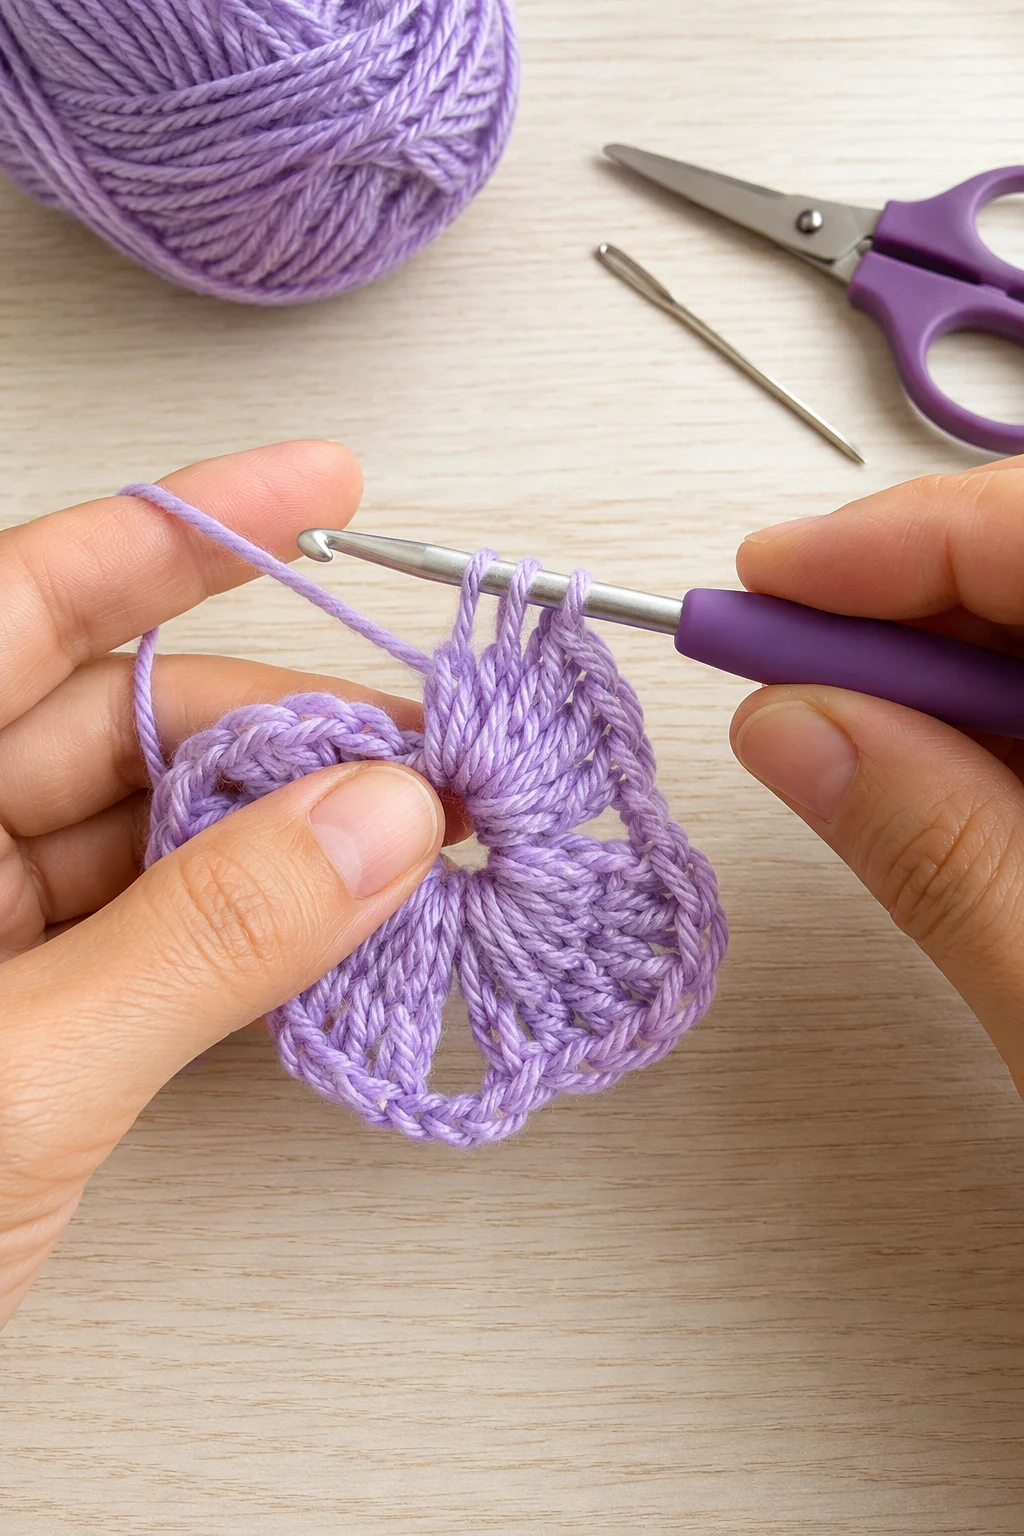
18. Add the third double crochet
Detailed instructions: Yarn over once, insert into the same original ch-space, pull up a loop, and complete one dc by pulling through 2 loops twice.
Expected result: The wing begins tapering down from its pointed center.
Check yourself: One new dc should sit immediately after the picot.
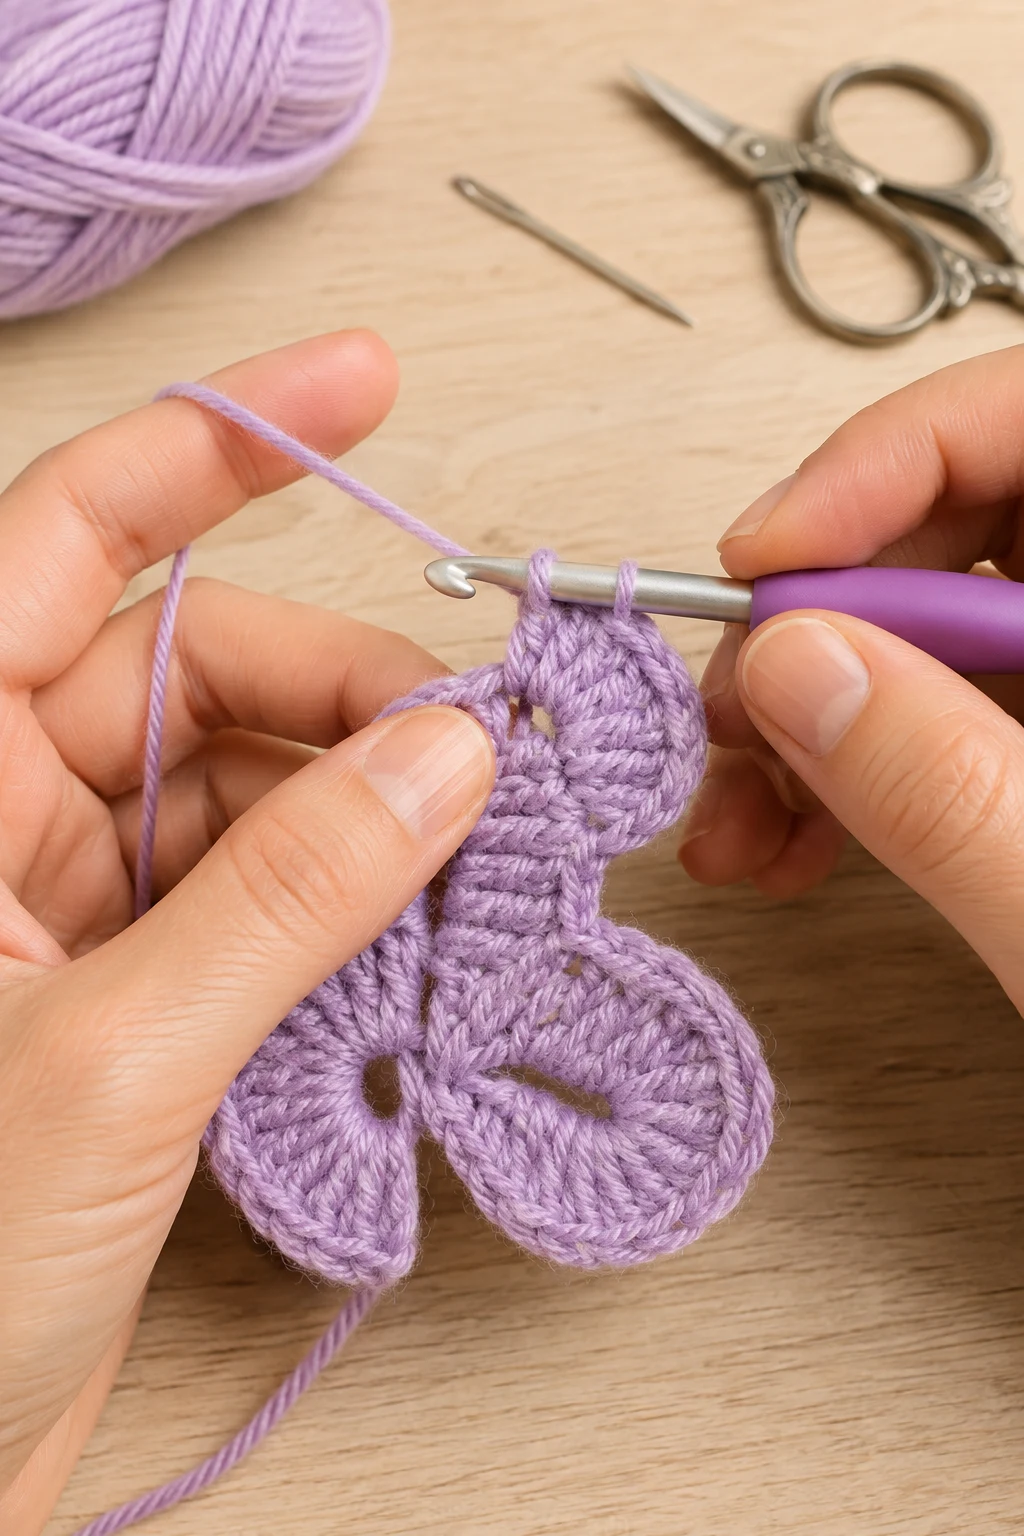
19. Finish the first wing
Action: Work the final double crochet and single crochet into the same chain space.
Detailed instructions: Work 1 dc into the original ch-space, then work 1 sc into that same space to close the rounded edge of the wing. Keep both stitches beside the earlier stitches rather than pulling them toward the center.
Expected result: The first complete wing has a rounded lower edge and pointed upper tip.
Check yourself: The first wing should contain 1 sc, 3 dc, 2 tr, 1 picot, 1 dc, and 1 sc in that working space.
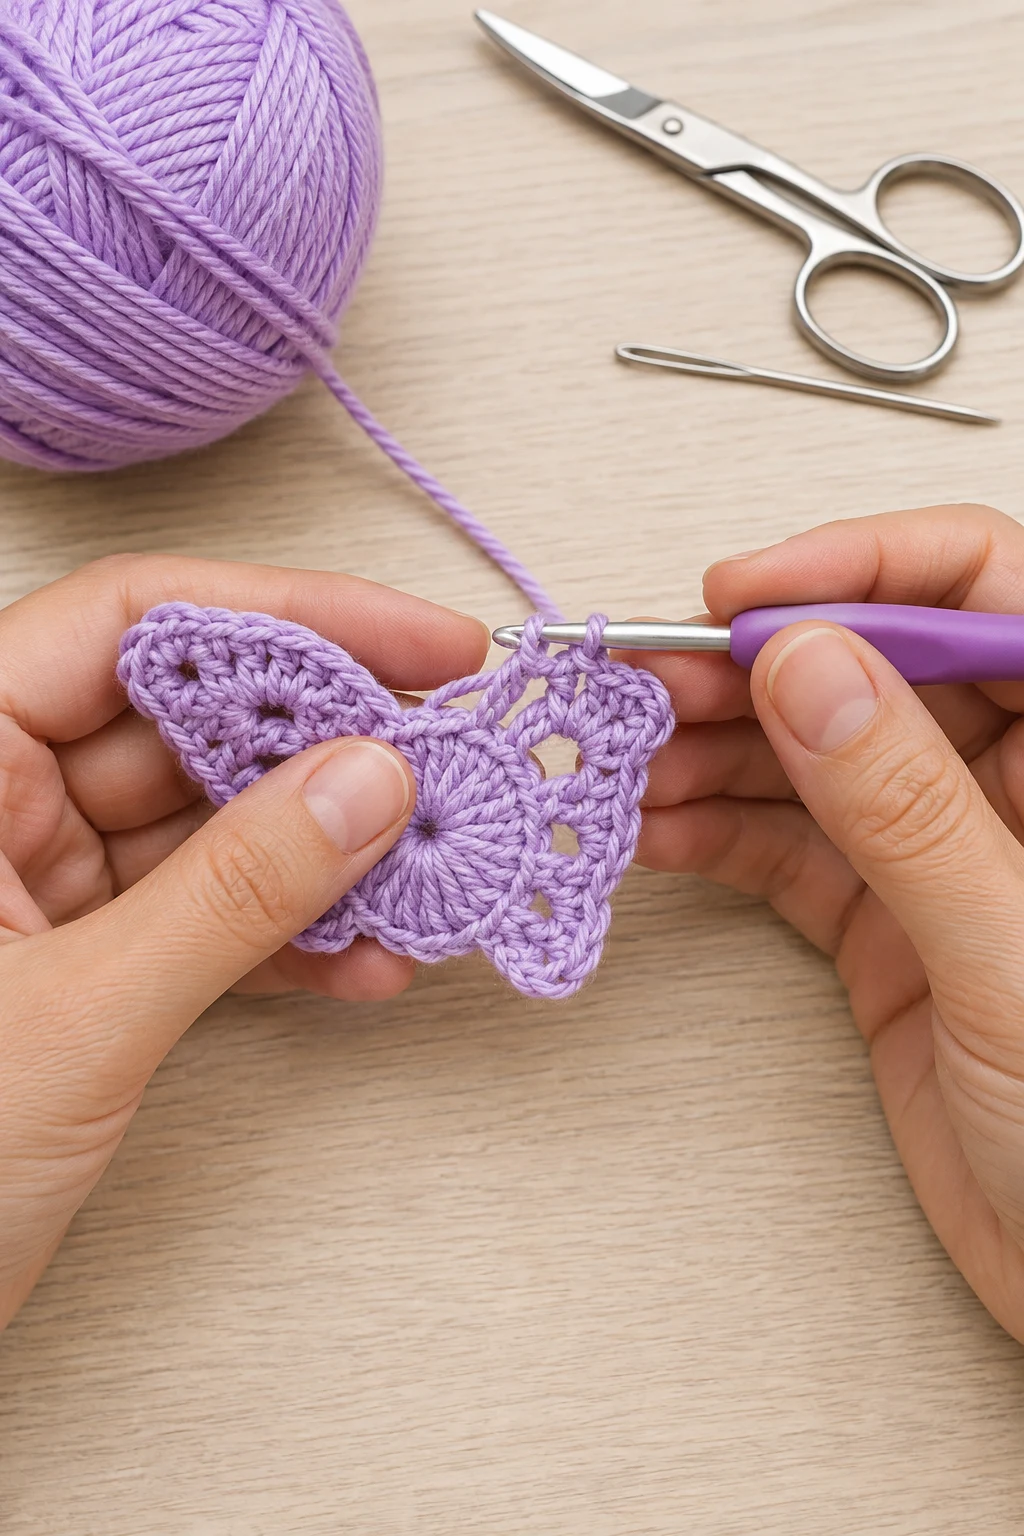
20. Begin the second wing
Action: Slip stitch into the next chain-1 space.
Detailed instructions: Move to the next open ch-space around the circular base. Insert the hook through its center and make 1 slip stitch to anchor the next wing.
Expected result: The hook is anchored in the next wing space.
Check yourself: The second wing will begin directly beside the first wing around the circular base.
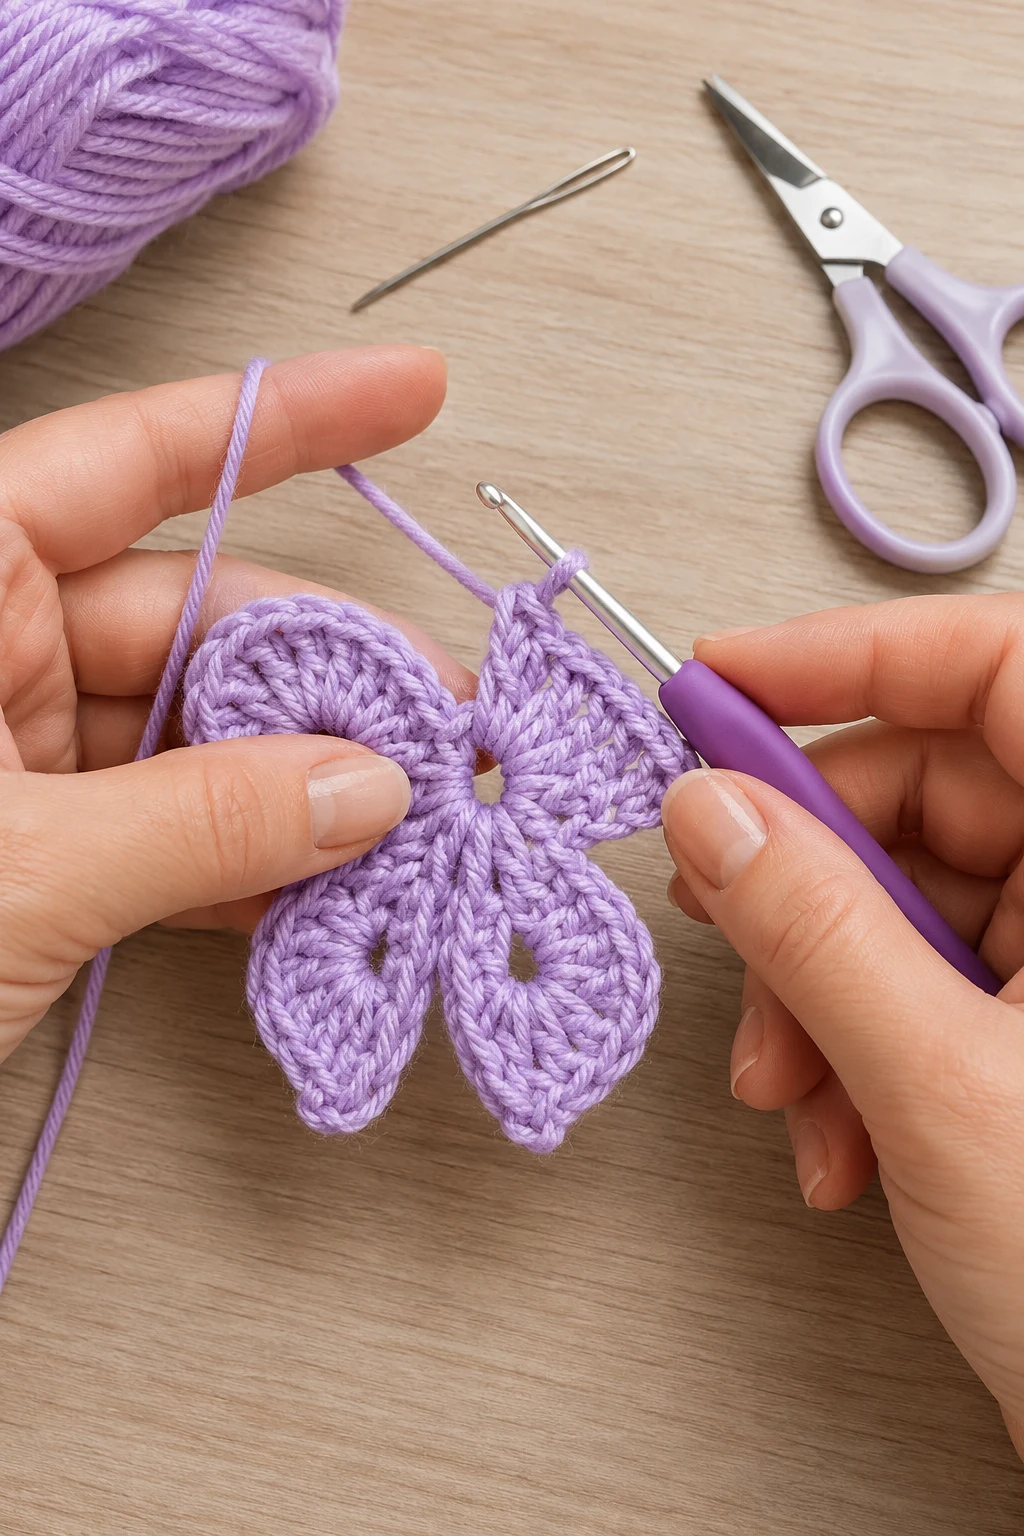
21. Complete the second wing
Action: Work the same wing sequence into the second chain space.
Detailed instructions: Into the anchored ch-space, work 1 sc, 3 dc, 2 tr, a 3-chain picot, 2 dc, and 1 sc. Keep every stitch inside the same ch-space so the second wing has the same rounded-and-pointed shape as the first.
Expected result: Two matching wings now extend from the circular center.
Check yourself: Both completed wings should have identical stitch proportions.
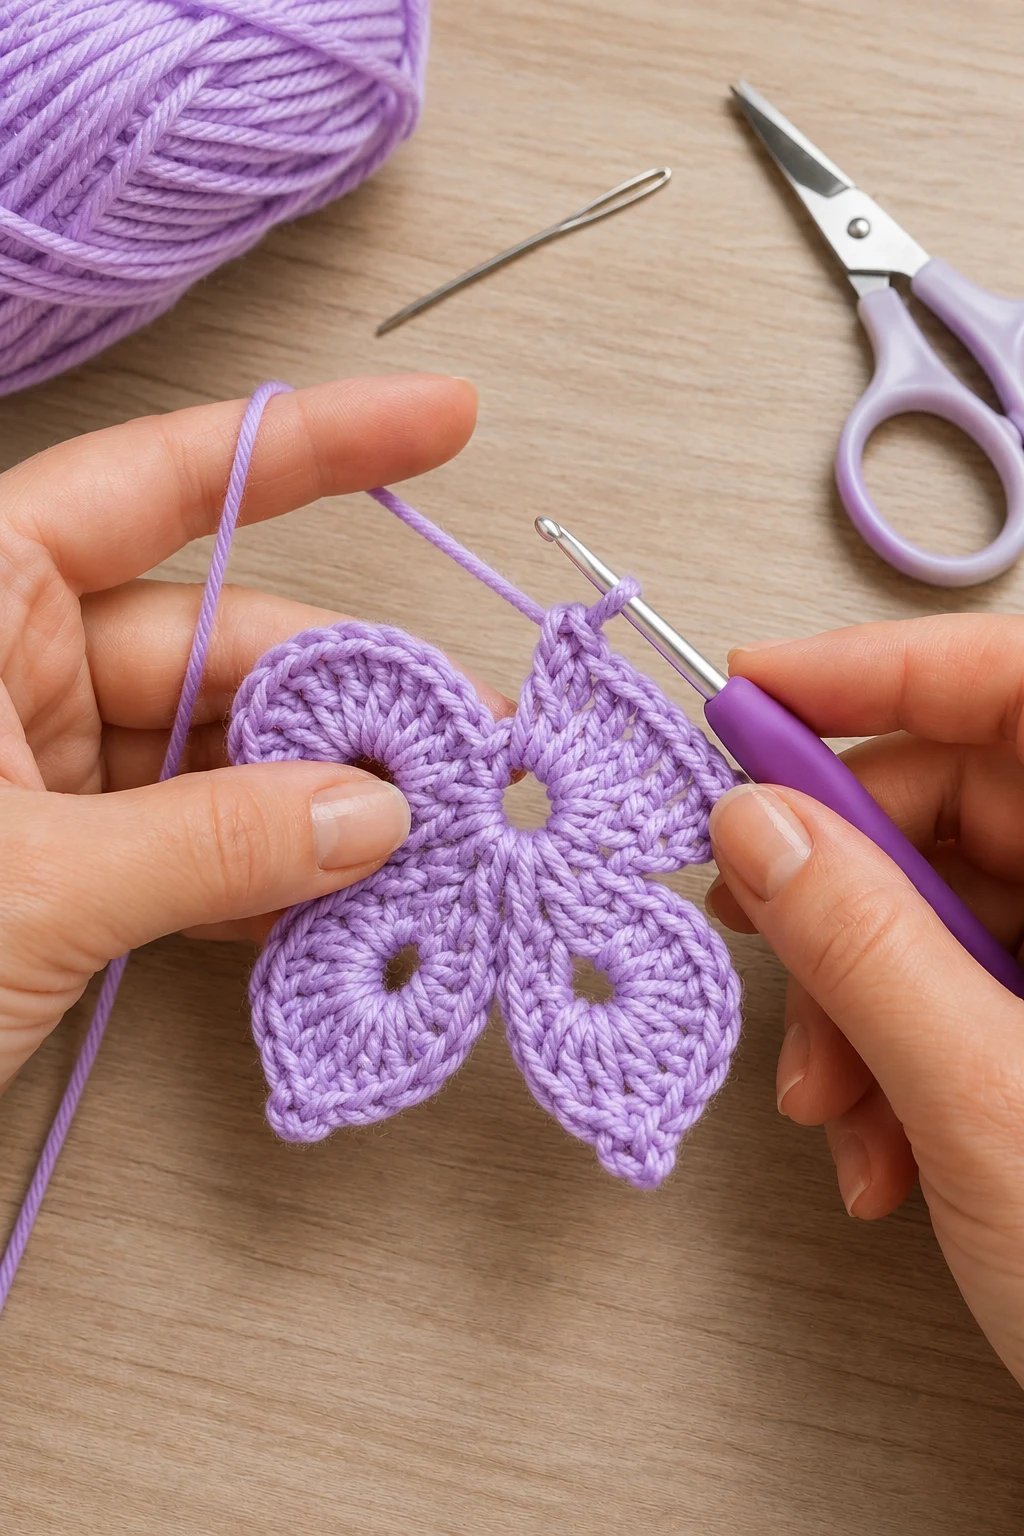
22. Complete the third wing
Action: Work the full wing sequence into the third chain space.
Detailed instructions: Into the next empty ch-space, work 1 sc, 3 dc, 2 tr, a 3-chain picot, 2 dc, and 1 sc. Maintain the same tension used for the first two wings.
Expected result: Three evenly shaped wings surround the center.
Check yourself: Count exactly 3 completed pointed wings.
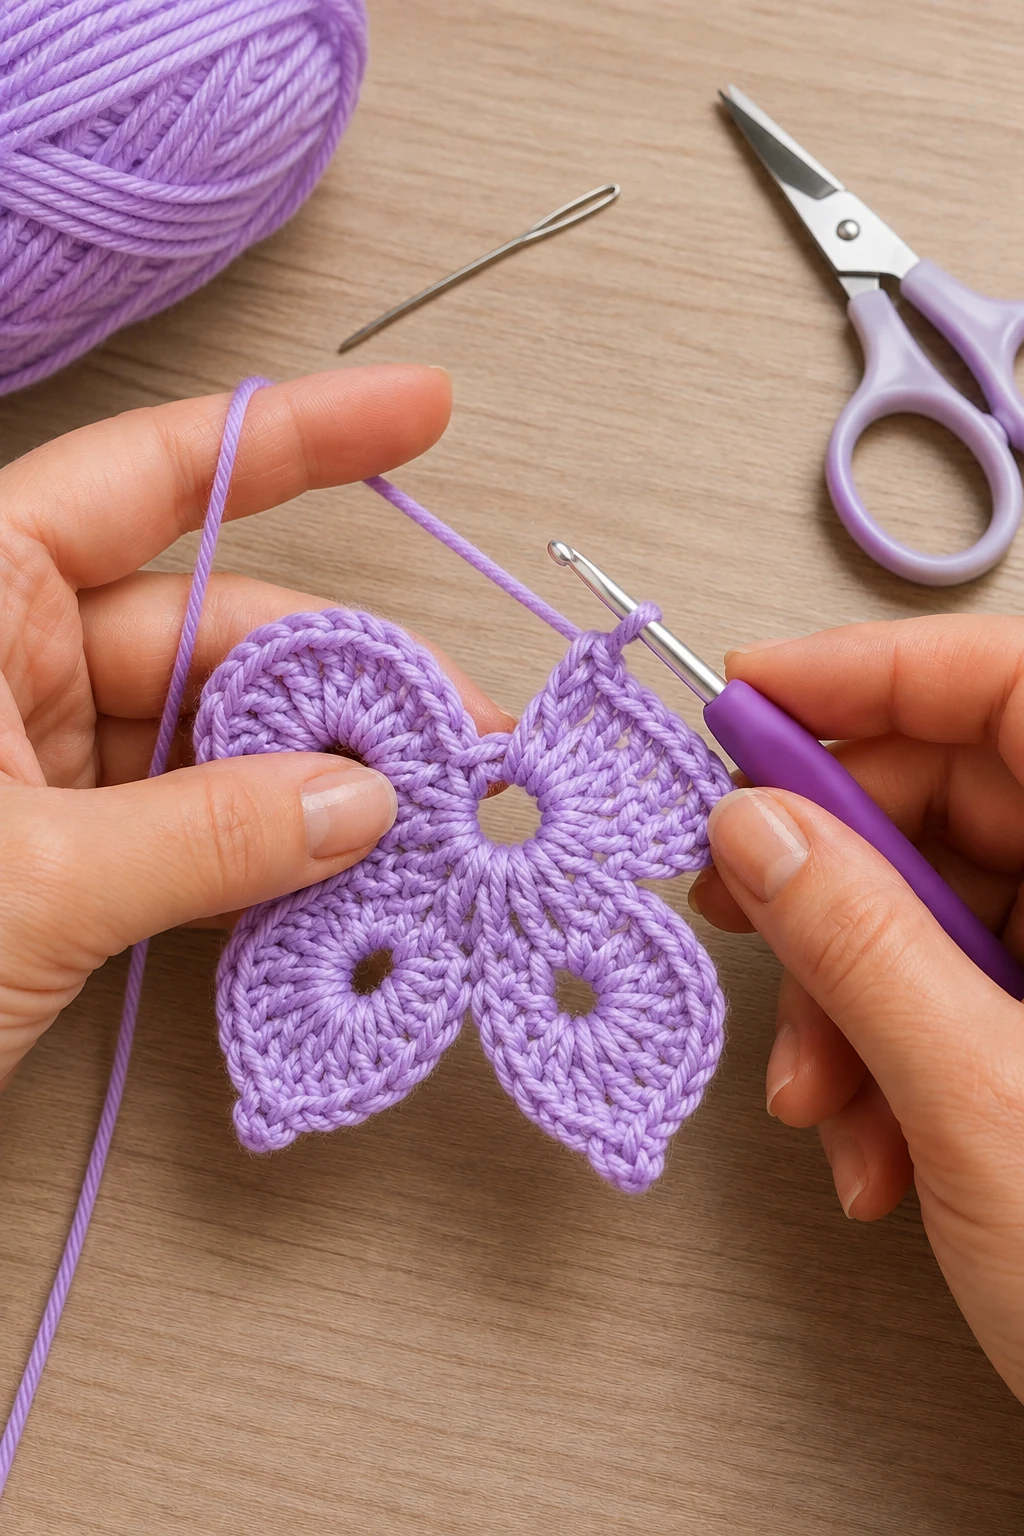
23. Complete the fourth wing
Action: Work the full wing sequence into the final chain space.
Detailed instructions: Into the last empty ch-space, work 1 sc, 3 dc, 2 tr, a 3-chain picot, 2 dc, and 1 sc. This completes the fourth and final wing of the applique.
Expected result: Four matching pointed wings surround the center.
Check yourself: There should be exactly 4 completed wings with no empty Round 2 chain spaces.
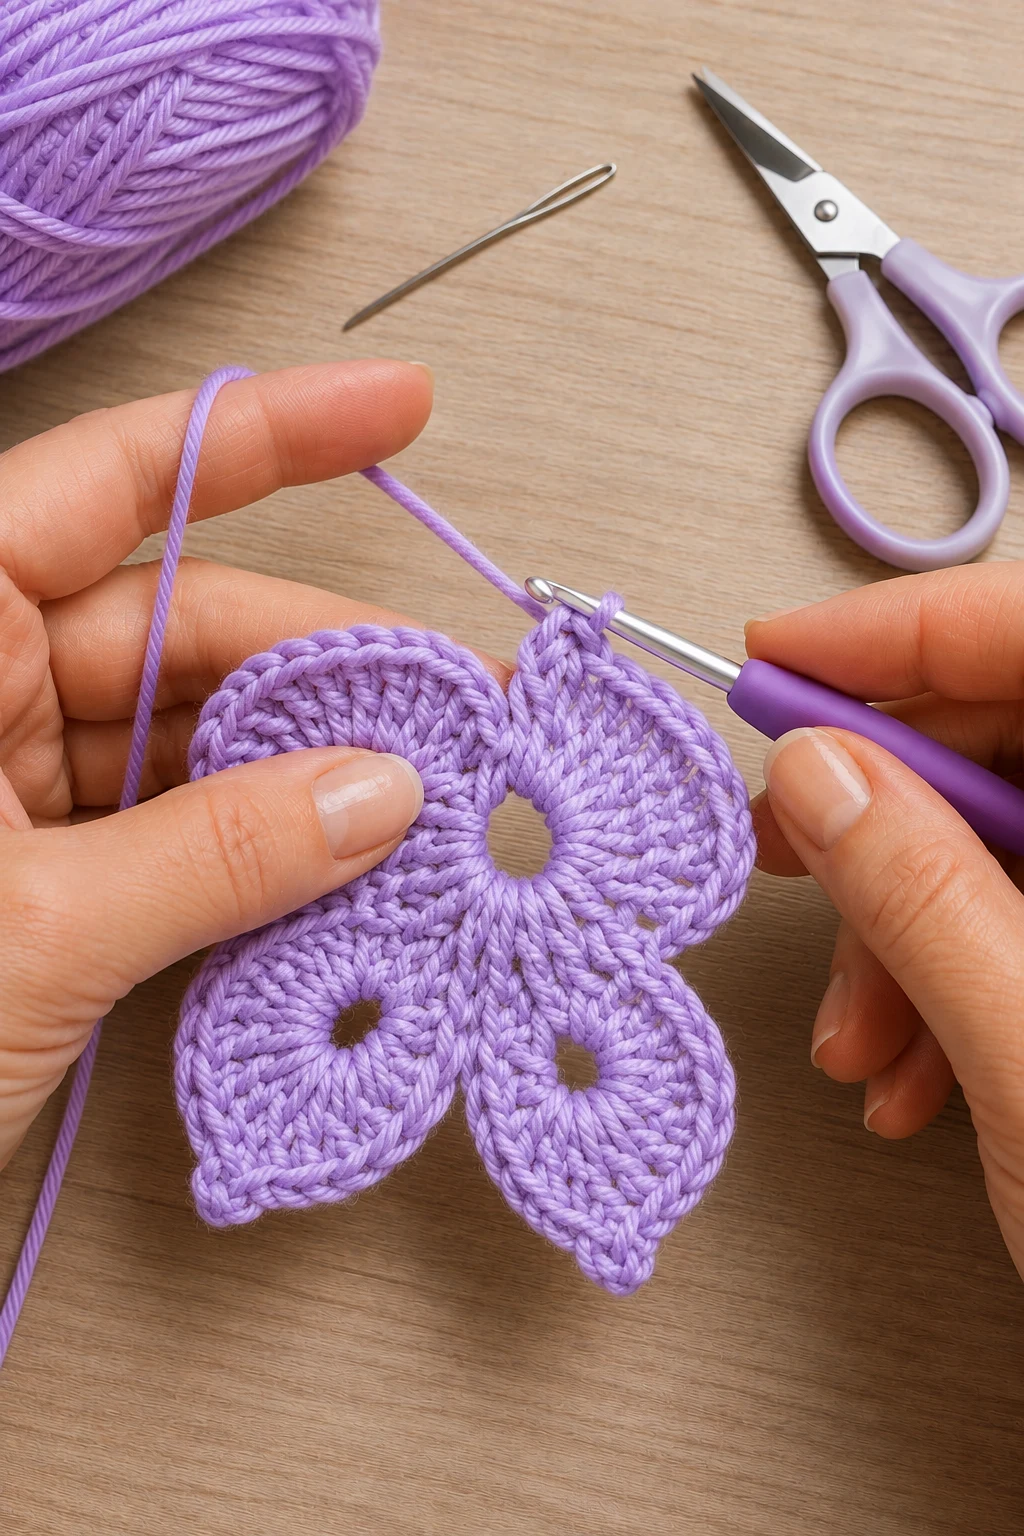
24. Close Round 2
Action: Slip stitch into the first Round 2 single crochet.
Detailed instructions: Insert the hook into the first sc made in Round 2, yarn over, and pull the yarn through the stitch and active loop together. This closes the decorative wing round.
Expected result: The four-wing motif is completely joined.
Check yourself: You should be able to lay the motif flat with four matching wings around the center.
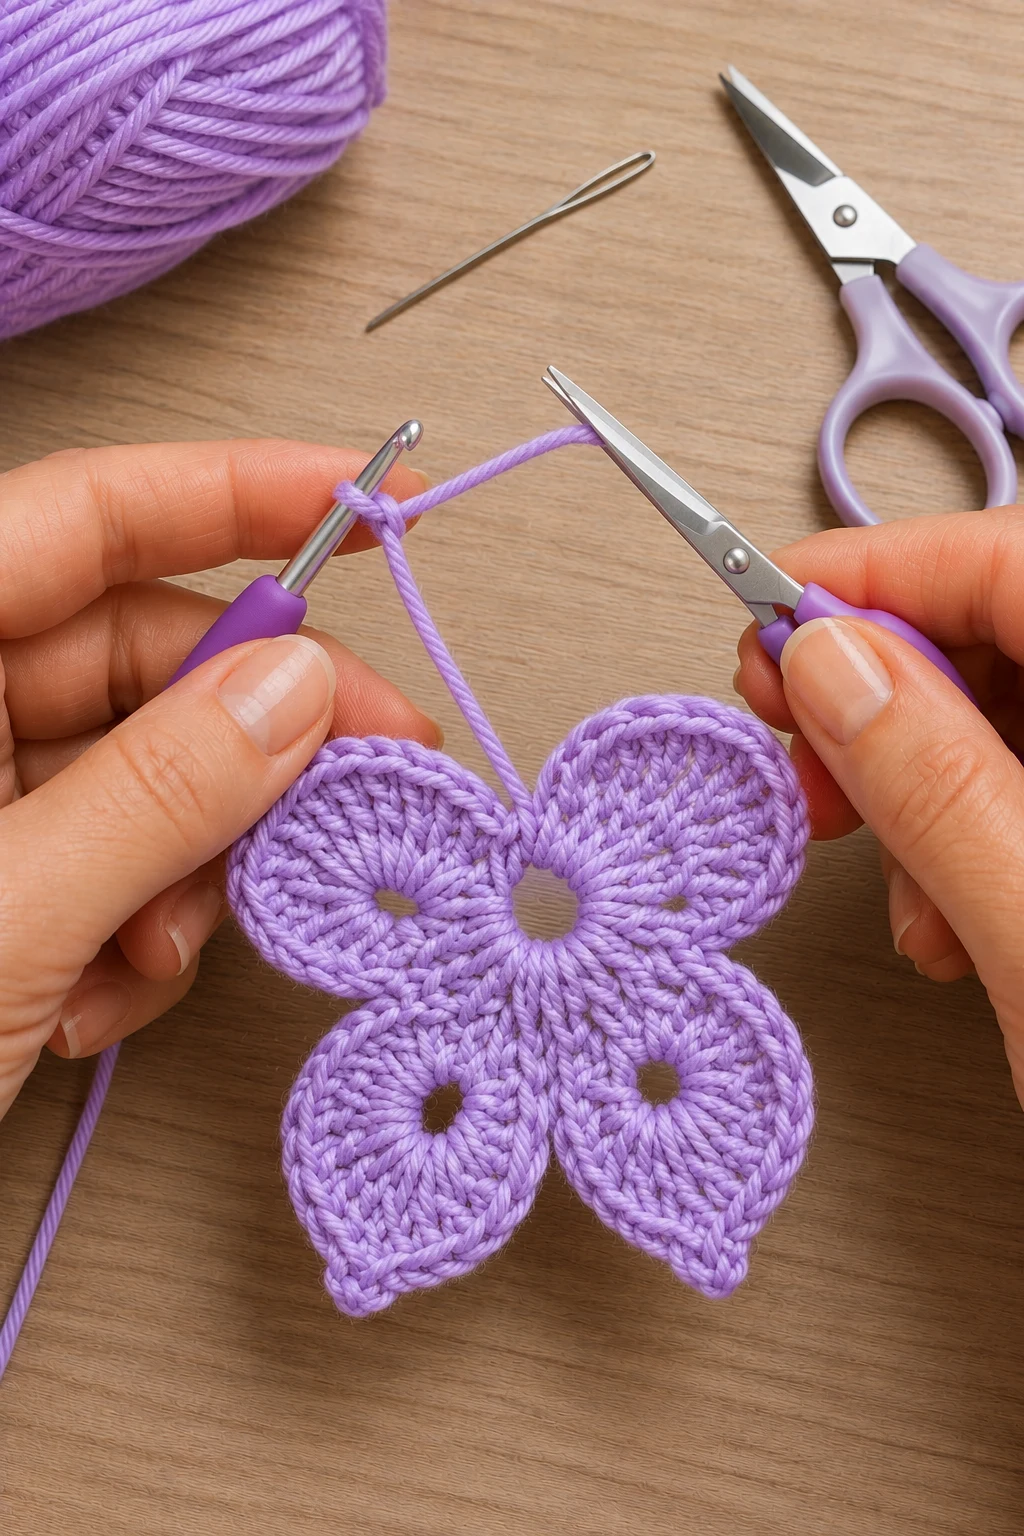
25. Secure the round
Action: Fasten off the working yarn.
Detailed instructions: Cut the working yarn leaving a tail of approximately 6 inches. Yarn over with the hook and pull the cut end completely through the active loop to secure the final stitch.
Expected result: The decorative motif is finished and has one working tail plus the original center tail.
Check yourself: Gently tug the final tail; the last stitch should stay closed.
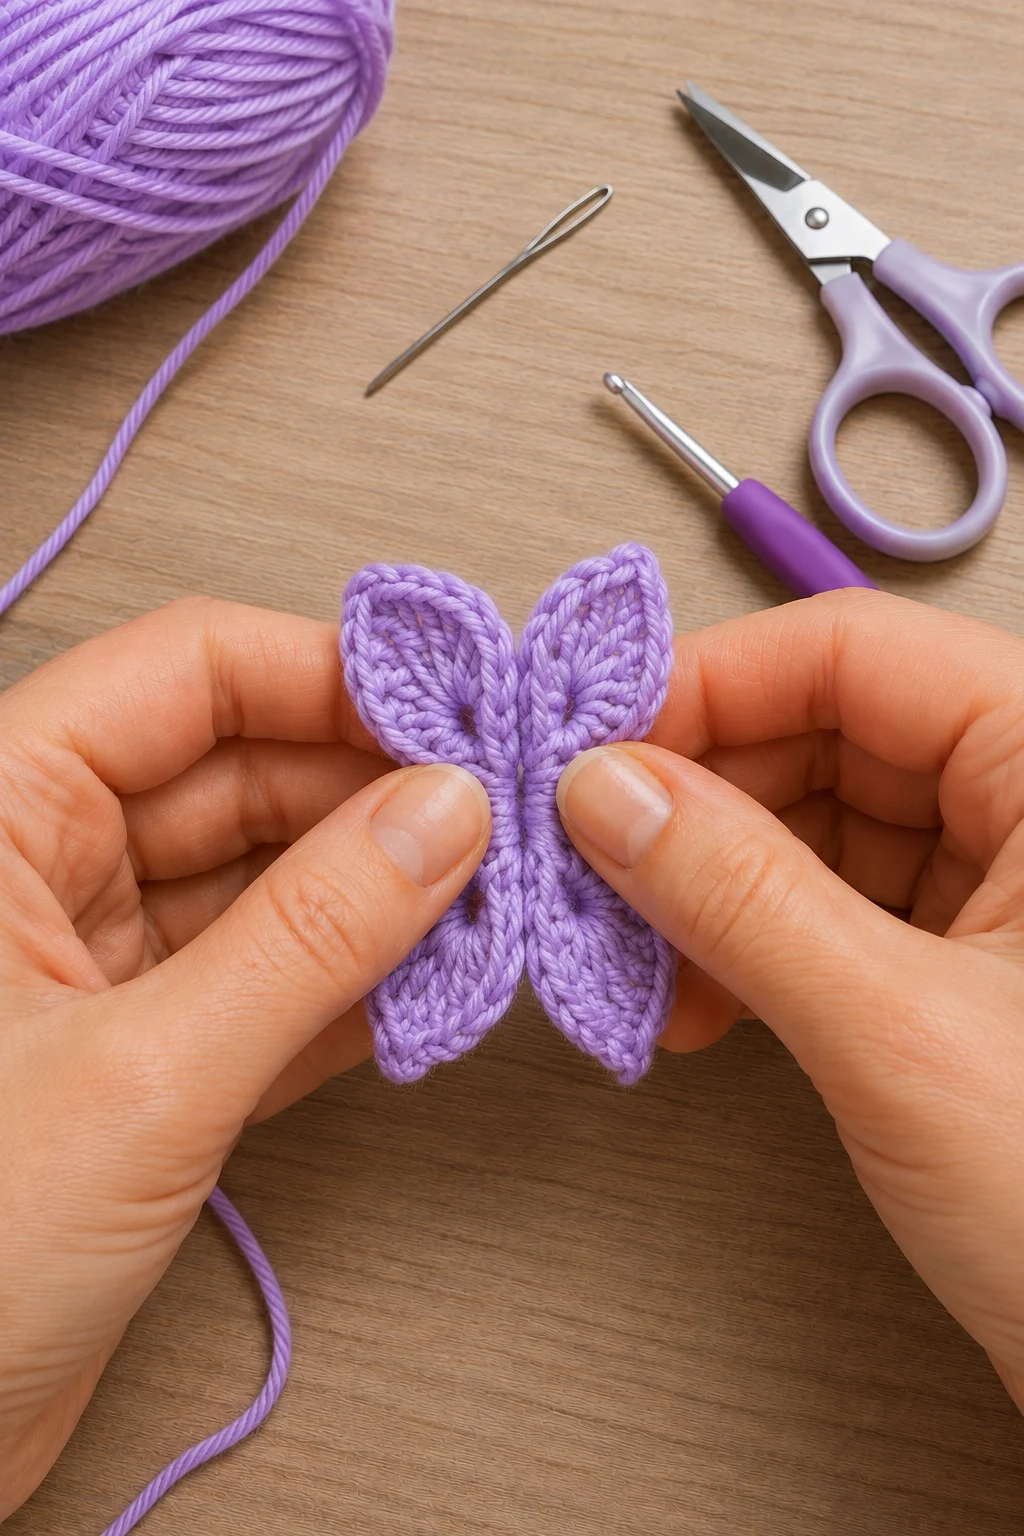
26. Fold the motif into a butterfly
Action: Fold the four-wing motif in half through the center.
Detailed instructions: Place the motif flat with two wings above and two below. Bring the two matching sides together along the center line so the four wings form two butterfly sides. Pinch the center gently between your fingers while keeping the wing tips spread.
Expected result: The flat flower-like motif becomes recognizable as a four-wing butterfly shape.
Check yourself: You should see two larger wing sections on each side of the center.
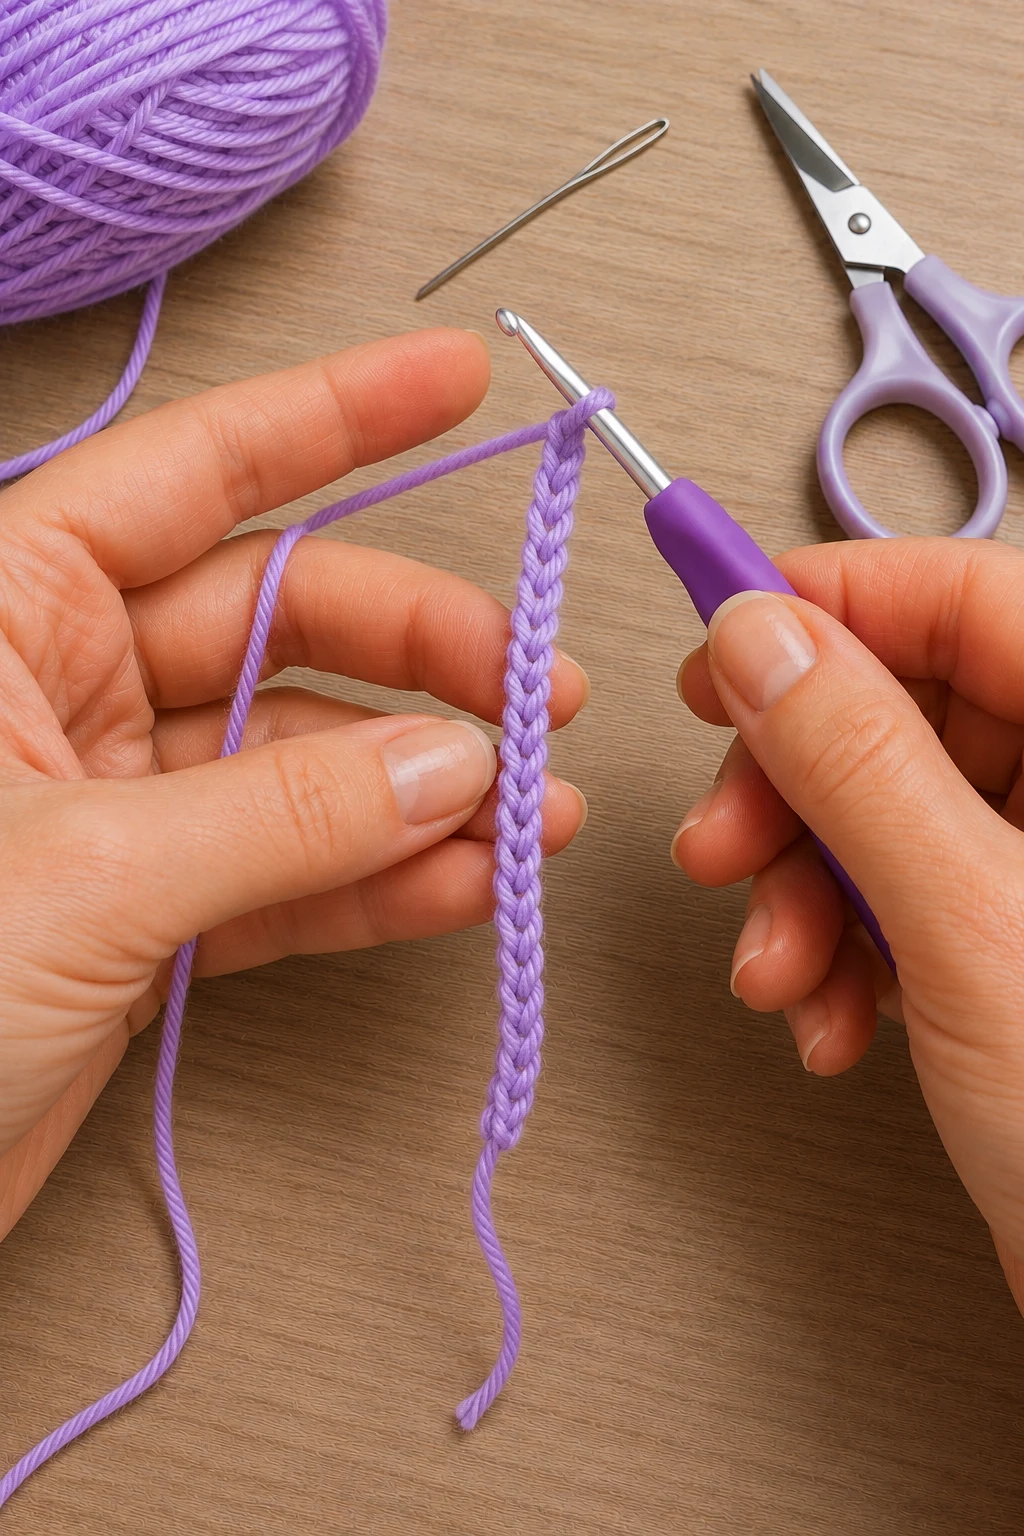
27. Make the butterfly body
Action: Chain 14 stitches with a fresh length of lavender yarn.
Detailed instructions: Leave approximately 5 inches of yarn before the first chain. Make 14 chain stitches with even tension, keeping the chain flexible rather than tight. Leave another 5-inch tail after the fourteenth chain.
Expected result: You have one 14-chain strand with long tails at both ends.
Check yourself: Count 14 chain stitches from end to end.
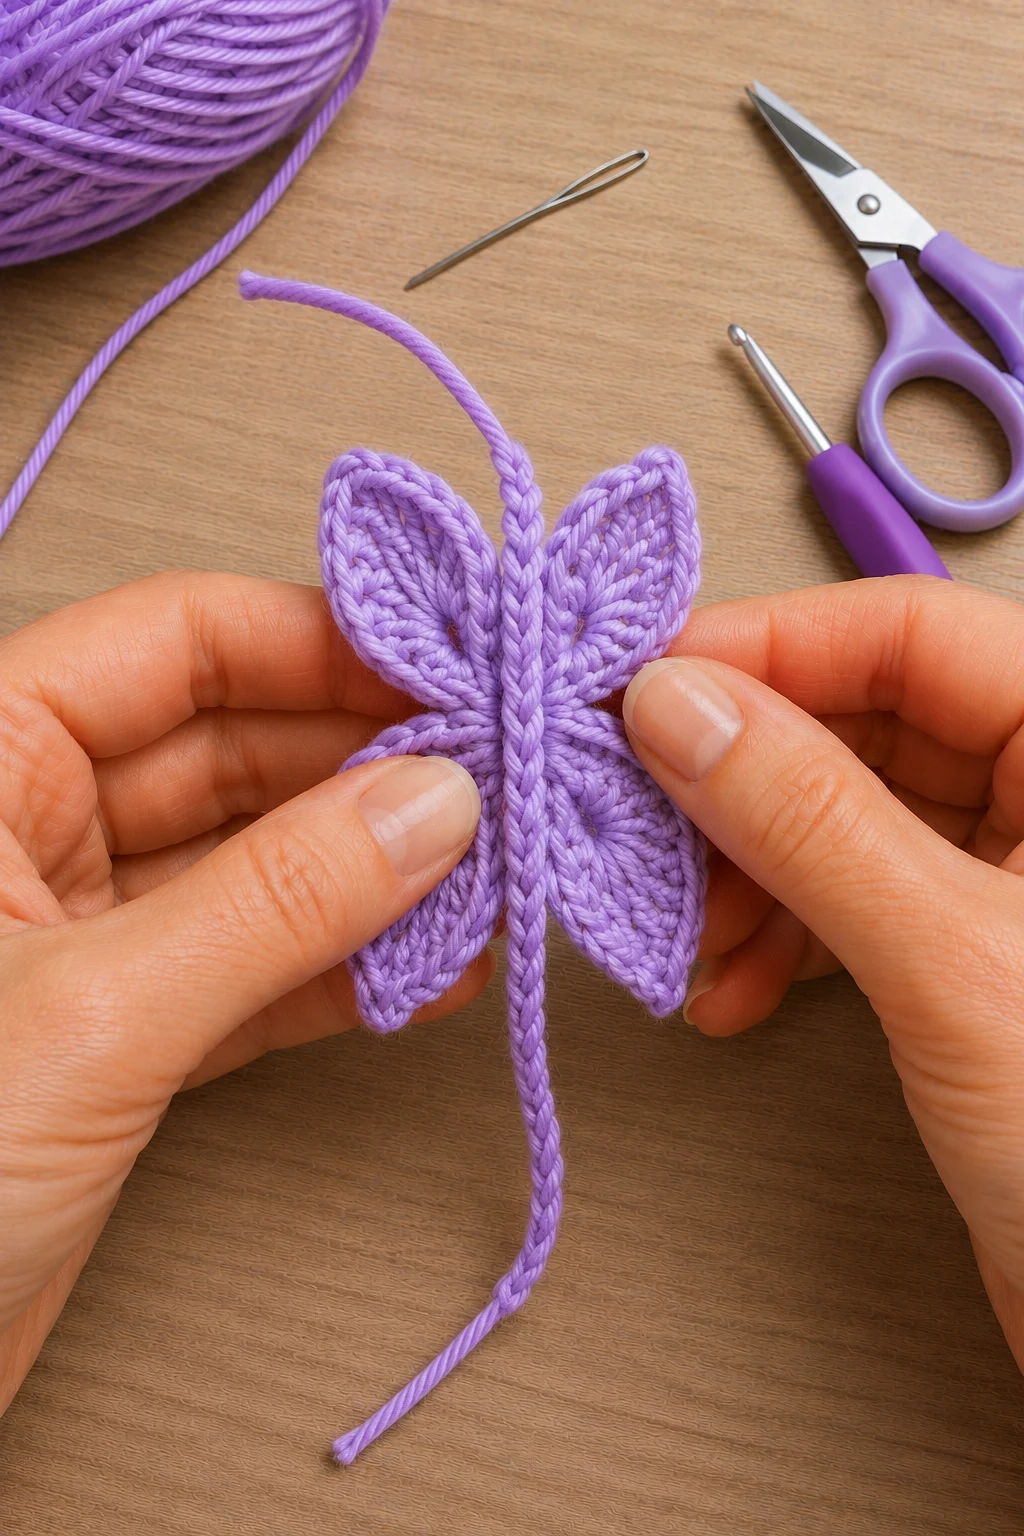
28. Position the body chain
Action: Place the 14-chain strand along the center of the folded butterfly.
Detailed instructions: Lay the middle section of the chain directly over the narrow center where the four wings meet. Keep approximately equal lengths extending above and below the butterfly so the ends can become antennae.
Expected result: The chain sits centered along the butterfly’s body.
Check yourself: The chain should divide the butterfly into balanced left and right sides.
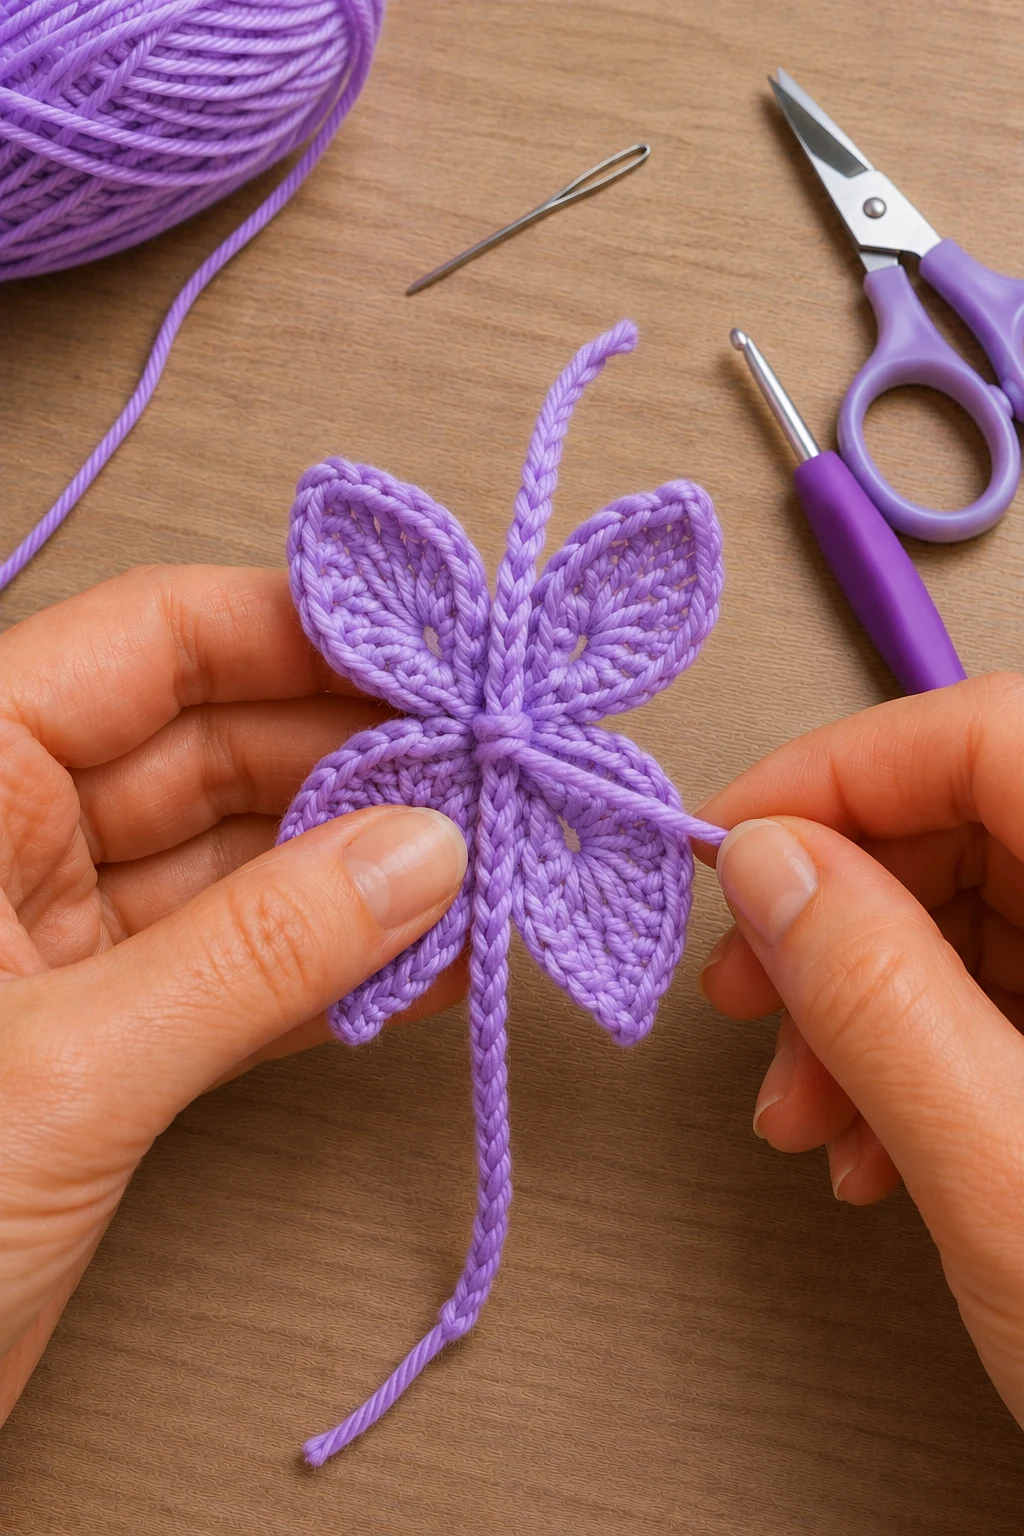
29. Wrap the body chain
Action: Wrap the center portion of the chain around the butterfly’s narrow middle.
Detailed instructions: Bring the lower portion of the chain around the back of the folded center and return it to the front. Keep the chain snug enough to hold the wings together without compressing them.
Expected result: The chain forms a narrow crochet body around the butterfly’s center.
Check yourself: The wings should stay together when you gently release them.
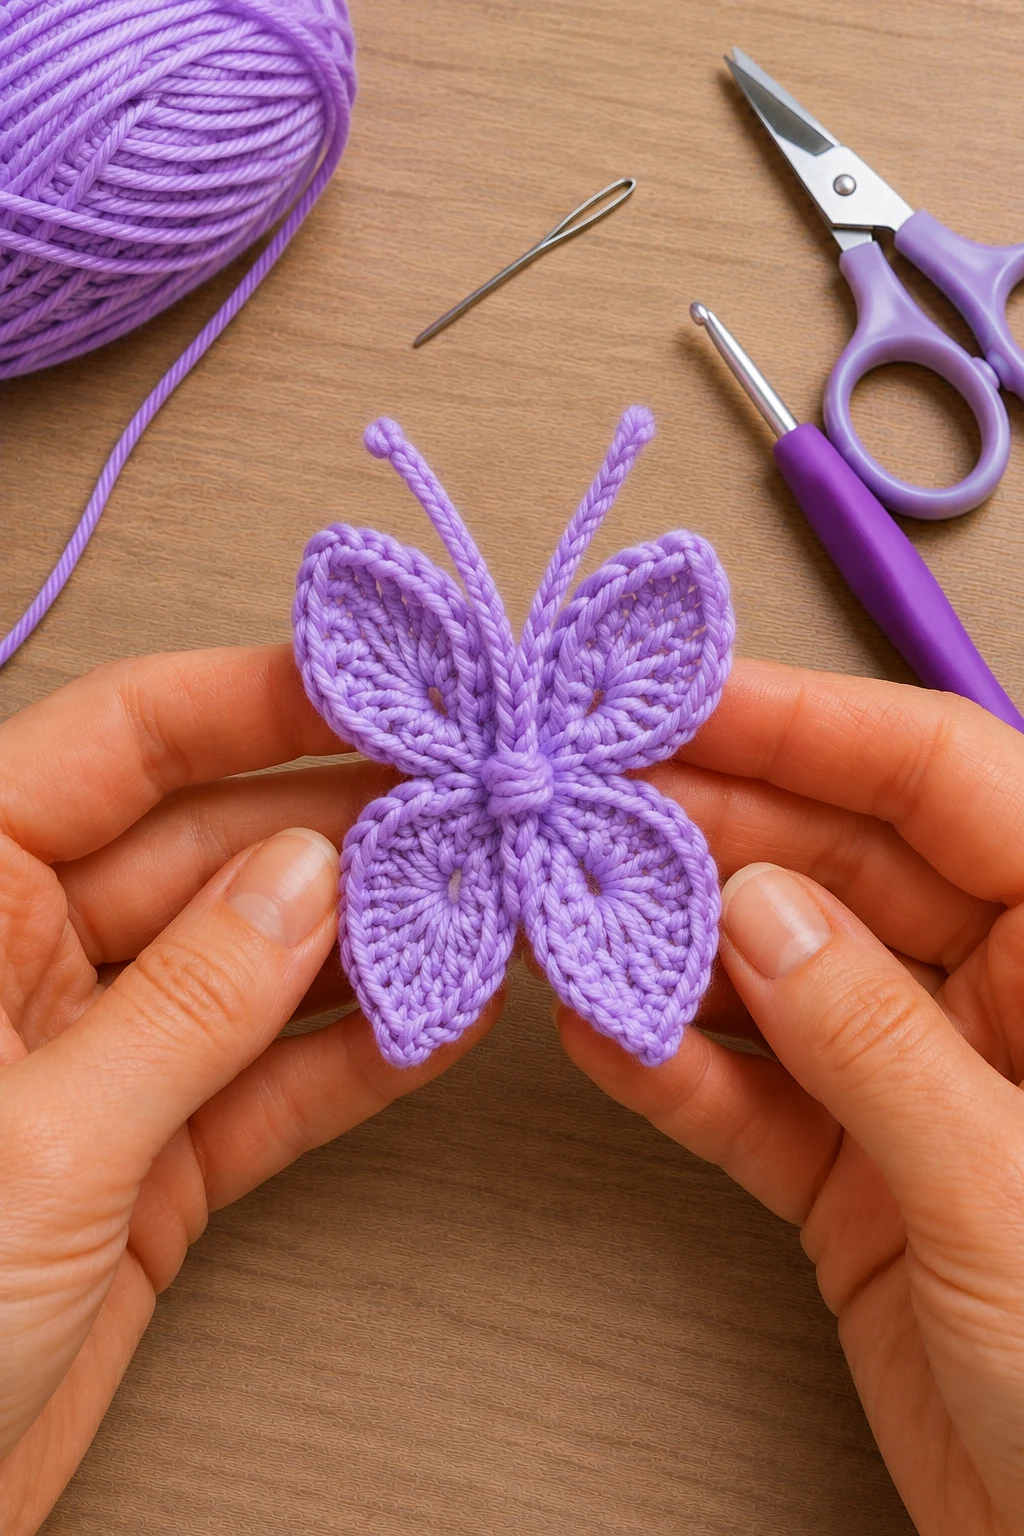
30. Secure the body
Action: Tie the two long yarn ends together at the butterfly’s center.
Detailed instructions: Bring the two tails together over the wrapped chain and tie a firm overhand knot. Tighten the knot just enough to hold the wings securely without flattening the decorative stitches.
Expected result: The butterfly body is fixed in place.
Check yourself: Gently lift the butterfly by one wing; the folded center should stay intact.
31. Shape the antennae
Action: Separate the two remaining yarn ends into two antennae.
Detailed instructions: After the center knot is secure, gently pull the two remaining tails upward and apart. Leave each tail approximately 1½ to 2 inches long so the butterfly has short, delicate antennae.
Expected result: Two matching lavender antennae extend from the top of the butterfly.
Check yourself: The antennae should be similar in length and spread naturally apart.
32. Finish the butterfly
Action: Trim the antennae and weave the remaining yarn tail into the center body.
Detailed instructions: Trim each antenna to approximately 1½ inches, then thread the original starting tail onto the yarn needle. Weave it back and forth through several center stitches on the underside, pull gently to secure, and trim the excess close to the work.
Expected result: The butterfly is completely finished, with clean edges, a secure center, and two neat antennae.
Check yourself: The butterfly should hold its shape when placed flat on a table.
Quick Reference
Round / Section Stitches / Elements Count
Round 1 Single crochet 4
Round 1 Double crochet 4
Round 1 Chain-1 spaces 8
Round 2 Butterfly wings 4
Each wing Single crochet 2
Each wing Double crochet 4
Each wing Treble crochet 2
Each wing Picot 1
Body Chain stitches 14
Finished piece Wings 4
Finished piece Antennae 2
Finished size Width × height Approx. 3½ × 2¾ in
📺 Watch the Video Tutorial
Final Thoughts
And there it is — your little lavender crochet butterfly applique is ready to flutter onto its next project! I love how much personality this tiny motif adds without requiring much yarn or time. This crochet butterfly applique patterns free tutorial is especially handy when you need a quick embellishment for a hat, bag charm, brooch, headband, baby accessory, or handmade card. For a crisp finished shape, lightly steam-block the wings from a short distance and let the butterfly cool completely before attaching it. I hope you have as much fun making yours as I did designing it!
Tips for a Better Experience
Keep the center ring tight. A loose magic ring can leave a noticeable hole and make the butterfly body look bulky.
Don’t over-tighten the wing stitches. The picot needs enough room to stand upright and create the pointed wing tip.
Match the four wings carefully. Try to keep your tension consistent from wing to wing so the butterfly sits symmetrically.
Make a smaller version with thinner yarn. For a tiny applique, use lightweight yarn with a smaller hook and keep the same stitch sequence.
FAQ
What is the easiest crochet butterfly applique patterns free project for beginners?
This two-round butterfly applique is a simple choice because it uses a magic ring, chains, single crochet, double crochet, treble crochet, and a small picot. The four wings are created from the same repeated sequence.
How do I crochet an applique butterfly?
Start with a small circular base, build four decorative wings around the chain spaces, fold the motif through the center, and secure it with a short crocheted body and two antennae.
Why does my crochet butterfly look like a flower?
The motif naturally looks flower-like before folding. Once the four wings are folded together and secured through the center, the shape becomes a butterfly applique.
📚 You Might Also Like
- Crochet Applique Patterns Free Butterfly Are Charming Crochet Motifs for Decorating Handmade Projects
Crochet applique patterns free butterfly designs are charming crochet motifs that add colorful, ligh…
- Crochet Applique Patterns Free Sheep: 7 Adorable DIY Ideas You’ll Want to Make Today
Crochet applique patterns free sheep are simple decorative crochet motifs that let you create charmi…
- Crochet applique patterns free deer: 9 Top DIY Ideas for
If you’re searching for crochet applique patterns free deer, you’re in for a creative tr…
- Crochet Applique Patterns Free Fish: 7 Adorable Designs to Make for Blankets, Bags, and Beach-Themed Décor
Crochet applique patterns free fish are decorative crochet motifs shaped like fish that you can stit…
- Crochet Applique Patterns Free Girl: 7 Adorable Projects You’ll Want to Make Today
Crochet applique patterns free girl are decorative crochet motifs featuring girl-inspired designs th…
🛍️ Shop the Look — crochet butterfly applique patterns free
Our handpicked Amazon picks curated specifically for crochet butterfly applique patterns free:
As an Amazon Associate I earn from qualifying purchases.