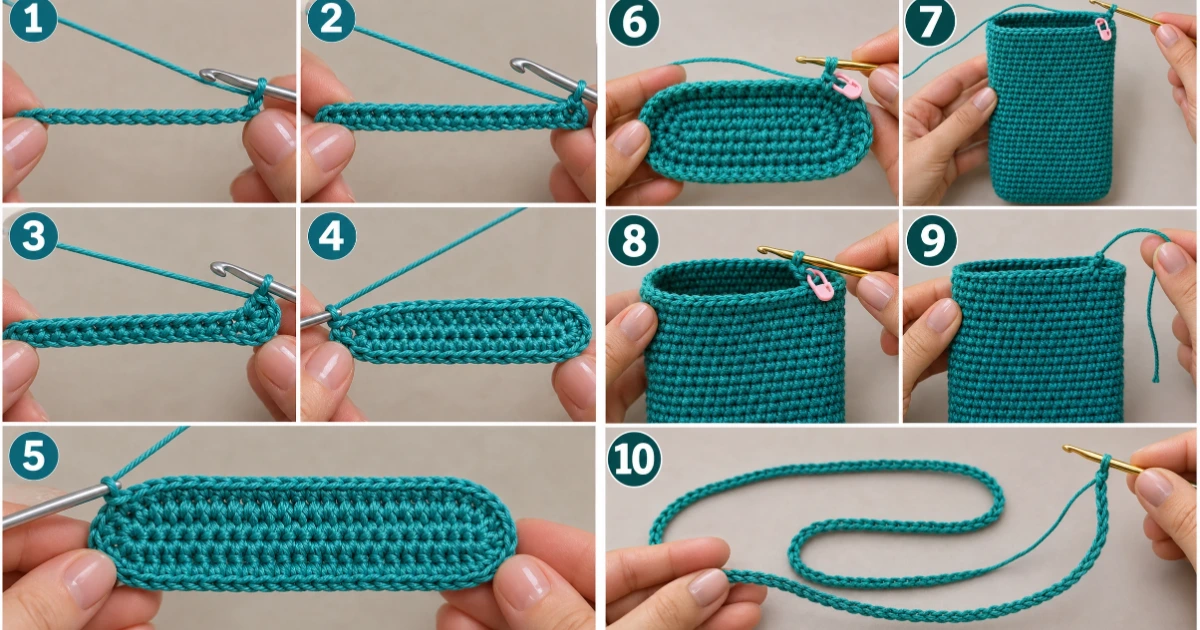
Modern Crochet Phone Bag Pattern for Everyday Style
This phone bag crochet pattern is one of my favorite little projects when I want to make something that’s both pretty and genuinely useful! It’s a stylish, lightweight pouch with a comfortable shoulder strap, a neat rectangular shape, and plenty of room for your phone and a few small essentials. I’m using teal cotton yarn to give this bag a fresh, modern look that works beautifully in every season. The best part? You don’t need complicated stitches or multiple pieces to put together. Grab your supplies, and let’s make this lovely little bag!
A Cute and Practical Crochet Phone Bag to Make This Weekend
This simple crochet phone bag combines a sturdy single-crochet body, a reinforced base, and a comfortable handmade strap to create an everyday accessory you’ll love carrying.
Materials Needed
- Yarn: Approximately 150 g of medium-weight (Category 4) 100% cotton yarn in teal.
- Crochet hook: 4 mm (US G/6) crochet hook.
- Stitch markers: 2 removable stitch markers to mark the beginning of each round and the strap attachment positions.
- Tapestry needle: 1 blunt-ended yarn needle for sewing the strap and weaving in ends.
- Scissors: 1 sharp pair of small craft scissors.
- Measuring tape: 1 flexible measuring tape for checking the bag and strap dimensions.
- Optional: 1 small decorative bag charm for personalizing your finished crochet phone bag.
Abbreviations / Terms Used
- ch: Chain stitch.
- sc: Single crochet.
- sl st: Slip stitch.
- st / sts: Stitch / stitches.
- inc: Increase; work 2 single crochet stitches into the same stitch.
- rnd: Round.
- RS: Right side of the crochet fabric.
- WS: Wrong side of the crochet fabric.
- FO: Fasten off.
- BLO: Back loop only.
- Sp: Space.
- YO: Yarn over.
- Working loop: The active loop remaining on your crochet hook.
What You Should Keep in Mind — phone
- Keep your tension consistent: Single crochet stitches should be firm enough to support your phone without creating large gaps, but not so tight that the fabric becomes stiff.
- Check your stitch count: This pattern uses 44 stitches around the pouch body. Use a stitch marker at the beginning of each round to avoid accidentally increasing or decreasing.
- Choose cotton yarn: Cotton gives this phone bag crochet project better structure and helps the finished pouch maintain its shape with everyday use.
- Measure before continuing: Check the width and height of your pouch as you work. Your phone should slide inside comfortably without stretching the crochet fabric.
Free Pattern: phone bag crochet
I’m so excited to walk you through this little project! We’ll crochet the base, build the pouch body in continuous rounds, and finish with a sturdy handmade shoulder strap.
Pattern Overview
- Skill level: Beginner-friendly.
- Construction: One-piece oval base with a rectangular pouch body.
- Stitches: Chain, single crochet, and slip stitch.
- Finished pouch dimensions: Approximately 4.25 inches wide × 7 inches tall × 1.25 inches deep.
- Finished strap length: Approximately 42–43 inches.
- Construction method: Worked in continuous rounds without turning.
- Color: Teal.
- Fit: Suitable for most standard smartphones measuring up to approximately 6.5 inches long.
STEP-BY-STEP INSTRUCTIONS
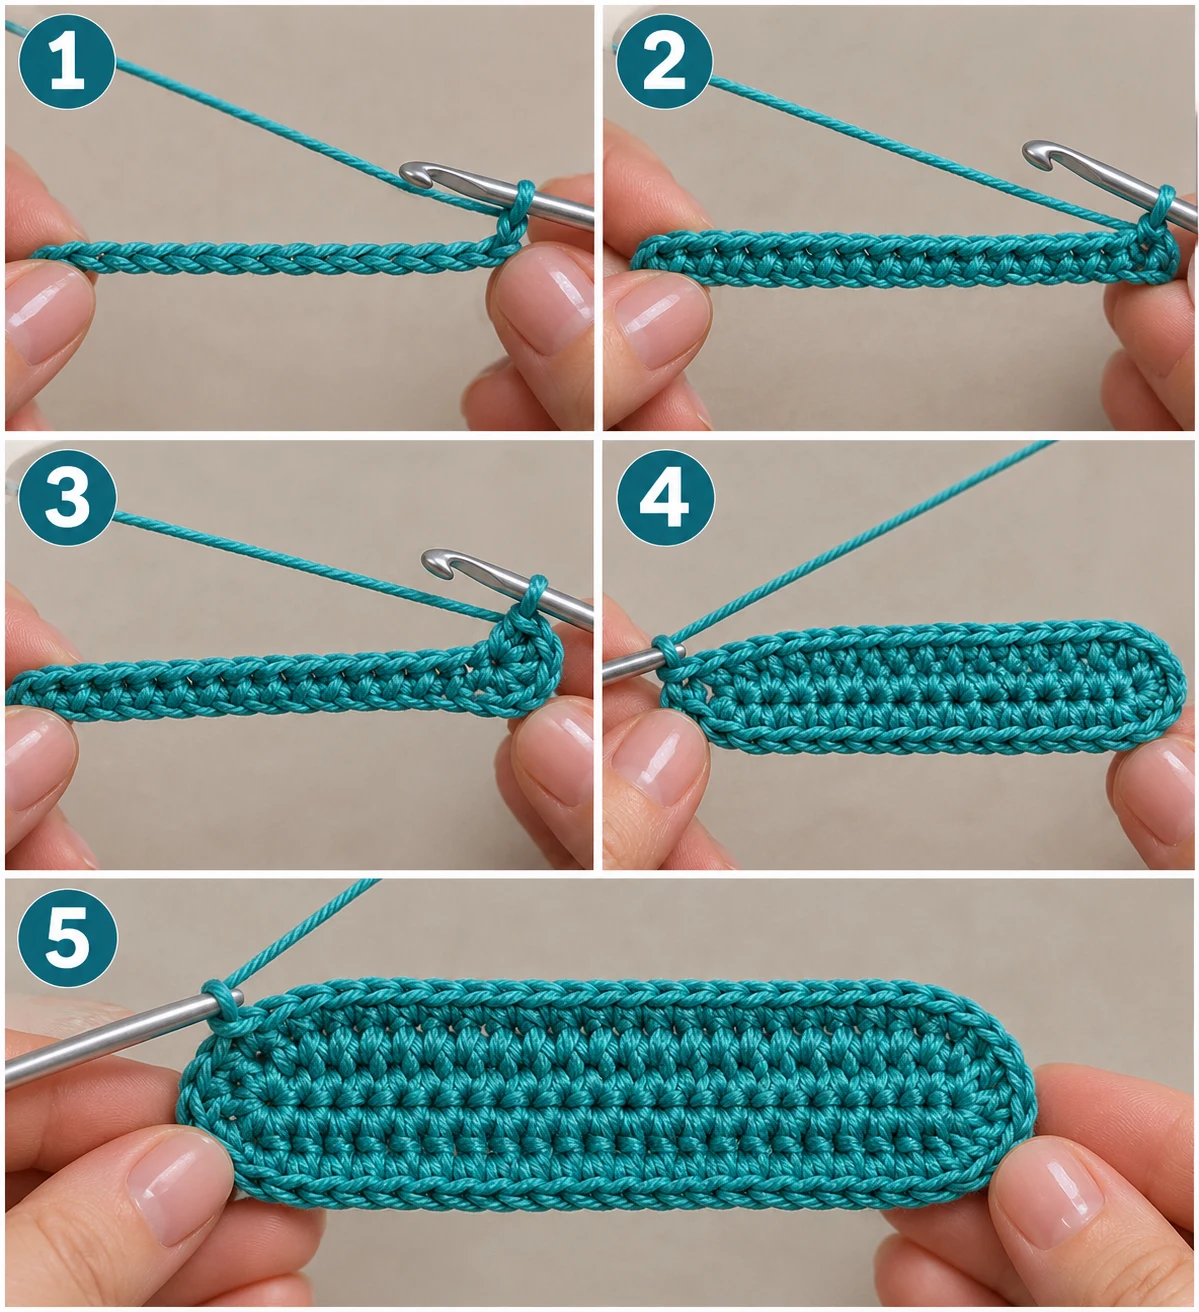
1. Create the Foundation Chain
Action: Make a foundation chain of 21 stitches using your teal cotton yarn.
Detailed instructions: Make a slip knot and place it onto your 4 mm crochet hook. Hold the working yarn comfortably in your non-hook hand. Wrap the yarn over the hook from back to front and pull it through the loop already on your hook. This creates one chain stitch. Repeat until you have exactly 21 chain stitches. Keep the chains relaxed and evenly spaced so you can easily insert your hook into them during the next step.
Expected result: You should have one straight foundation chain containing 21 clearly visible chain stitches.
Check yourself: Count 21 V-shaped chain stitches, including the loop at the base of your starting chain but excluding the active loop on your hook.
2. Crochet the First Side of the Base
Action: Work 20 single crochet stitches along the first side of the foundation chain.
Detailed instructions: Insert your hook into the second chain from the hook, passing underneath the top two loops of the chain. Yarn over and pull up a loop so that you have two loops on your hook. Yarn over again and pull through both loops to complete one single crochet. Repeat in each remaining chain along the first side until you have worked 20 single crochet stitches. The final stitch should sit in the last chain at the far end of your foundation chain.
Expected result: A straight row of 20 teal single crochet stitches should sit along one side of the foundation chain.
Check yourself: Count 20 single crochet stitches and make sure one unworked turning chain remains at the starting end.
3. Shape the First Rounded End
Action: Work 3 single crochet stitches into the final foundation chain at the end of the first side.
Detailed instructions: Locate the final foundation chain stitch where your first-side row ends. Insert your hook into the same chain space that contains your twentieth single crochet. Yarn over and pull up a loop, then yarn over and pull through both loops. Repeat this process twice more in the same chain space. You will now have three single crochet stitches sharing that end chain, creating a rounded turning point. The three stitches should fan gently around the end of the foundation chain.
Expected result: The first end of your base should have a rounded curve made from 3 single crochet stitches in one foundation chain.
Check yourself: Look at the end of your work and confirm that three distinct stitch tops emerge from the same foundation chain.
4. Crochet Along the Opposite Side
Action: Work 19 single crochet stitches into the unworked underside of the foundation chain.
Detailed instructions: Rotate your work slightly so that the underside of the foundation chain faces upward. Locate the unused bottom loops along the chain. Insert your hook beneath the next available bottom loop immediately after the three turning stitches. Yarn over and pull up a loop, then yarn over and pull through both loops to complete one single crochet. Continue along the underside, working one single crochet into each of the next 18 bottom loops. You should finish with 19 stitches along this side.
Expected result: Your foundation chain should now have crochet stitches along both long sides, with the opposite rounded end still unfinished.
Check yourself: Count 19 single crochet stitches along the underside and make sure the original chain is no longer exposed along its long edge.
5. Complete the Rounded Base
Action: Work 2 single crochet stitches into the remaining starting chain space.
Detailed instructions: Locate the last unworked bottom loop at the starting end of your foundation chain. Insert your hook underneath that loop. Yarn over, pull up a loop, yarn over again, and pull through both loops to complete the first single crochet. Insert your hook into the same chain space again and repeat to make the second single crochet. These two stitches finish the oval base and bring your total stitch count to 44.
Expected result: You should have a complete, flat oval base with rounded ends and 44 single crochet stitches around its perimeter.
Check yourself: Count 44 stitches around the entire base: 20 on the first side, 3 at the first end, 19 on the opposite side, and 2 at the final end.
6. Establish the First Body Round
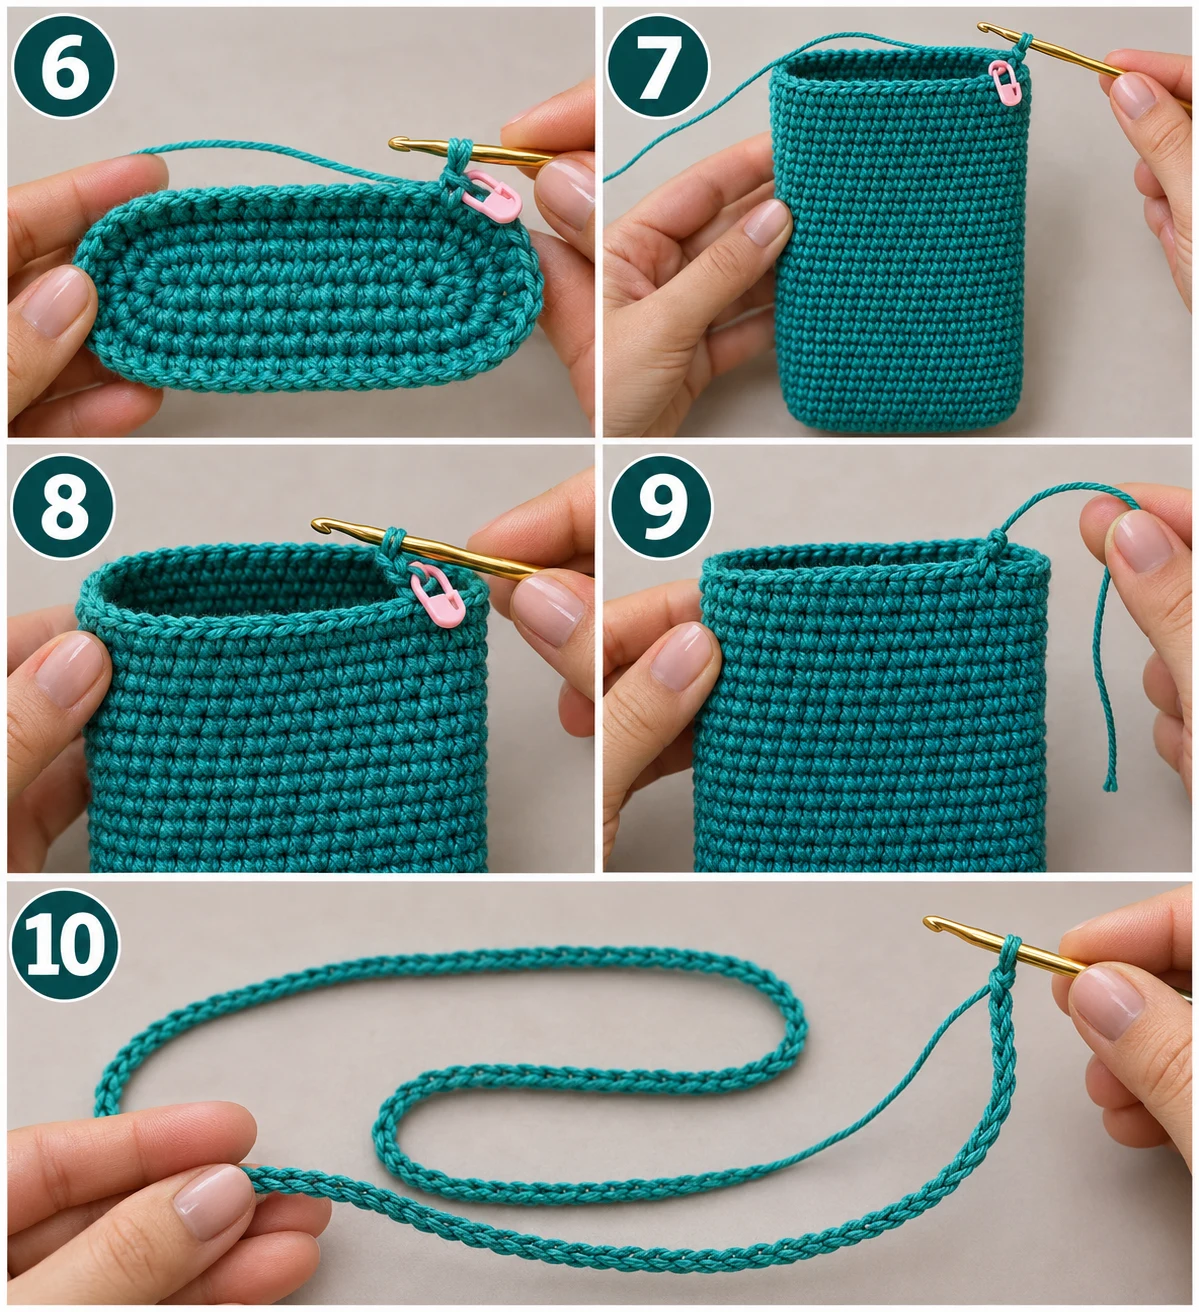
Action: Work one single crochet stitch into each of the 44 stitches around the oval base.
Detailed instructions: Place a removable stitch marker in the first stitch of the new round. Insert your hook beneath both top loops of that stitch. Yarn over and pull up a loop, then yarn over and pull through both loops. Continue working one single crochet into every stitch around the oval, including the stitches at both rounded ends. Do not add extra increases. When you reach the marked first stitch, you should have completed 44 single crochet stitches. Keep your work facing the same direction rather than turning it.
Expected result: The oval base will begin to develop a small raised edge, creating the bottom and lower sides of your phone pouch.
Check yourself: Count 44 stitches and make sure the stitch marker still identifies the beginning of the round.
7. Build the Pouch Body (Rounds 2–30)
Action: Continue working 29 identical rounds of 44 single crochet stitches each.
Detailed instructions: Starting from the beginning of round 2, insert your hook under both top loops of the next stitch. Yarn over and pull up a loop, then yarn over and pull through both loops. Continue making one single crochet into every stitch around. Work exactly 44 single crochet stitches in each round, moving your stitch marker to the first stitch as you begin each new round. Repeat this same instruction for rounds 2 through 30. Do not turn your work, skip stitches, or add increases. Keep the pouch upright as the sides gradually grow. Your work should develop a consistent rectangular shape with gently rounded bottom corners.
Expected result: You will have a tall, open-top teal pouch with a firm oval bottom and straight single-crochet sides.
Check yourself: Each round should contain exactly 44 stitches. After round 30, the pouch should measure approximately 6.5–6.75 inches tall from the bottom.
8. Finish the Top Edge (Round 31)
Action: Work one final round of 44 single crochet stitches around the top opening.
Detailed instructions: Continue directly from round 30. Insert your hook under both loops of the next stitch and make one single crochet. Repeat around the entire opening, maintaining the 44-stitch count. Keep your stitches even and avoid pulling the working yarn too tightly. When you reach the beginning of the round, work the final single crochet into the stitch immediately before the marked starting point.
Expected result: Your pouch will have a neat, reinforced top edge with 31 completed rounds and a clean opening.
Check yourself: Count 44 stitches along the finished top edge and check that the opening remains wide enough for your phone.
9. Fasten Off the Pouch Body
Action: Secure the completed pouch body by fastening off the working yarn.
Detailed instructions: After completing the last single crochet, cut the working yarn, leaving approximately 8 inches of yarn for finishing. Yarn over and pull the cut end completely through the active loop on your hook. Pull gently to tighten the fastening knot. Remove your hook and check that the final stitch is secure. Keep the remaining tail long enough to weave into the inside of the pouch using your tapestry needle.
Expected result: The pouch body should be complete, with a secure top edge and one loose yarn tail ready to weave in.
Check yourself: Gently tug the last stitch. It should remain secure without opening or unraveling.
10. Make the Shoulder Strap Foundation
Action: Crochet a foundation chain of 171 stitches for the shoulder strap.
Detailed instructions: Make a slip knot with your teal yarn and place it onto your 4 mm hook. Yarn over and pull through the active loop to create the first chain. Continue until you have exactly 171 chain stitches. Keep the chain relaxed and avoid pulling it too tightly, as an overly tight chain can make the finished strap uncomfortable. Lay the chain flat occasionally to make sure it isn’t twisting.
Expected result: You should have a long teal foundation chain that will form the base of your shoulder strap.
Check yourself: Count 171 chain stitches and lay the chain flat to verify that it does not twist.
11. Crochet the Strap Row
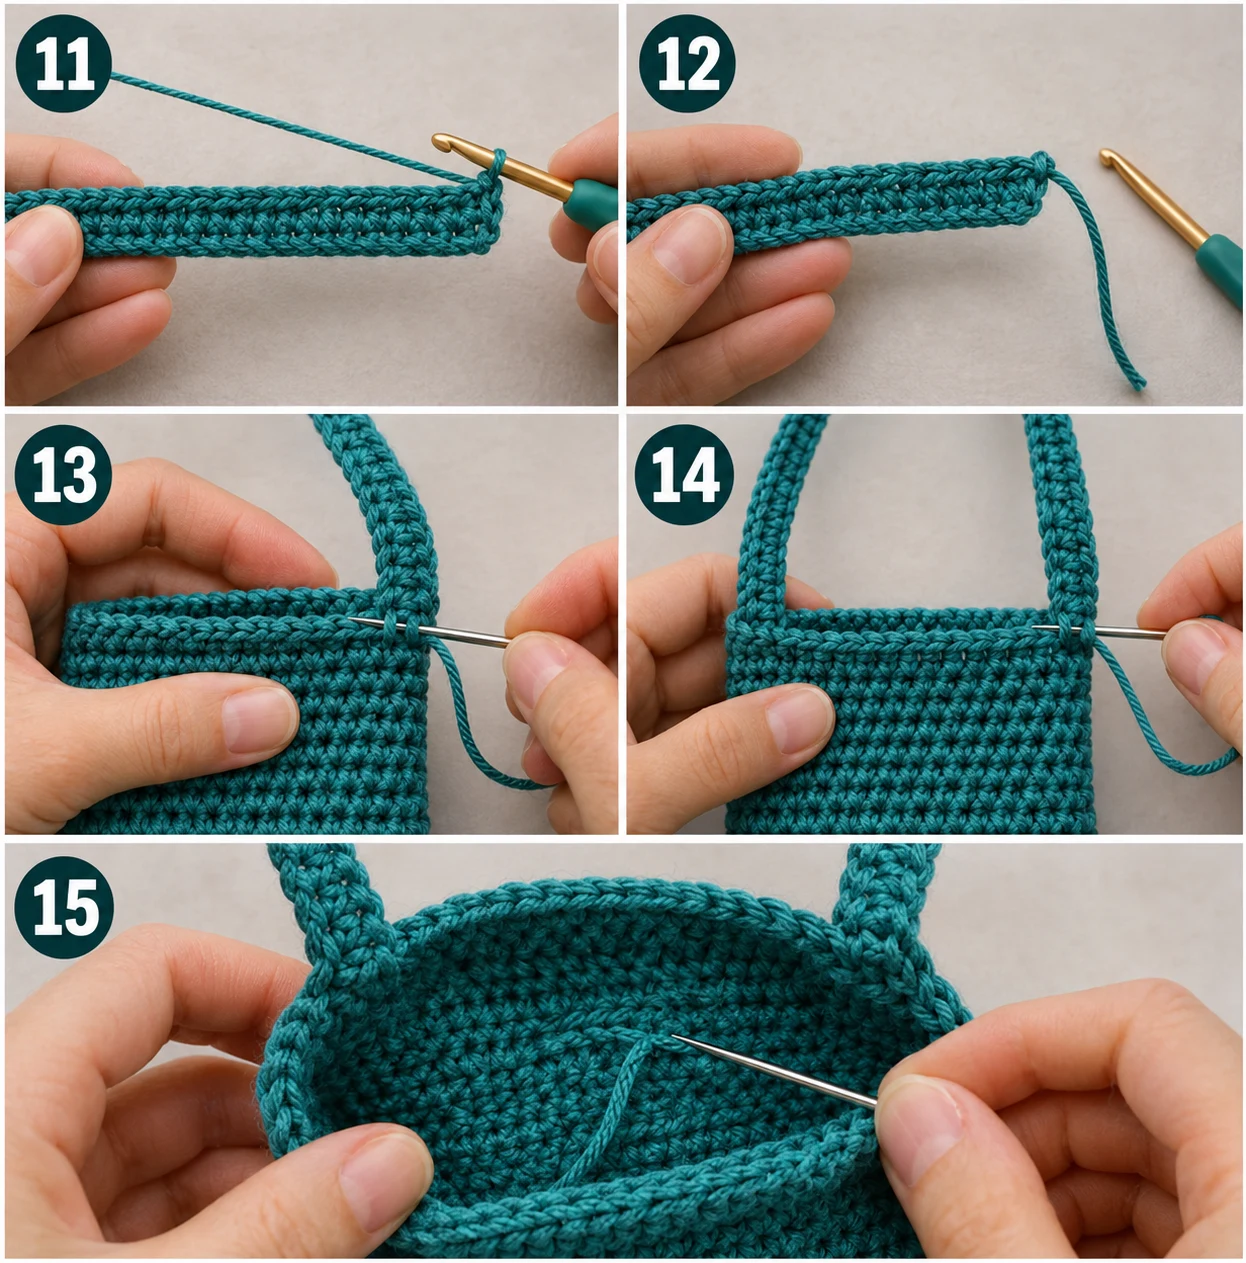
Action: Work 170 single crochet stitches along the 171-chain strap foundation.
Detailed instructions: Insert your hook into the second chain from the hook. Yarn over and pull up a loop, then yarn over again and pull through both loops. This completes your first single crochet. Continue working one single crochet into each remaining chain until you have 170 stitches. Keep the stitches evenly spaced so the strap will have a consistent width. The finished strap should look like a long, narrow strip rather than a loose chain.
Expected result: You should have a flat, sturdy teal strap approximately 1.25 inches wide and 42–43 inches long.
Check yourself: Count 170 single crochet stitches and measure the strap. Adjust the measurement to your gauge if necessary.
12. Fasten Off the Shoulder Strap
Action: Secure the strap by fastening off the working yarn.
Detailed instructions: Once all 170 single crochet stitches are complete, cut the working yarn, leaving an approximately 10-inch tail. Yarn over and pull the cut end completely through the active loop. Tighten gently to secure the last stitch. Remove your hook and leave the yarn tail attached because you will use it to sew one end of the strap to the pouch.
Expected result: You should have one finished long teal crochet strap with secure ends and a long sewing tail at one end.
Check yourself: Hold the strap by both ends and gently pull. The last stitch should remain secure.
13. Attach the First Strap End
Action: Sew one end of the strap securely to the first upper side of the pouch.
Detailed instructions: Position the strap approximately half an inch below the top edge on one side of the pouch. Use the loose yarn tail and your tapestry needle to sew the strap end onto the pouch. Pass the needle through the strap stitches and corresponding pouch stitches, making several secure passes. Keep the strap centered over the side panel rather than too close to either corner. Tie off the yarn securely on the inside of the pouch.
Expected result: One end of the shoulder strap should be firmly attached to the upper side of the teal pouch, with the remaining strap hanging freely.
Check yourself: Gently pull the strap away from the pouch. The attachment should feel secure and should not stretch or separate.
14. Attach the Second Strap End
Action: Sew the opposite end of the shoulder strap to the other upper side of the pouch.
Detailed instructions: Bring the free end of the strap around to the opposite side of the pouch, making sure it is not twisted. Position it at approximately the same height as the first attachment, about half an inch below the top edge. Thread the remaining yarn tail through your tapestry needle and sew the strap securely into the pouch stitches using several passes. Tie off the yarn on the inside and check that both attachment points are aligned.
Expected result: Your phone pouch will now have a complete shoulder strap attached at both sides.
Check yourself: Lift the bag by its strap and check that the pouch hangs straight without twisting or pulling unevenly at either attachment.
15. Weave in the Remaining Yarn Ends
Action: Hide all remaining loose yarn tails inside the crochet fabric.
Detailed instructions: Thread any remaining yarn tails through your tapestry needle. Turn the pouch inside out and weave each tail through the backs of several nearby stitches, following the natural direction of the crochet fabric. Change direction once to help prevent the ends from slipping out. Trim the excess yarn close to the fabric without cutting any of the actual stitches. Repeat for every loose end, including those at the strap attachments.
Expected result: Your teal phone bag crochet project should have clean edges, secure strap attachments, and no visible loose yarn ends.
Check yourself: Run your fingers over the inside and outside of the pouch. No loose tails should stick out, and no stitches should have been cut.
Your Finished Crochet Phone Bag
Congratulations! You’ve completed your very own phone bag crochet project.
The finished bag should have:
- A sturdy oval-shaped bottom.
- A rectangular pouch measuring approximately 4.25 × 7 inches.
- 31 rounds of single crochet around the body.
- A neat reinforced top opening.
- A comfortable 42–43-inch shoulder strap.
- Securely sewn strap attachments.
- A consistent teal finish throughout.
You can slip your smartphone inside, add a few everyday essentials, and enjoy your new handmade accessory!
Quick Reference
Here’s a handy reference table for keeping track of your phone bag crochet pattern while you work.
| Section | Instructions | Stitch Count |
|---|---|---|
| Foundation | Chain 21 | 21 chains |
| Base, first side | Single crochet | 20 sc |
| Base, first end | 3 sc in final chain | 3 sc |
| Base, opposite side | Single crochet | 19 sc |
| Base, second end | 2 sc in starting chain | 2 sc |
| Completed base | Oval foundation | 44 sc |
| Round 2 | Single crochet around | 44 sc |
| Rounds 3–30 | Repeat single crochet | 44 sc each |
| Round 31 | Final top-edge round | 44 sc |
| Strap foundation | Chain | 171 chains |
| Strap row | Single crochet | 170 sc |
| Assembly | Sew strap ends | 2 attachments |
Finished Measurements
| Feature | Approximate Measurement |
|---|---|
| Pouch width | 4.25 inches |
| Pouch height | 7 inches |
| Pouch depth | 1.25 inches |
| Strap length | 42–43 inches |
| Strap width | 1.25 inches |
| Yarn quantity | 150 g |
| Crochet hook | 4 mm |
| Main stitch | Single crochet |
| Color | Teal |
Pattern note: These measurements are approximate and may vary slightly depending on your yarn and individual crochet tension.
Final Thoughts
And that’s it! Your beautiful phone bag crochet project is finished, and I hope you had as much fun making it as I did creating this pattern. I absolutely love how the teal cotton yarn gives this little bag a fresh, modern look while keeping it practical for everyday use. Before carrying it, gently steam-block the pouch from a safe distance, avoiding direct contact between the steam and your cotton stitches. I’d love to see your finished creation, so share a photo and tag my blog when you post it!
Tips for a Better Experience
- Make the strap extra secure: When attaching the strap, sew through several rows of pouch stitches rather than relying on just one stitch. This distributes the weight and helps prevent stretching.
- Keep the opening firm: Maintain consistent tension during the final round. A loose top edge can stretch when you repeatedly take your phone in and out.
- Check the phone fit early: Compare your phone measurements with the pouch after completing the base and several body rounds. If your phone is larger, adjust the foundation chain before continuing.
- Personalize your crochet bag aesthetic: You can add a removable bag charm, a small decorative bow, or a handmade crochet flower without changing the original teal pouch construction.
FAQ
What yarn is best for a phone bag crochet pattern?
Medium-weight cotton yarn is an excellent choice because it creates firm, durable stitches and helps your phone pouch maintain its shape. For this pattern, I recommend approximately 150 g of teal cotton yarn.
How long does this phone bag crochet tutorial take?
A beginner may need approximately 4–6 hours, depending on their crochet speed and familiarity with single crochet stitches. More experienced crocheters may finish it in less time.
Can I customize the size of my phone bag crochet project?
📚 You Might Also Like
- Granny square daisy crochet pattern: 12 IdeasA granny square daisy crochet pattern is a crochet design that combines traditional granny square st…
- Granny square bag crochet pattern: 12 IdeasA granny square bag crochet pattern is a creative way to turn colorful crochet squares into stylish,…
- Oversized crochet cardigan: 13 Best DIY Ideas for 2027An oversized crochet cardigan is the ultimate handmade garment that combines slouchy, drapey comfort…
- Skull granny square pattern free crochet: 10 IdeasA skull granny square pattern free crochet project is a decorative crochet square featuring a skull…
- Granny square crochet pattern bag: 15 IdeasA granny square crochet pattern bag is a handmade accessory created by joining individual crocheted…
🛍️ Shop the Look — Best Sellers for phone bag crochet
Our handpicked Amazon best sellers curated specifically for phone bag crochet:
As an Amazon Associate I earn from qualifying purchases.