
As the temperature drops, it’s time to give your nail game a frosty boost with icy winter nails. The latest winter nail art trends are all about embracing the cold weather with creative and stylish designs.

From subtle snowflakes to bold, icy hues, there’s a winter nail art look to suit every style. In this article, we’ll explore 15 chic nail art designs that will keep your nails looking frosty and fabulous all winter long.
Key Takeaways
- Discover the latest winter nail art trends
- Get inspired by 15 chic nail art designs
- Learn how to create icy winter nail looks at home
- Find out which nail shapes and colors are trending this winter
- Get tips on how to make your nail art last longer
Winter Nail Art Trends for the Season
Winter brings a new wave of nail art trends that are both icy and elegant. This season, people are loving designs that show off winter’s beauty. From frosty landscapes to icy accents, there’s something for everyone.
Current Winter Nail Fashion
Winter’s nail fashion is all about bold, icy colors and detailed designs. Nail artists are getting creative with blue and white shades. They’re creating looks that feel like frost on a winter morning.

Celebrity Winter Nail Inspirations
Celebrities lead the way in nail fashion, and this winter is no different. Stars like Billie Eilish and Kate Moss have shown off icy nail designs. These looks have inspired fans all over.
Why Icy Designs Are Perfect for Winter
Icy designs are a perfect fit for winter. They capture the season’s unique look. The cool tones and frosty effects remind us of snow and ice.
- Icy designs add a touch of winter wonder to your look.
- They offer a refreshing contrast to the dullness of winter.
- Icy nail art can be both elegant and bold, depending on your preference.
Icy Winter Nails: Essential Tools and Techniques
To get frosty nail art, you need the right tools and skills. It’s not just about the polish colors. You also need the correct tools and techniques.
Must-Have Tools for Creating Frost Effects
You’ll need the right brushes and applicators for a pro finish. Fine-tip brushes are great for detailed work like snowflakes or frost patterns. Dotting tools help with small details and patterns in your nail art.
Brushes and Applicators
- Fine-tip brushes for detailed designs
- Dotting tools for small details and patterns
- Nail art sponges for gradient effects
Specialty Polishes and Topcoats
Specialty polishes, like glitter or holographic, add depth to icy designs. A good topcoat seals your design and keeps it looking great all winter.
| Product | Description | Effect |
|---|---|---|
| Holographic Polish | Contains holographic particles | 3D holographic effect |
| Glitter Topcoat | Adds glitter on top of nail art | Sparkling finish |
| Cold-resistant Topcoat | Protects nail art from chipping | Long-lasting |
Base Preparation for Long-Lasting Winter Designs
Before you start, make sure your nails are clean and ready. Apply a base coat to protect them. Then, you’re set to create your icy winter nail design.

With the right tools, techniques, and creativity, you can make beautiful icy winter nails. They’ll last all season.
Preparing Your Nails for Winter Art
To get the perfect icy winter nails, start with a good nail care routine for cold weather. Cold weather can make your nails brittle and more likely to break.
Nail Care in Cold Weather
Cold weather needs special nail care. Moisturizing is important to stop dryness and brittleness. Use a thick nail cream or oil to keep your nails and cuticles moist.
Preventing Brittleness and Breakage
- Keep your nails at a moderate length to prevent breakage.
- Use a nail strengthening base coat to fortify your nails.
- Avoid excessive exposure to cold water.
Creating the Perfect Canvas
A well-prepared nail surface is key for lasting winter nail art. Start with a clean slate by removing old nail polish and pushing back your cuticles.
Base Coat Recommendations
Choose a base coat that fits your nail type. For weak or brittle nails, a strengthening base coat is best. For a smooth application, pick a primer base coat.

By following these tips, you’ll create beautiful and lasting winter nail art. Healthy nails are the base of any great nail art. So, take the time to get them ready.
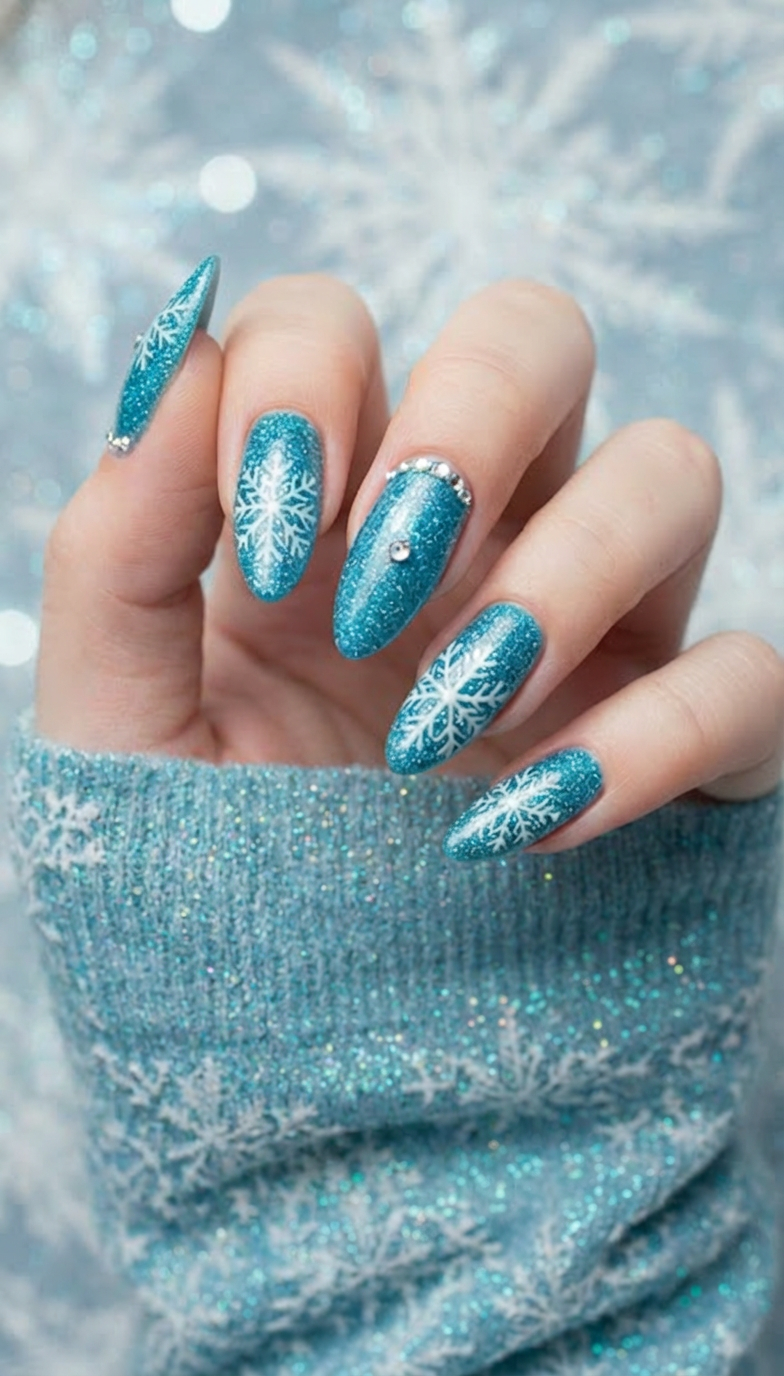
Look 1: Snowflake Elegance
Winter’s frosty beauty shines through in snowflake elegance nail art. This design is both detailed and stylish. It’s perfect for anyone, from beginners to seasoned nail artists.
Step-by-Step Tutorial
Creating snowflake designs is a fun, creative journey. Here’s how to get started:
- Start with a base coat for a smooth surface.
- Choose your snowflake method: freehand or stamping plates.
- Finish with a top coat for shine and seal.
Freehand Snowflake Techniques
Freehand snowflakes let you express your creativity. Use a fine brush and white or silver polish for detailed patterns.
Using Stamping Plates for Perfect Snowflakes
Stamping plates make uniform snowflakes easy. Apply polish, scrape off excess, and stamp onto your nail.
Color Combinations to Try
The right colors can make your snowflake nail art pop. Here are some ideas:
| Color Combination | Description |
|---|---|
| Classic White and Silver | A timeless choice that gives a frosty, elegant look. |
| Blue and White Variations | Cool blues paired with white create a winter wonderland effect. |

Try different techniques and colors to find your perfect snowflake elegance design. It’s a great way to make your icy winter nails stand out.
Look 2: Frosted French Tips
Elevate your winter nail game with frosted French tips. This modern twist on a classic manicure adds a winter wonderland touch. It’s perfect for those who want to add frost to their nail art.
Modernizing the Classic French Manicure
The classic French manicure gets a winter makeover with frosted tips. Start with a sheer base coat and apply a white or light-colored tip. Add a frosted effect using a glitter gradient technique for a modern twist.
Glitter Gradient Techniques
To create a glitter gradient, apply clear glitter polish from the tip to the cuticle. Gradually decrease the glitter amount towards the cuticle. This adds depth and dimension to your frosted French tips.

Variations for Different Nail Shapes
Frosted French tips can be adapted for various nail shapes. Whether you have almond or square nails, this look can be tailored to flatter your nail bed.
Almond vs. Square Nail Adaptations
For almond nails, elongate the frosted tip to accentuate the natural curve. On square nails, apply the tip more subtly for a clean, crisp look. Try different glitter colors to find the perfect shade for your winter nail art.
Look 3: Glittering Ice Queen
Get ready to shine this winter with the ‘Glittering Ice Queen’ nail art. It’s a mesmerizing mix of glitter and icy tones. This look adds glamour to your winter nails.
Materials Needed
To get the ‘Glittering Ice Queen’ look, you’ll need a few things. Start with a base coat to protect your nails. Then, pick a pale blue or clear polish for your base color. This will give your nails an icy look.
Best Glitters for Ice Effects
For the glitter effect, pick from various glitters for an icy look. Some top choices include:
| Glitter Type | Description | Effect |
|---|---|---|
| Silver Holographic Glitter | A fine, holographic glitter that gives a 3D effect | Icy, dimensional look |
| Clear Glitter with Icy Blue Shimmer | A clear glitter mixed with icy blue shimmer particles | Frosty, cool tone |
| Glitter Mix with Chunky Particles | A mix of fine and chunky glitter particles in silver and clear | Textured, icy effect |
Application Techniques
Now, it’s time to apply the glitter. You can go for full coverage or accent nails, depending on how much sparkle you want.
Full Coverage vs. Accent Nails
For a bold look, cover all your nails with glitter. For a subtle effect, use it on accent nails like the ring finger or thumb.
Look 4: Winter Wonderland Landscapes
Make your nails look like a winter wonderland with nail art. This design brings the calm and beauty of snow to your fingertips. It’s all about creating a magical scene on your nails.

Creating Depth and Dimension
To make your winter wonderland landscape pop, add depth and dimension. Use layering techniques to achieve this.
Layering Techniques for Scenery
Begin with a base coat of icy blue or white polish. Then, use a sponge for a gradient effect with blue shades. Lighten the color towards the tips.
Add snowflakes or trees with a fine brush and white or light gray polish.
Seasonal Color Palettes
The colors you choose greatly impact your winter wonderland nail art. You can go for a day or night scene.
Day vs. Night Winter Scenes
For a day scene, pick bright and pastel colors. This shows a sunny winter day. For a night scene, use darker shades and glitter for stars and moonlight.
Try different color combinations to find your favorite.
By using these techniques and picking the right colors, you can create a beautiful winter wonderland on your nails. It shows off your creativity and style.
Look 5: Crystal Clear Accents
Elevate your winter nail game with crystal clear accents. They add elegance to your icy winter nails. Crystal clear nail accents are versatile and sophisticated, perfect for winter.
Working with Nail Gems and Crystals
Nail gems and crystals add sparkle to your nail art. It’s key to choose the right size and shape for your design.
- Select gems that are proportional to your nail size.
- Consider the shape of your nail bed when choosing gem shapes.
Placement for Maximum Impact
The placement of your nail gems and crystals is critical. For maximum impact, place gems:
- Near the tip of your nail for a bold statement.
- Along the cuticle line for a subtle accent.

Securing for Long-Lasting Wear
To keep your crystal clear accents in place, secure them properly. This is key for winter wear.
Adhesives and Encapsulation Methods
Choosing the right adhesives and encapsulation methods is vital. They help extend the wear of your nail gems and crystals.
- Use a high-quality nail glue for a strong bond.
- Apply a top coat to encapsulate and protect your gems.
Look 6: Metallic Winter Swirls
Try metallic winter swirls for a shimmering look on your nails. This design mixes metallic elegance with swirly patterns. It’s unique and catches the eye.
Technique Breakdown
To get the metallic swirls, you need special tools and techniques. First, apply a base coat for a smooth surface.
Tools for Creating Perfect Swirls
A dotting tool or small brush is key for swirly patterns. You can also use a nail stamp for detailed designs.
Best Metallic Polishes for Winter
The right metallic polish is vital for winter nails. Here are top picks for silver, gold, and rose gold.
Silver, Gold, and Rose Gold Options
| Metallic Finish | Polish Name | Brand |
|---|---|---|
| Silver | Frosted Metal | Nail Polish Co. |
| Gold | Golden Glam | Glamour Nails |
| Rose Gold | Rosy Glow | Nail Luxe |
Try different metallic finishes for depth and interest in your nail art.

Look 7: Ombre Frost Effect
The ombre frost effect is a stunning nail art technique. It captures the essence of icy winter nails. This gradient-like effect gives your nails a frosty appearance, perfect for the cold winter months.
Blending for Perfect Gradients
Achieving a seamless ombre frost effect requires blending colors expertly. You can use either a sponge or a brush, each with its own advantages.
Sponge vs. Brush Techniques
Using a sponge gives a subtle, gradual transition between colors. It’s ideal for a soft, frosty effect. A brush, on the other hand, offers more control for precise gradient lines.
Cool-Toned Color Combinations
For an authentic icy look, focus on cool-toned colors. Shades of blue and white are perfect.
Blue to White Transitions
A gradient from blue at the cuticle to white at the tip mimics winter ice. This color combination is visually appealing and embodies the icy winter nails trend.

To summarize, the ombre frost effect is a versatile and stylish nail art technique. By mastering blending techniques and choosing the right color combinations, you can achieve a beautiful, icy winter nail look.
Look 8: Minimalist Snowfall Design
Snowfall-inspired nail art can be elegant and understated with minimalist techniques. This look is perfect for those who prefer a subtle winter beauty that doesn’t overwhelm.
Simple Techniques for Elegant Results
To achieve a minimalist snowfall design, start with a light base coat. Use a dotting tool to create small, delicate dots across the nail, mimicking snowfall.
Dotting Tool Mastery
Mastering the dotting tool is key for realistic snowfall effects. Practice varying the size and spacing of the dots for a natural look.
Negative Space Incorporation
Incorporating negative space into your nail design can enhance the minimalist aesthetic. Leave some areas of the nail bare to create a subtle, icy effect.
Balancing Simplicity with Impact
Balance is key when working with negative space. Ensure your design is not too sparse by distributing elements thoughtfully across the nail.
| Technique | Description | Effect |
|---|---|---|
| Dotting | Using a dotting tool to create small dots | Mimics snowfall |
| Negative Space | Leaving areas of the nail bare | Creates a subtle, icy effect |

Look 9: Sweater Weather Nails
Winter brings cold, but our nails can show off the season’s warmth with sweater weather nails. These designs look like knitwear, making our fingers feel cozy.
Creating Textured Cable Knit Patterns
To get the sweater weather look, focus on textured cable knit patterns. You can use:
- Specialized nail gels for 3D effects
- Nail art brushes for detailed work
- Cable knit stamping plates for precise designs
3D Gel Techniques
3D gel techniques add depth to your nails. Layer gel polish to make patterns that look like sweater cables. It takes time but looks amazing.
Cozy Color Schemes
The colors for sweater weather nails are warm and cozy. Think about:
- Soft neutrals like beige and cream
- Pastel hues for a softer look
- Rich jewel tones for a luxurious feel
Neutrals and Pastels for Winter
Neutrals and pastels are big in winter. They remind us of snow and warm sweaters. You can mix them for a look that’s both stylish and fitting for the season.

Look 10: Holographic Ice Shards
The ‘Holographic Ice Shards’ nail art is a stunning winter design. It captures the essence of icy elegance. This look is perfect for those who want to add a touch of futuristic glamour to their winter nail art.
Working with Holographic Elements
Holographic nail art can be achieved using various techniques and materials. Two popular options are holographic foils and powders.
Foils vs. Powders
Holographic foils provide a more dramatic effect, while powders offer a subtle shimmer. Choose the one that best suits your desired look.
Light-Catching Placement Tips
To maximize the holographic effect, consider the placement of your design. Here are some tips:
- Apply holographic elements to accent nails for a bold statement.
- Use a light background to make holographic colors pop.
Creating Broken Glass Effects
For a more intriguing design, try creating a broken glass effect with your holographic elements. This adds depth and visual interest to your nail art.

Look 11: Midnight Frost Designs
Elevate your winter nail game with midnight frost designs. They feature dark bases and frosty accents. This look is perfect for adding drama to your winter nails.
Dark Backgrounds with Icy Accents
Midnight frost designs start with a dark background. Navy, black, and deep purple bases are popular for a dramatic effect.
Navy, Black, and Deep Purple Bases
These dark shades contrast beautifully with icy accents. Here’s how different dark bases change your midnight frost design:
| Base Color | Icy Accent Effect | Overall Look |
|---|---|---|
| Navy Blue | Silver frost | Sophisticated and elegant |
| Black | White ice crystals | Dramatic and edgy |
| Deep Purple | Glittering ice | Luxurious and rich |
Creating Contrast in Winter Nail Art
Contrast is key to making your midnight frost design stand out. Playing with different finishes is one way to achieve this.
Matte vs. Glossy Finishes
Matte and glossy finishes add depth to your nail art. For example, a matte black base with glossy icy accents creates a striking contrast.

Experimenting with different combinations will help you find the perfect midnight frost design for your winter nail art.
Look 12: Geometric Ice Crystals
This season, make your icy winter nails stand out with geometric ice crystals. This design mixes frosty patterns with modern shapes. It’s a unique look that’s perfect for winter.
Precision Techniques
To get the geometric ice crystals look, you need precision and the right tools. You’ll need striping tape, various shades of blue and white nail polish, and a top coat.
Using Striping Tape for Clean Lines
Striping tape is key for sharp lines in geometric patterns. Place the tape on your nail, paint over it, and then remove it. This reveals crisp, precise lines.
Modern Winter Color Combinations
Color choices for geometric ice crystals are endless. You can go for a single color with different shades or mix contrasting colors for a bold look.
Monochromatic vs. Contrasting Schemes
A single color can look sophisticated and cohesive. But contrasting colors add interest and make your nails pop. Try icy blues with crisp whites or metallic silvers for a winter vibe.
By using precision and modern colors, you can create a geometric ice crystals design. It’s stylish and perfect for winter.
Look 13: Pearlescent Snow Drifts
The pearlescent snow drifts design is a stunning icy winter nail look. It captures the soft, ethereal quality of snow gently falling around you.
Working with Pearl Finishes
Pearl finishes give your nail art a lustrous, shimmering effect. This effect mimics the sheen of freshly fallen snow. You’ll need a pearl finish polish in a shade that complements the icy winter theme.
Building Dimensional Texture
To create a dimensional texture, layer the pearl finish polish over a base coat. Let each layer dry before adding the next. This technique builds up the color and gives the nails a deep, rich appearance.
Creating Realistic Snow Effects
To make your snow drifts look realistic, use a combination of white polishes in different shades and textures. Start with a base color, then add layers of lighter shades to create depth.
Layering White Polishes
Layering different white polishes is key to creating a realistic snow effect. Begin with a creamy white base, then add layers of cooler, bluer whites on top. This gives the illusion of depth and dimension.
| Layer | Polish Color | Effect |
|---|---|---|
| Base | Creamy White | Foundation for snow effect |
| Second | Cool White | Adds depth |
| Top | Blue-White | Gives icy sheen |
By following these steps and using the right materials, you can achieve a beautiful pearlescent snow drifts look. It’s perfect for the winter season.
Look 14: Aurora Borealis Inspired Nails
Nail art lovers can now bring the magic of the Aurora Borealis to their nails. This phenomenon, with its vibrant colors dancing in the sky, can be captured on your nails. The right techniques and colors are all you need.
Capturing Northern Lights on Nails
To get the Aurora Borealis look, start with a night sky base color. Deep blues and purples work best. Then, use a sponge to add shades of green, pink, and purple. Blend them slightly for a gradient effect.
Color Blending Techniques
Blending colors is key for a realistic Aurora Borealis look. Use a wet sponge to blend colors from the center outwards. This creates a smooth transition between colors.
Color Shifting Techniques
To make your nails even more special, try color shifting techniques. Chrome powders and specialty topcoats can help achieve this.
Chrome Powders and Specialty Topcoats
Apply chrome powder or a specialty topcoat for a reflective, holographic finish. This not only enhances the color shifting but also adds depth and interest.
| Technique | Description | Effect |
|---|---|---|
| Color Blending | Using a wet sponge to merge colors | Gradient effect |
| Color Shifting | Applying chrome powders or specialty topcoats | Holographic finish |
Look 15: Glassy Ice Cube Effect
For a mesmerizing winter nail look, try the glassy ice cube effect. It adds elegance to your icy winter nails. This technique creates a transparent, glossy finish that looks like ice.
Creating Transparent Depth
To get the glassy ice cube effect, you need transparent depth on your nails. Start with a clear gel polish base.
Glossy Finishing Techniques
After getting the right transparency, add a glossy finish. This makes your nails look sophisticated and glassy.
High-Shine Topcoats
Use a high-shine topcoat to seal your design and add gloss. Choose topcoats made for high-gloss finishes. Some also extend your nail polish wear.
By mixing transparent depth with glossy finishes, you get a stunning glassy ice cube effect. This look is great for adding winter elegance to your nails.
Conclusion: Showcasing Your Icy Winter Nail Art
With these 15 chic nail art looks, you’re ready to shine this winter. From Snowflake Elegance to the Glassy Ice Cube Effect, each design offers a unique way to showcase your icy winter nail art. Whether you’re heading to a holiday party or just want to add some frosty flair to your daily look, these icy designs are sure to impress.
Now it’s your turn to get creative. Try out these looks, experiment with different colors and techniques, and don’t be afraid to put your own spin on these icy designs. Share your winter nail art creations on social media using relevant hashtags, and get ready for the compliments to roll in. Showcasing your icy winter nail art is a great way to inspire others and stay on top of the latest nail trends.
As you master the art of icy winter nails, you’ll find that the possibilities are endless. So go ahead, get creative, and make this winter one to remember with your stunning nail art.
FAQ
What are icy winter nails?
Icy winter nails are a nail art style. They use cool colors and frosty effects. They’re inspired by winter and ice.
How do I create icy effects on my nails?
Use special polishes, topcoats, and glitters for icy nails. Layering and blending can help. Chrome powders also work well.
What are the best nail polishes for icy winter nails?
Choose polishes in cool shades like blues, silvers, and whites. OPI, Essie, and Sally Hansen have great options.
Can I do icy winter nail art at home?
Yes, you can do icy nail art at home. Just use the right tools and practice. It might take a few tries to get it right.
How do I make my icy winter nail design last longer?
Use a good base coat and apply thin polish coats. Finish with a topcoat. Avoid using your nails as tools and wear gloves for chores.
What are some popular icy winter nail designs?
Popular designs include snowflakes, frosted French tips, and glittering ice queen looks. Winter wonderland landscapes and minimalist snowfall designs are also favorites. Try sweater weather nails and holographic ice shards too.
How do I care for my nails during the winter season?
Keep your nails moisturized and avoid cold weather. Wear gloves outside. Use a nail strengthening base coat to prevent brittleness and breakage.