
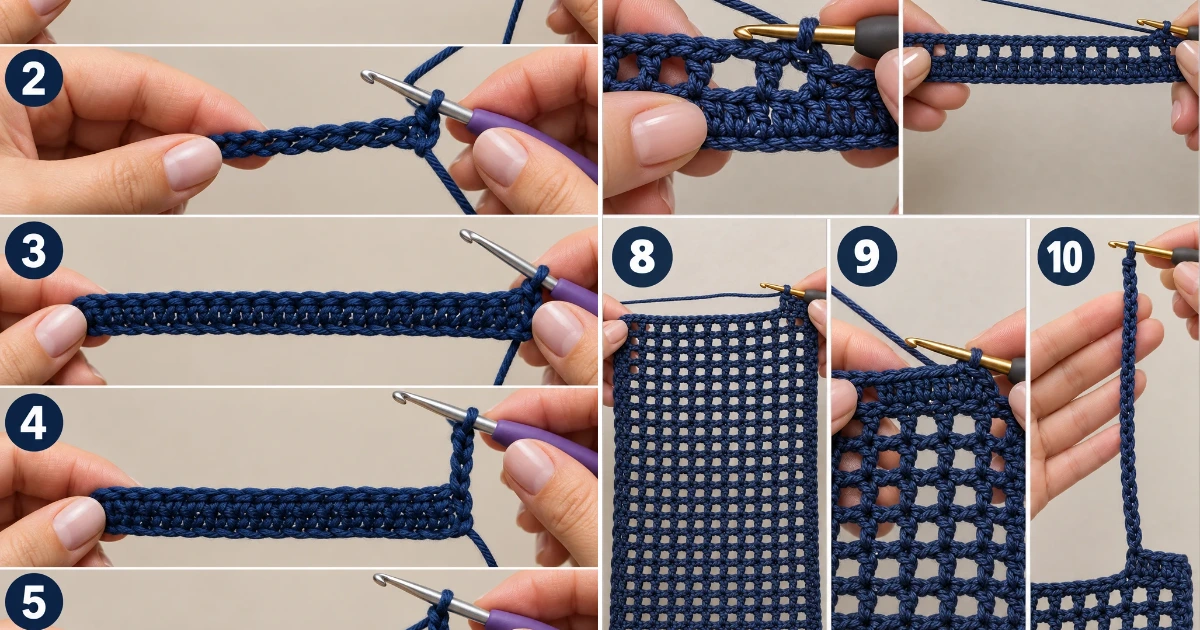
Easy Crochet Mesh Tote That Feels Effortlessly Chic
Crochet Bag Patterns can be wonderfully simple, and this beginner-friendly mesh tote is one of my favorite examples. I’m so excited to share a written version of this easy net shoulder bag, inspired by the construction and beginner-friendly flow of the Lilthings mesh tote tutorial. I kept the open, airy mesh, simple shoulder straps, and practical market-bag shape, but worked this written version entirely in navy blue. Grab your hook, your milk cotton yarn, and a cozy spot to crochet—this is such a satisfying project!
A Breezy Mesh Tote for Everyday Errands — Crochet
Materials Needed
- Milk cotton yarn, 50g balls — 2 balls, approximately 100g total
- Crochet hook: 3.5 mm
- Yarn needle for weaving in ends
- Small scissors
- 4 stitch markers — optional but helpful
- Measuring tape
- Gauge (Approximate): 10 mesh spaces × 10 mesh rows measure approximately 10 × 10 cm (4 × 4 in) when worked without stretching
- Quantity: 2 × 50g balls of yarn for one standard-size tote, approximately 30 cm wide × 34 cm tall before the handles are stretched
- Color: navy blue
The open structure means the finished size can vary slightly with tension, so don’t worry if your measurements are a little different from mine.
Abbreviations / Terms Used
- ch — chain
- sc — single crochet
- sl st — slip stitch
- st/sts — stitch/stitches
- sp — space
- sk — skip
- rep — repeat
- rnd — round
- yo — yarn over
- ch-sp — chain space
- turning chain — chain made at the beginning of a row to bring the yarn to the required working height
- mesh space — an open area created by chaining and skipping stitches
What You Should Keep in Mind — Crochet
- Keep your tension relaxed rather than tight. A tight grip makes the mesh smaller and can make the bag feel stiff.
- Count your stitches at the end of the solid base carefully. Once the mesh begins, counting the open spaces is often easier than counting every stitch.
- Because milk cotton can have a smooth feel, avoid pulling the working loop excessively tight after each stitch.
- If you’re following the accompanying Crochet Bag Patterns YouTube tutorial, pause after each completed section and compare the overall shape rather than trying to make every loop look identical.
Free Pattern: Crochet Bag Patterns
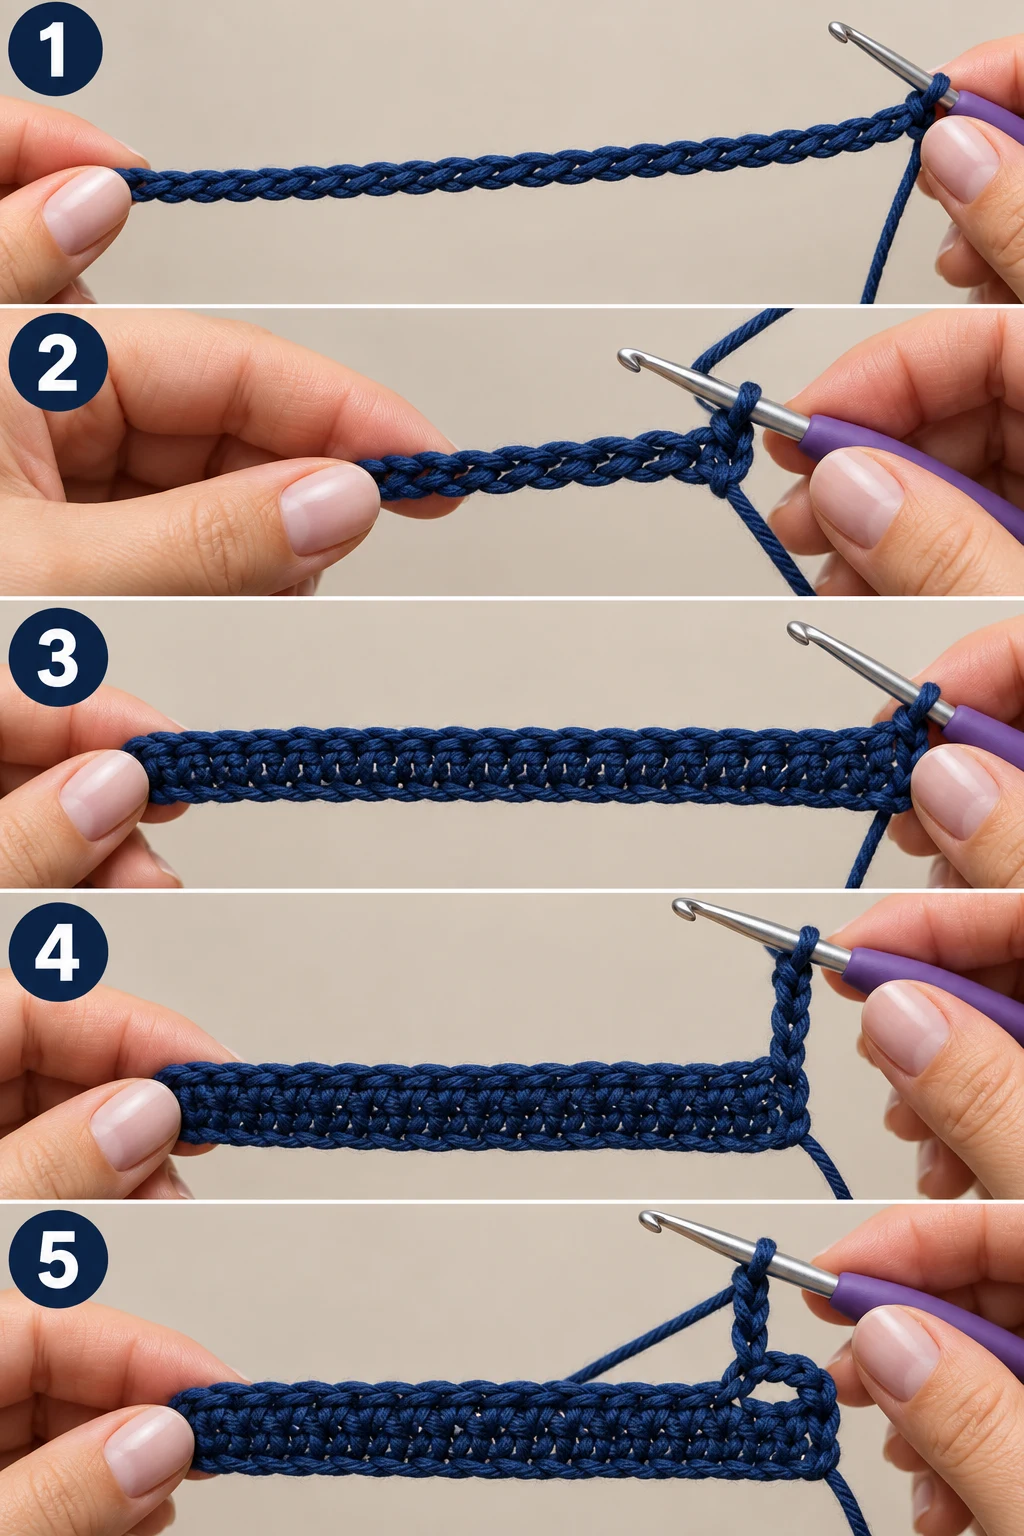
1. Make the Foundation Chain
Action: Make a foundation chain of 31 ch using navy blue yarn.
Detailed instructions: Make a slip knot and place it on your 3.5 mm hook without tightening it excessively. Yarn over and pull through the loop to make the first chain. Continue making chains until you have exactly 31 chain stitches. Keep the chains loose enough that your hook can enter them easily in the next step.
Expected result: You should have one straight foundation chain containing exactly 31 visible chain links.
Check yourself: Count from the hook backward and confirm there are 31 chains, including the loop currently on your hook only if your chosen counting method includes the active loop; otherwise count the completed chain links and make one additional chain if needed.
2. Work the First Single Crochet
Action: Work 1 sc into the second chain from the hook.
Detailed instructions: Insert the hook under the top two loops of the second chain from the hook. Yarn over with navy blue yarn and pull up a loop, giving you two loops on the hook. Yarn over again and pull through both loops to complete the single crochet.
Expected result: One single crochet sits at the beginning of the foundation chain.
Check yourself: You should have 1 completed sc and one active loop on your hook.
3. Complete the Straight Base
Action: Work 1 sc into each remaining chain across.
Detailed instructions: Insert the hook into the next chain, yarn over, pull up a loop, yarn over again, and pull through both loops. Repeat this same single crochet action across the remaining 29 chains, ending with 30 sc total across the foundation.
Expected result: You have a straight strip containing 30 single crochet stitches.
Check yourself: Count the top edge and confirm you have 30 sc.
4. Turn and Begin the Mesh
Action: Turn the work and make 3 ch.
Detailed instructions: Rotate the crochet strip so you can work back across the top of the base. Yarn over and pull through the active loop three times to create a three-chain turning section. Do not insert the hook into the fabric yet.
Expected result: A short vertical chain of 3 rises from the edge of the solid base.
Check yourself: You should see 3 chain stitches above the first base row.
5. Create the First Mesh Space
Action: Make 1 ch and skip the next single crochet.
Detailed instructions: Yarn over and pull through the active loop once to make 1 chain. Then skip the next sc of the solid base without working into it.
Expected result: A small open gap appears between the turning chain and the next available stitch.
Check yourself: You should have one clearly visible chain-1 gap before your next insertion point.
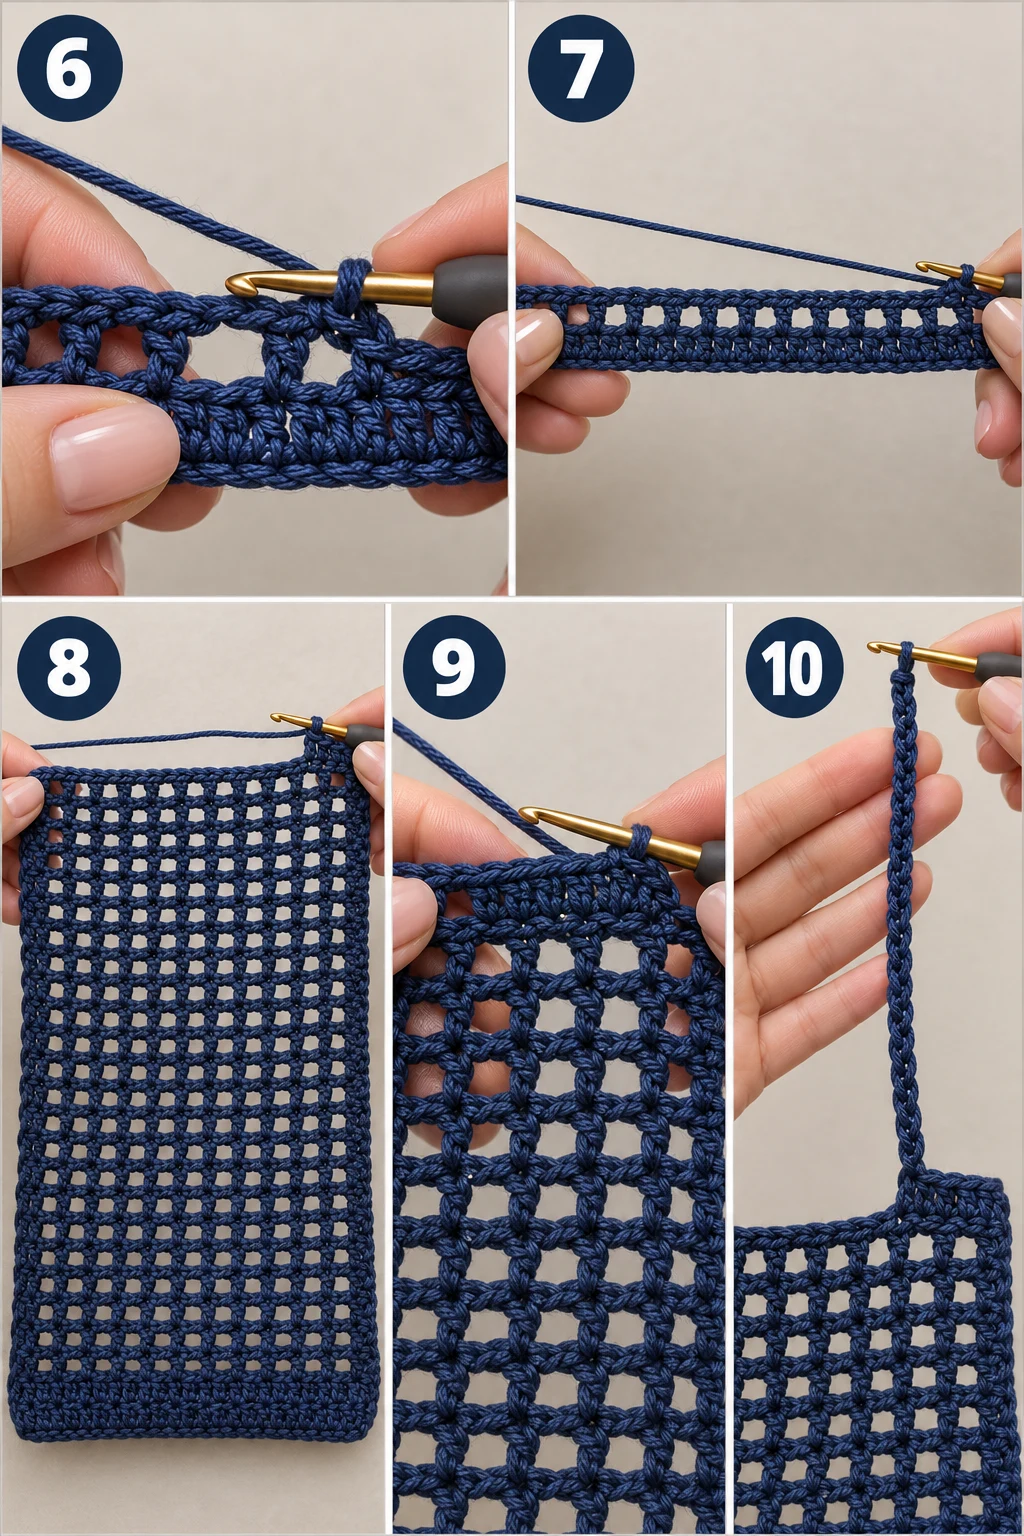
6. Anchor the First Mesh
Action: Work 1 sc into the following base stitch.
Detailed instructions: Insert the hook through the top of the next sc after the skipped stitch. Yarn over and pull up a loop so two loops sit on the hook. Yarn over again and pull through both loops to complete the sc.
Expected result: The first mesh opening is anchored by a single crochet.
Check yourself: You should now see 1 open mesh space between two solid anchor points.
7. Repeat the Mesh Across the Base
Action: Repeat ch 1, skip 1 sc, 1 sc in the next sc across the row.
Detailed instructions: Continue the same mesh sequence across the base: make 1 chain, skip the next sc, then work 1 sc into the following sc. Repeat until you reach the end. You will have 15 mesh spaces and 15 sc anchors across the row, with the turning chain functioning as the first edge opening.
Expected result: The first open mesh row stretches evenly across the solid base.
Check yourself: You should be able to count 15 open mesh spaces across the row.
8. Continue Mesh Rows 2 Through 18
Action: Repeat the established ch-1, skip-1, sc mesh pattern for rows 2 through 18.
Detailed instructions: At the beginning of each row, make 3 turning chains. Work 1 sc into each previous-row sc anchor while making 1 chain over each previous-row mesh space. Continue until you have completed rows 2–18. Each completed mesh row contains 15 mesh spaces and 15 sc anchors.
Expected result: The tote body grows into a flexible rectangular mesh panel approximately 19–20 cm tall.
Check yourself: Count upward from the solid base and confirm 18 mesh rows have been completed.
9. Begin the Handle Shaping
Action: Work 4 sc across the next four anchor stitches.
Detailed instructions: Make the turning chain, then work 1 sc into each of the first four sc anchors of the previous mesh row. Do not create a chain space between these four stitches; this begins the denser shoulder section.
Expected result: A short solid section appears at one side of the bag’s top edge.
Check yourself: You should have exactly 4 consecutive sc with no mesh opening between them.
10. Create the First Shoulder Strap
Action: Chain 24 stitches to form the first shoulder strap.
Detailed instructions: After the fourth solid sc, make 24 loose but even chain stitches. Keep the chains approximately the same tension as the body mesh so the strap does not become noticeably tighter or wider than the rest of the project.
Expected result: A long navy blue chain arches away from the top edge, forming the foundation of the first shoulder strap.
Check yourself: Count the strap and confirm it contains exactly 24 chains.
11. Anchor the First Strap
Action: Work 1 sc into the fifth top anchor stitch.
Detailed instructions: Bring the 24-chain strap down to the top edge and insert the hook into the fifth sc anchor of the previous mesh row. Yarn over, pull up a loop, yarn over again, and pull through both loops to secure the strap to the bag.
Expected result: The first strap forms a loop between its two attachment points.
Check yourself: Gently lift the strap; it should be securely connected to the top edge at both ends.
12. Rebuild the Mesh After the Strap
Action: Work 1 sc into each of the next six mesh anchors, using the established mesh rhythm between them.
Detailed instructions: From the first strap attachment, continue across the top: work a sc into each anchor while maintaining the chain-1 opening over each skipped stitch. This produces the open section between the first strap and the center top area.
Expected result: The mesh resumes neatly after the first strap.
Check yourself: You should see 6 mesh openings leading away from the first strap.
13. Form the Second Strap
Action: Chain 24 stitches for the second shoulder strap.
Detailed instructions: From the end of the mesh section, make 24 chain stitches using the same relaxed tension as the first strap.
Expected result: A second matching chain extends from the top edge.
Check yourself: Both strap foundations should now measure approximately the same length.
14. Secure the Second Strap
Action: Work 1 sc into the next top anchor stitch to secure the second strap.
Detailed instructions: Bring the free end of the 24-chain strap down to the next available top anchor. Insert the hook through that stitch, yarn over, pull up a loop, yarn over again, and pull through both loops.
Expected result: Both shoulder straps are now connected to the top edge.
Check yourself: Lift the bag gently and verify that both straps are attached securely at their ends.
15. Complete the Top Edge
Action: Work 1 sc into each remaining top anchor to finish the upper edge.
Detailed instructions: Continue with single crochet along the remaining top edge, working evenly around the strap attachment points. Do not add extra mesh spaces here; the goal is to create a clean, slightly firmer upper rim.
Expected result: The top opening has a neat reinforced edge surrounding both straps.
Check yourself: The top edge should lie flat without large gaps or puckering.
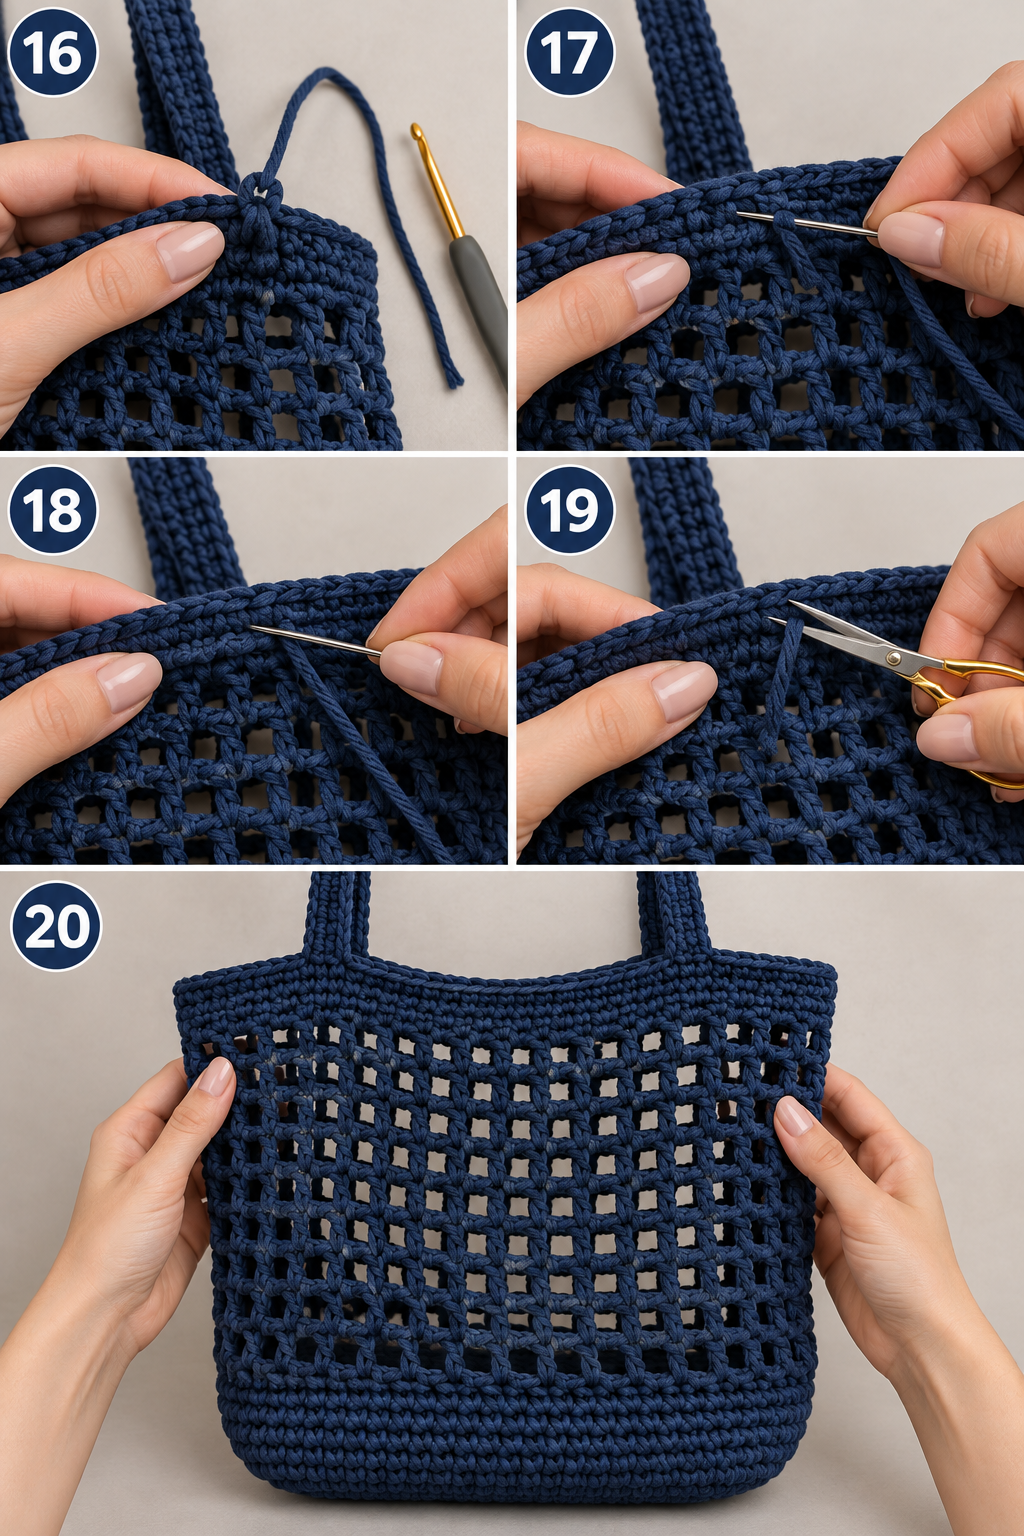
16. Fasten Off the Crochet
Action: Cut the working yarn and pull the tail completely through the final loop.
Detailed instructions: Leave a yarn tail approximately 15 cm (6 in) long. Cut the yarn with scissors, then pull the cut end through the active loop until the loop tightens into a secure finishing knot.
Expected result: The crochet work is completely detached from the hook with a secure finishing tail.
Check yourself: Gently tug the yarn tail; the final stitch should remain closed.
17. Weave In the First Tail
Action: Weave the first loose yarn tail through the nearby stitches with the yarn needle.
Detailed instructions: Thread the navy blue tail onto the yarn needle. On the inside of the bag, weave the needle under several adjacent stitch bars for approximately 3–4 cm, changing direction once so the tail is held securely without showing on the outside.
Expected result: The first yarn tail disappears neatly into the crochet fabric.
Check yourself: You should not be able to pull the tail loose with a gentle tug.
18. Weave In the Remaining Tail
Action: Weave in the remaining yarn tail using the same inside-of-the-bag method.
Detailed instructions: Thread the second navy blue tail onto the yarn needle and weave it through 3–4 cm of nearby stitches on the inside of the bag. Change direction once before pulling the tail snugly into the fabric.
Expected result: Both yarn tails are secured and hidden inside the crochet fabric.
Check yourself: Turn the bag inside out and confirm there are no loose tails hanging freely.
19. Trim the Secured Ends
Action: Trim the excess woven-in yarn tails close to the fabric.
Detailed instructions: Using sharp scissors, trim only the excess portion of each secured navy blue tail. Leave the woven section untouched so the ends remain anchored inside the stitches.
Expected result: The inside of the bag looks neat, with no long loose yarn tails.
Check yourself: Run your fingers lightly over the inside and confirm no unsecured ends remain.
20. Gently Shape the Finished Tote
Action: Gently stretch the mesh by hand to even out the openings and shape the tote.
Detailed instructions: Place both hands inside the finished navy blue bag and gently pull the side walls outward and downward. Do not stretch aggressively; simply encourage the mesh squares to settle into an even grid and allow the straps to relax into their natural shoulder-bag shape.
Expected result: The tote has an even open mesh texture, a practical rectangular body, and two comfortable shoulder straps.
Check yourself: Set the bag flat and confirm the mesh openings look consistent from the base to the top edge.
Quick Reference
This quick chart is the part of these Crochet Bag Patterns I would bookmark if I were crocheting along for the first time.
| Section | Stitch Count | Mesh Spaces | Notes |
|---|---|---|---|
| Foundation chain | 31 ch | — | Starting chain |
| Solid base | 30 sc | — | First structural row |
| Mesh Row 1 | 15 sc + 15 spaces | 15 | ch-1 mesh |
| Mesh Rows 2–18 | 15 sc + 15 spaces each | 15 per row | Repeat same mesh |
| First shoulder strap | 24 ch | — | Strap foundation |
| Second shoulder strap | 24 ch | — | Match first strap |
| Top edge | Even sc | — | Reinforced finish |
| Finished bag | — | — | Approx. 30 × 34 cm |
📺 Watch the Video Tutorial
Final Thoughts
And there you have it—your own airy Crochet Bag Patterns project, finished in navy blue and ready for market trips, summer errands, or simply carrying your everyday essentials. I love how much personality this simple mesh construction gets from the open spaces and long shoulder straps. If your stitches aren’t perfectly identical, don’t stress; the fabric is wonderfully forgiving. For the prettiest finish, lightly steam-block the bag from a distance without pressing the iron directly onto the milk cotton, then let it cool completely in its natural shape. I hope you loved making it as much as I did!
Tips for a Better Experience
- Keep the mesh loose: If your openings look tiny, loosen your tension rather than automatically changing hook sizes. The airy structure is what gives these Crochet Bag Patterns their signature look.
- Match the straps: Lay the first 24-chain strap beside your second strap before securing it. Matching their lengths makes the finished tote sit much more evenly.
- Make a smaller version: For another size of these Crochet Bag Patterns, shorten the initial chain by a multiple of 2 and reduce the number of mesh rows.
- Use the bag gently: The open mesh expands under weight, so avoid filling it with extremely heavy objects. For groceries, distribute the weight rather than putting everything in one concentrated area.
FAQ
What makes these Crochet Bag Patterns beginner-friendly?
The design uses a simple solid single-crochet base followed by a repetitive chain-and-single-crochet mesh, so beginners only need to manage a few basic stitches.
How much yarn do Crochet Bag Patterns like this use?
This version uses approximately 100g of milk cotton yarn, or two 50g balls, in navy blue. Actual consumption can vary slightly depending on tension.
Why are mesh Crochet Bag Patterns useful for everyday bags?
The open construction keeps the tote lightweight and flexible while allowing it to expand slightly when carrying soft items, making this style useful as a market or shoulder bag.
📚 You Might Also Like
- Crochet dice bag pattern free: 11 Beautiful DIY Ideas
If you are searching for a crochet dice bag pattern free, you have landed in the exact right corner…
- 15 Summer Bag Crochet Ideas for a Fresh Handmade Look
Summer bag crochet projects are handmade bags designed for warm-weather use, typically using lightwe…
- 13t shirt yarn crochet bag pattern free Pattern Free Ideas You’ll
T shirt yarn crochet bag pattern free projects turn old cotton tees into sturdy, washable bags with…
- Crochet storage bag: 20 Stunning DIY Ideas for 2026
20 Crochet Storage Bag Ideas for a Prettier, More Organized Home A crochet storage bag is a simple h…
- Crochet Star Bag Pattern: 15 Easy DIY Ideas for 2026
If you have been searching for a stunning, celestial accessory to elevate your handmade wardrobe, lo…
🛍️ Shop the Look — Crochet Bag Patterns
Our handpicked Amazon picks curated specifically for Crochet Bag Patterns:
As an Amazon Associate I earn from qualifying purchases.
✨ For more inspiration, check out The Spruce Crafts and Martha Stewart Crafts — our go-to sources for the latest trends.