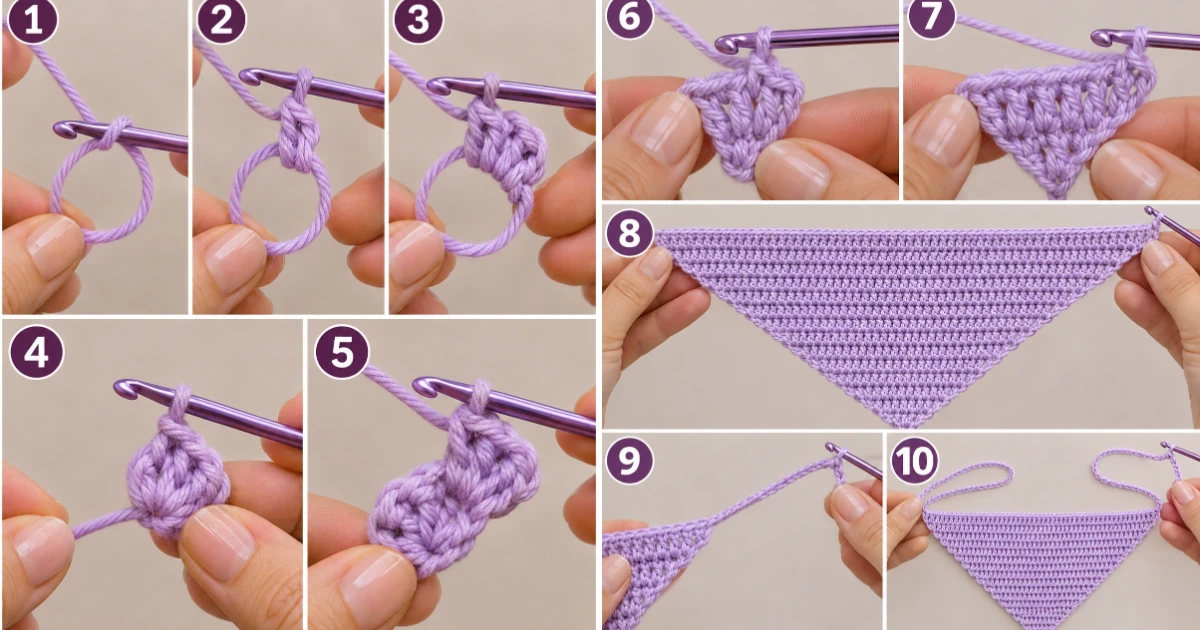
Modern Crochet Bandana Pattern With a Pretty Triangle Shape
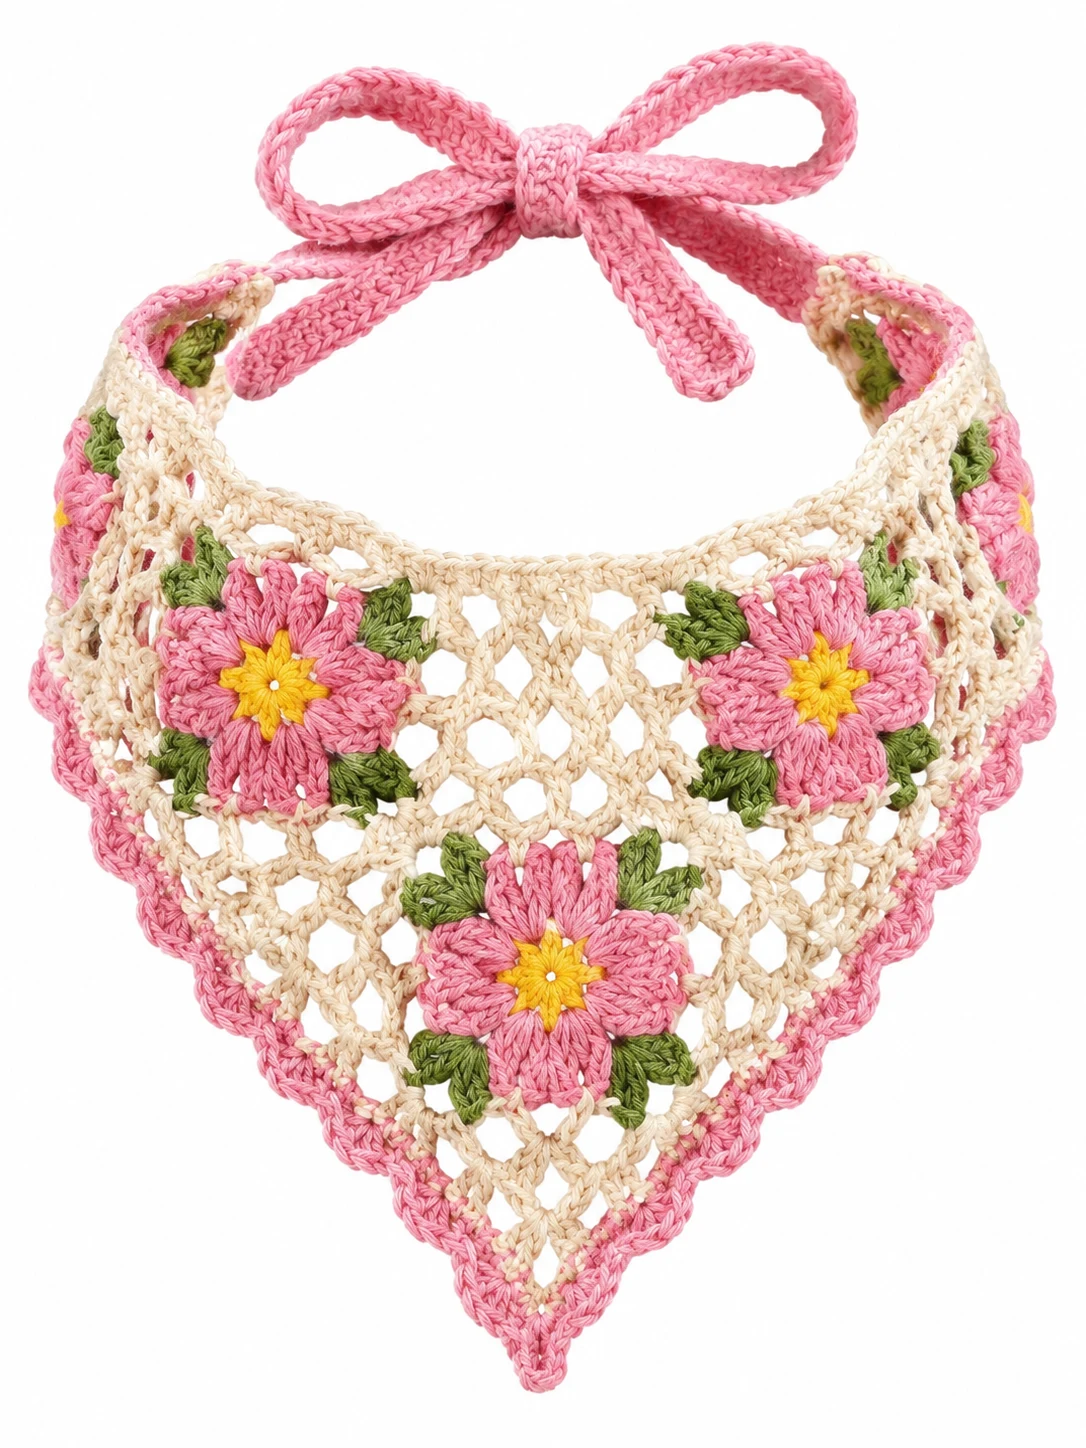
If you’ve been wondering how to crochet bandana styles that look cute, feel comfortable, and are genuinely easy to make, you’re going to love this little project! I’m so excited to share my free crochet bandana pattern with you. This design features a simple triangular shape, beautiful double crochet stitches, and delicate ties that make it easy to wear in different ways. I’ve chosen a gorgeous soft lavender yarn for a fresh, feminine finish. Whether you’re a beginner or an experienced crocheter, this is a fun project you can finish in an afternoon!
A Sweet Little Crochet Accessory You’ll Love Wearing — how
This crochet bandana is lightweight, customizable, and perfect for adding a handmade touch to everyday outfits.
Materials Needed
- Yarn: Approximately 100 g (180–200 yards) of worsted-weight cotton yarn in soft lavender.
- Crochet hook: 5 mm (H/8) crochet hook.
- Scissors: Sharp yarn scissors for trimming the working yarn.
- Tapestry needle: One blunt-ended yarn needle for weaving in ends.
- Stitch markers: Two removable stitch markers to identify the first and last stitches of a row.
- Measuring tape: For checking the finished dimensions.
- Gauge (Approximate): 10 double crochet stitches × 4 rows = 4 × 4 inches in the pattern stitch, worked with the 5 mm hook.
- Quantity: One triangular bandana consisting of 25 rows, approximately 51 stitches across the final row, plus two crochet ties.
- Color: soft lavender throughout the entire project.
Abbreviations / Terms Used
This pattern uses US crochet terminology.
- ch: Chain stitch.
- dc: Double crochet.
- sl st: Slip stitch.
- st/sts: Stitch/stitches.
- RS: Right side of the project.
- WS: Wrong side of the project.
- sp: Space.
- rep: Repeat.
- YO: Yarn over.
- FO: Fasten off.
- Working loop: The active loop currently sitting on your crochet hook.
- Turning chain: A chain made at the beginning of a row to bring the hook to the correct working height. It does not count as a stitch in this pattern.
What You Should Keep in Mind — how
- Check your tension: Keep your stitches relaxed and consistent. Tight double crochet stitches can make your bandana stiff and affect its final measurements.
- Count your stitches: The first and last stitches of each row are important because they create the triangular increases.
- Use the right hook: Start with a 5 mm hook and adjust if your fabric feels too tight or too loose. Always check your gauge before continuing.
- Keep your edges straight: Work two double crochet stitches into the first and last stitch of every row after the foundation. This creates the gradual triangular shape.
Free Pattern: how to crochet bandana
Here’s my complete beginner-friendly pattern! We’ll start with a small foundation and gradually increase the width until we have a beautiful triangular bandana. Follow each step in order, and remember that stitch counts are included to help you check your progress.
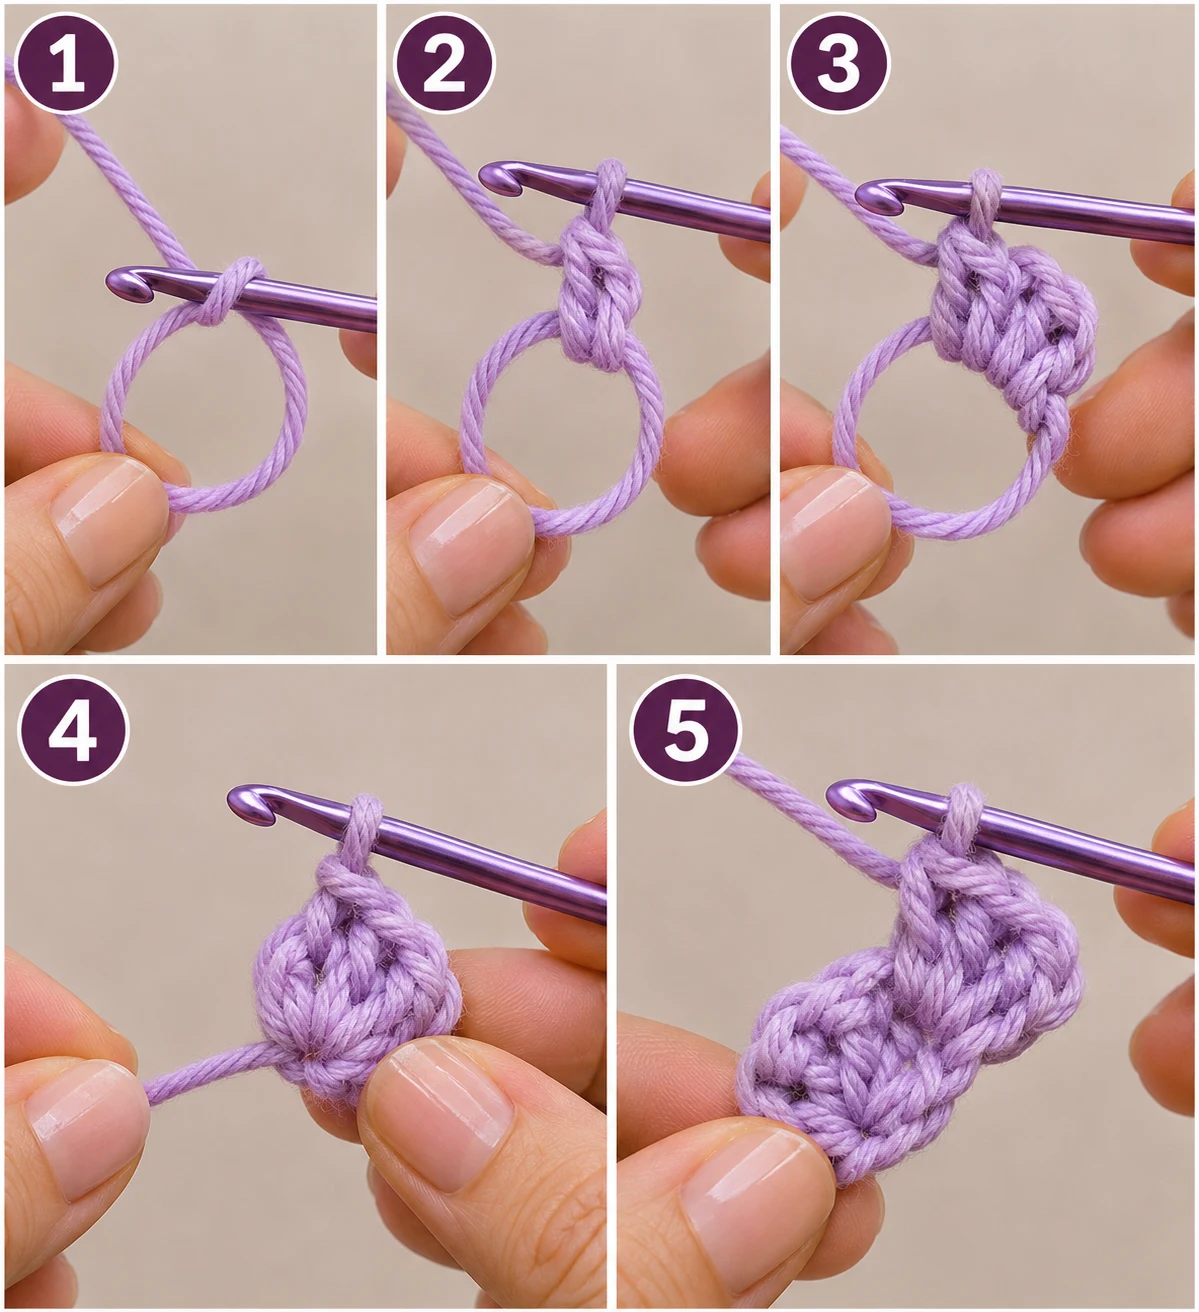
1. Create the Foundation Ring
Action: Make a magic ring to create the center foundation of your bandana.
Detailed instructions: Hold the yarn in your left hand and wrap it twice around two fingers to form a loose circle. Cross the working yarn over the yarn tail. Insert your 5 mm crochet hook underneath the first strand, catch the working yarn, and pull a loop through the ring. Yarn over and pull through the loop on your hook to secure the adjustable ring. Keep the ring loose enough to accommodate three double crochet stitches.
Expected result: You should have one adjustable magic ring with one active loop on your hook.
Check yourself: The ring should open and close when you gently pull the yarn tail.
2. Work the First Double Crochet Stitch
Action: Work the first double crochet into the magic ring.
Detailed instructions: Yarn over once, insert your hook through the center of the magic ring, and catch the working yarn. Pull up a loop so that you have three loops on your hook. Yarn over and pull through the first two loops. You should now have two loops remaining. Yarn over again and pull through both remaining loops. This completes your first double crochet stitch.
Expected result: One complete double crochet should sit inside the adjustable ring.
Check yourself: Look for the recognizable vertical post of one completed double crochet and one active loop on your hook.
3. Complete the Foundation Row
Action: Work two additional double crochet stitches into the same magic ring.
Detailed instructions: Yarn over once and insert the hook through the center of the magic ring again. Pull up a loop, yarn over and pull through two loops, then yarn over and pull through the remaining two loops. Repeat this exact double crochet process once more in the same ring. You should now have three double crochet stitches in total. Keep the ring adjustable for the next step.
Expected result: Three double crochet stitches should form a small curved foundation cluster inside the magic ring.
Check yourself: Count three distinct vertical stitch posts. Your active loop should remain on the hook.
4. Close the Magic Ring
Action: Pull the yarn tail to tighten the center of the foundation.
Detailed instructions: Hold the three completed double crochet stitches gently between your fingers. Locate the yarn tail coming from the adjustable ring. Pull it slowly and steadily until the center opening closes. Keep the stitches facing upward and avoid pulling so tightly that the fabric puckers. The three double crochet stitches should remain clearly visible.
Expected result: A compact three-stitch foundation with a closed center.
Check yourself: There should be no large opening in the middle of the three-stitch cluster.
5. Begin Row 2 With an Increase
Action: Chain one and work two double crochet stitches into the first stitch of the foundation row.
Detailed instructions: Turn the small foundation so you can work back across the row. Chain one without counting it as a stitch. Yarn over and insert your hook underneath both top loops of the first double crochet from the previous row. Pull up a loop, yarn over and pull through two loops, then yarn over and pull through the remaining two loops. Work a second double crochet into that same first stitch using the same method. This creates the first increase. You now have two stitches in the first stitch of the previous row.
Expected result: The beginning of Row 2 has two double crochet stitches emerging from the same foundation stitch.
Check yourself: Both new stitch posts should share the same insertion point.
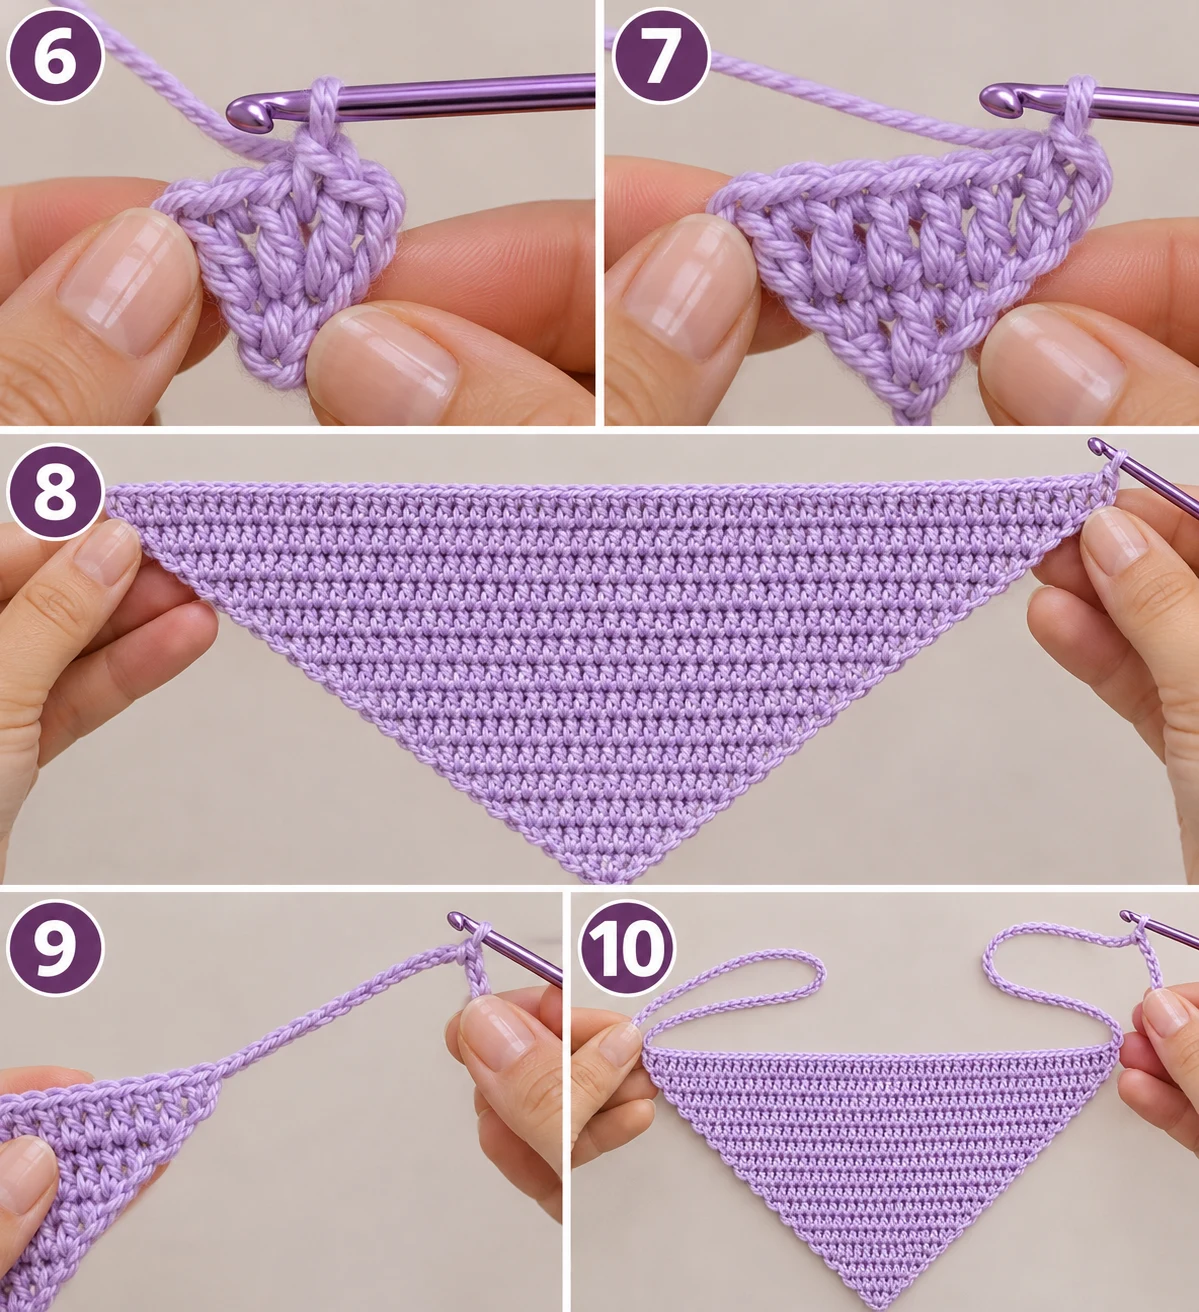
6. Work the Middle Stitch of Row 2
Action: Work one double crochet into the middle stitch of the previous row.
Detailed instructions: Yarn over once and locate the second original double crochet stitch from Row 1. Insert your hook underneath both top loops of that stitch. Catch the working yarn and pull up a loop. Yarn over and pull through two loops, then yarn over and pull through the final two loops. You should now have one double crochet in the middle position.
Expected result: Row 2 now contains three double crochet stitches: two at the beginning and one in the middle.
Check yourself: The middle stitch should be worked into its own original stitch, not into the increase’s shared insertion point.
7. Complete the Row 2 Increase
Action: Work two double crochet stitches into the final original stitch of Row 1.
Detailed instructions: Locate the third and final original double crochet stitch from the foundation row. Yarn over once, insert the hook underneath both top loops, pull up a loop, and complete one double crochet. Without moving to another stitch, yarn over again and work a second double crochet into that same final original stitch. You should now have five double crochet stitches across Row 2. The stitch count is two at the beginning, one in the middle, and two at the end.
Expected result: Row 2 forms a small, symmetrical triangle with five double crochet stitches.
Check yourself: Count five stitch tops along the working edge. The first two and final two stitches should form the increases.
8. Continue the Triangle Through Rows 3–25
Action: Repeat the two-edge-increase double crochet pattern until you complete Row 25.
Detailed instructions: Turn your work and chain one. This turning chain does not count as a stitch. Work two double crochet stitches into the first stitch of the previous row. Work one double crochet into each remaining stitch across the row until you reach the final stitch. Work two double crochet stitches into that final stitch.
Repeat this same construction for every row from Row 3 through Row 25.
Each row increases the total stitch count by two:
Always place the two increases at the very beginning and end of each row. Work one double crochet into every stitch between them. Do not accidentally skip the first stitch after turning.
Expected result: A gradually widening triangular piece with smooth edges and 51 double crochet stitches across Row 25.
Check yourself: Every new row should contain exactly two more stitches than the previous row. Your final row should contain 51 stitches.
9. Make the First Side Tie
Action: Crochet the first chain tie from one upper corner of the bandana.
Detailed instructions: After completing Row 25, do not fasten off. Keep the active loop on your hook. Chain 1 to secure the corner, then chain 45 additional stitches to create the first tie. To make each chain, yarn over and pull through the active loop. Keep your chains even, with a relaxed tension so the tie bends comfortably without curling. You should have 46 chain stitches in total, including the initial securing chain.
Expected result: One long, flexible chain tie extends from the first upper corner of the triangular bandana.
Check yourself: Count 46 chain stitches and make sure the tie lies naturally without twisting.
10. Make the Second Side Tie
Action: Crochet a matching 46-chain tie from the opposite upper corner.
Detailed instructions: Fasten off the first tie by cutting the yarn and pulling the cut end through the active loop. Reattach the same yarn at the opposite upper corner of the bandana with a slip knot. Insert your hook into the corner stitch, pull the slip-knot loop through, and secure it with a slip stitch. Chain 46 stitches using the same relaxed tension as the first tie. This creates a matching pair of ties.
Expected result: The triangular bandana now has two matching chain ties, one at each upper corner.
Check yourself: Lay both ties side by side. They should have the same number of chain links and approximately the same length.
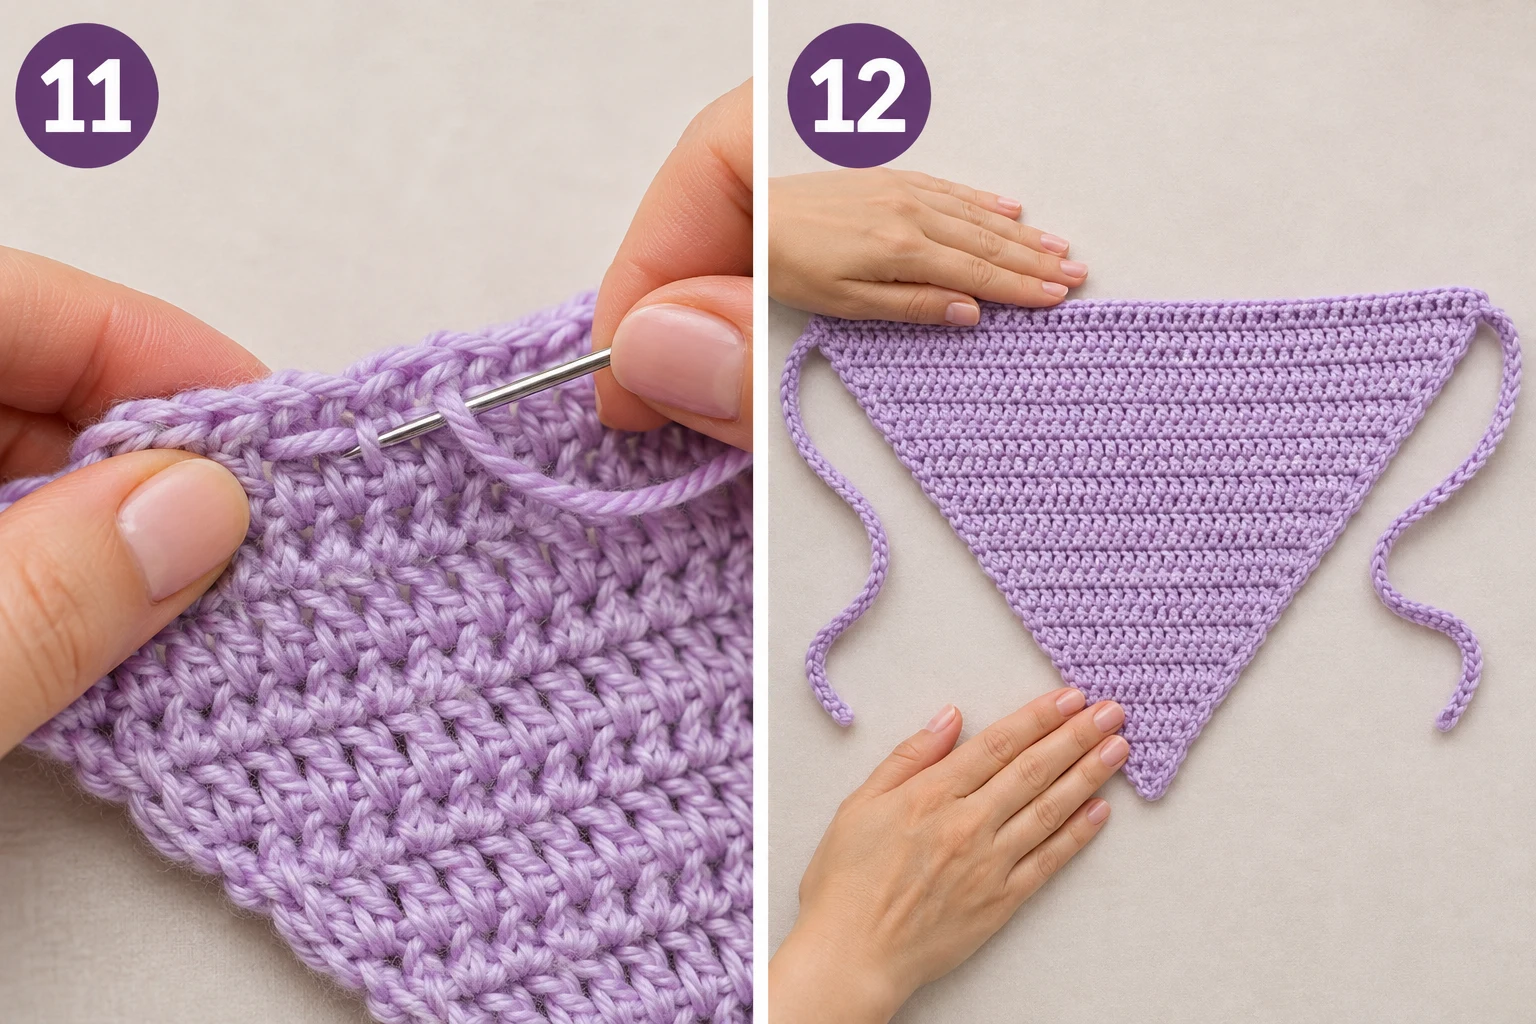
11. Weave in the Loose Ends
Action: Hide the remaining yarn tails using a tapestry needle.
Detailed instructions: Cut any remaining working yarn, leaving approximately 5–6 inches of tail. Thread the tail through your tapestry needle. On the wrong side of the bandana, pass the needle underneath several nearby double crochet stitch loops without pulling the fabric tightly. Change direction and weave through a few more stitches to secure the end. Repeat with the remaining loose yarn tails, including the starting tail and the attachment tail from the second tie. Trim the excess yarn carefully without cutting any stitches.
Expected result: The bandana has two cleanly finished ties and no visible loose yarn tails.
Check yourself: Gently tug the nearby stitches. The woven ends should stay secure without creating visible gaps.
12. Block and Shape Your Bandana
Action: Gently block the finished bandana to even out its triangular shape.
Detailed instructions: Place the finished bandana on a clean, flat, blocking surface. Lightly mist the fabric with water until the cotton feels slightly damp but not soaking wet. Smooth the triangular body into its natural shape, straightening both diagonal edges and the wide upper edge. Use rust-resistant blocking pins to hold the three corners and edges in place. Make sure both ties lie flat and remain untwisted. Allow the bandana to dry completely before removing the pins.
Expected result: A neat triangular crochet bandana with smooth edges, an even surface, and two matching ties.
Check yourself: The two diagonal edges should look balanced, and the fabric should lie flat without puckering.
Quick Reference
Here’s a handy table to keep beside you while following this how to crochet bandana pattern. It includes the main stitch counts and measurements so you can check your progress without rereading every instruction.
| Pattern Section | Row / Section | Stitch or Chain Count |
|---|---|---|
| Foundation | Row 1 | 3 dc |
| First increase | Row 2 | 5 dc |
| Triangle | Row 3 | 7 dc |
| Triangle | Row 4 | 9 dc |
| Triangle | Row 5 | 11 dc |
| Triangle | Row 6 | 13 dc |
| Triangle | Row 7 | 15 dc |
| Triangle | Row 8 | 17 dc |
| Triangle | Row 9 | 19 dc |
| Triangle | Row 10 | 21 dc |
| Triangle | Row 11 | 23 dc |
| Triangle | Row 12 | 25 dc |
| Triangle | Row 13 | 27 dc |
| Triangle | Row 14 | 29 dc |
| Triangle | Row 15 | 31 dc |
| Triangle | Row 16 | 33 dc |
| Triangle | Row 17 | 35 dc |
| Triangle | Row 18 | 37 dc |
| Triangle | Row 19 | 39 dc |
| Triangle | Row 20 | 41 dc |
| Triangle | Row 21 | 43 dc |
| Triangle | Row 22 | 45 dc |
| Triangle | Row 23 | 47 dc |
| Triangle | Row 24 | 49 dc |
| Final triangle row | Row 25 | 51 dc |
| First side tie | Finishing | 46 ch |
| Second side tie | Finishing | 46 ch |
Finished measurements (approximate):
- Width across the upper edge: 20–21 inches.
- Center depth: approximately 10 inches.
- Side ties: approximately 9 inches each.
- Main stitch: Double crochet.
- Main construction: Two-stitch increases at the beginning and end of each row.
Measurements can vary depending on your individual tension and yarn.
Final Thoughts
And that’s it! You’ve made your very own crochet bandana, and I hope you enjoyed learning how to crochet bandana step by step. I absolutely love how the soft lavender color gives this simple triangular accessory such a delicate, pretty finish. It’s a lovely project for beginners and makes a thoughtful handmade gift, too. My favorite finishing tip is to lightly steam-block the edges from a safe distance, following your yarn’s care instructions, to help the triangle sit beautifully. I’d love to see your finished creation, so share a photo and tag my blog!
Tips for a Better Experience
- Keep both ties identical: Make sure you chain exactly 46 stitches for each tie. Counting as you go prevents one side from becoming longer than the other.
- Use stitch markers at the edges: Place a removable marker in the first and last stitch of a row if you find it difficult to identify the edge stitches. This helps prevent accidentally losing an increase.
- Adjust the triangle size: For a smaller bandana, stop after Row 21. For a larger bandana, continue adding rows using the same two-edge-increase method, remembering that every new row adds two stitches.
- Keep the soft lavender look consistent: If you need additional yarn, use the same color and a compatible yarn weight so the finished bandana looks uniform.
FAQ
1. How do you crochet a bandana for beginners?
The easiest way to learn how to crochet bandana styles is to start with a simple triangular pattern using double crochet stitches. Begin with three stitches and increase twice on every row until you reach your desired size.
2. How long does it take to crochet a bandana?
Most beginners can finish this pattern in approximately 3–5 hours, depending on their crochet speed and experience. The straightforward double crochet technique makes it a manageable weekend or afternoon project.
3. How do you wear a crochet bandana?
Fold or position the triangular section over your hair, place the two ties behind your head, and secure them with a comfortable knot. You can also wear it around your neck as a lightweight crochet bandana scarf.
📚 You Might Also Like
- Crochet mesh bandana: 7 Gorgeous DIY Ideas for 2027A crochet mesh bandana is a lightweight handmade hair accessory featuring an open, airy stitch patte…
- Easy crochet bandana: 7 Perfect DIY Ideas for 2027An easy crochet bandana is a lightweight handmade hair accessory created with yarn and a crochet hoo…
- Crochet hair bandana: 7 Beautiful DIY Ideas for 2027A crochet hair bandana is a handmade hair accessory created with yarn and a crochet hook, usually fe…
- Crochet bandana pattern free: 7 Amazing DIY IdeasA crochet bandana pattern free is a beginner-friendly or intermediate crochet project that creates a…
- Bandana crochet: 7 Perfect DIY Ideas for 2027Bandana crochet projects are handmade accessories and fashion pieces created with yarn and a crochet…
🛍️ Shop the Look — Best Sellers for how to crochet bandana
Our handpicked Amazon best sellers curated specifically for how to crochet bandana:
As an Amazon Associate I earn from qualifying purchases.