
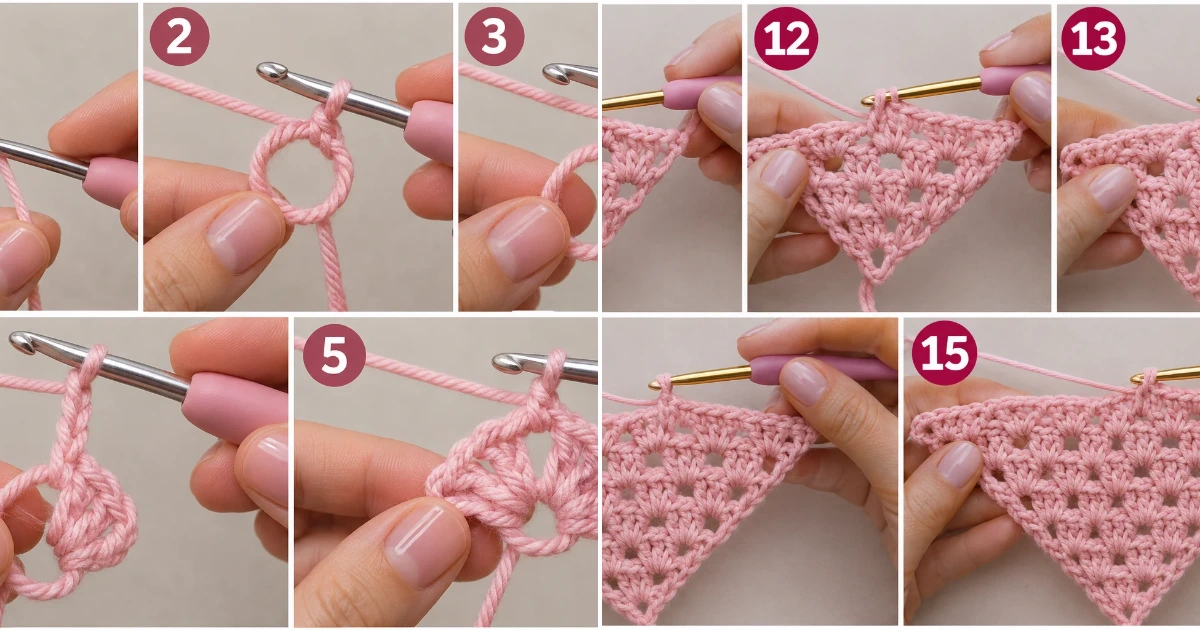
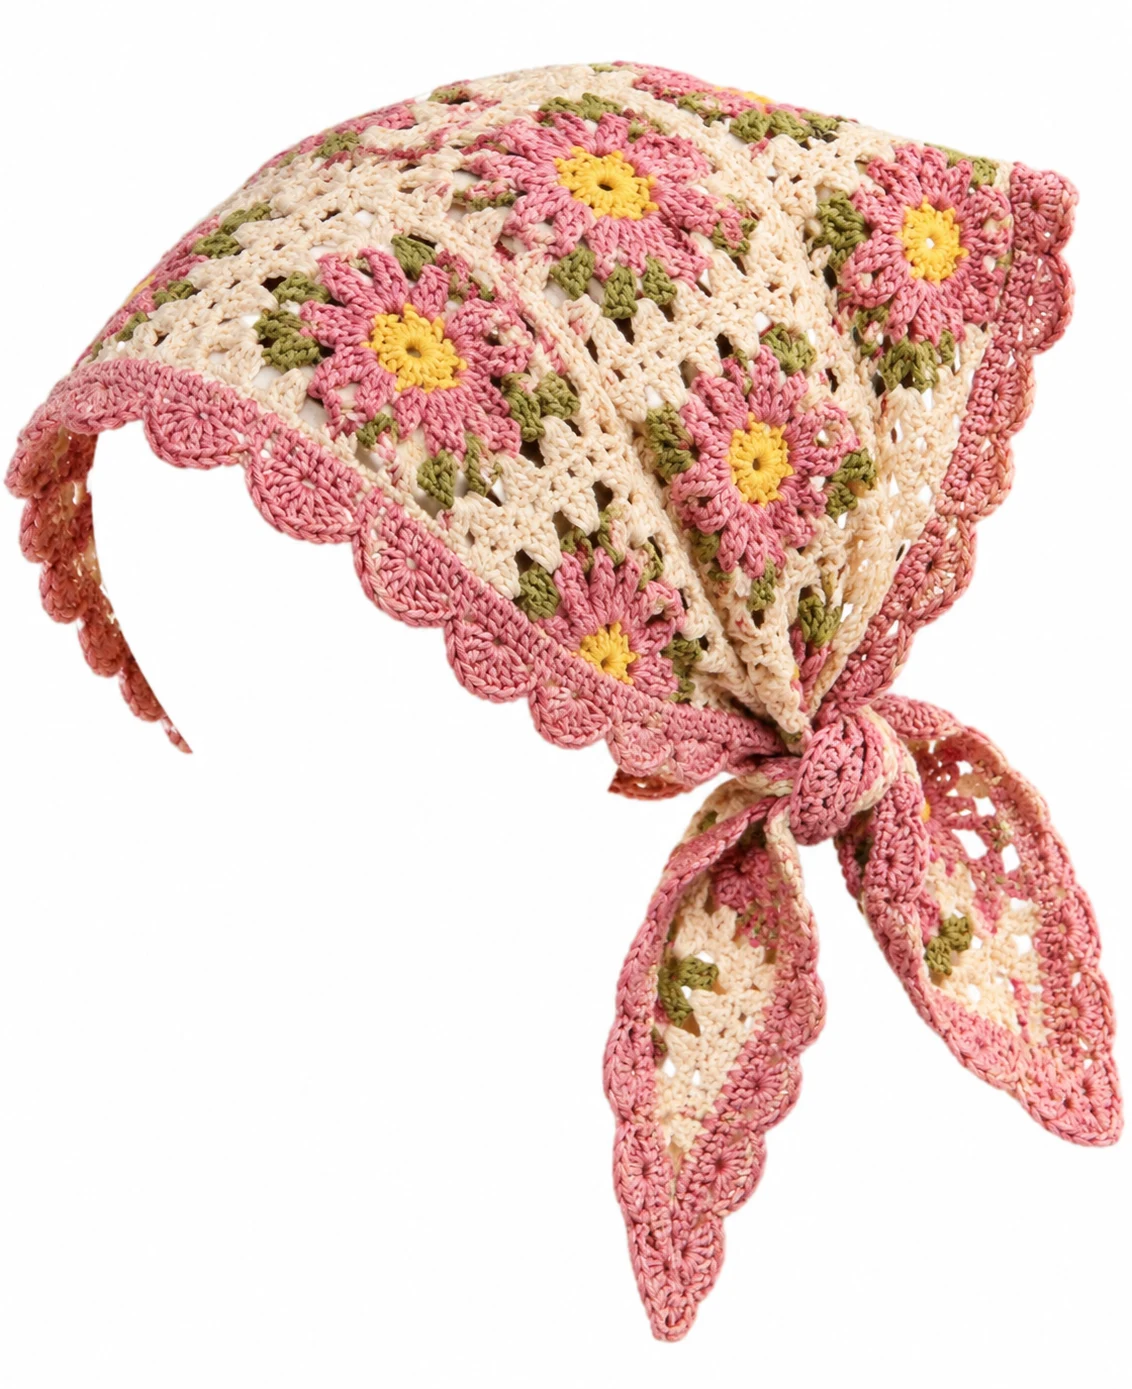
Blush Pink Granny Crochet Bandana That Looks Beautifully Handmade
I’m so excited to share this bandana crochet tutorial with you! This sweet granny triangle bandana has that lovely handmade texture, a classic triangular shape, and delicate ties that make it easy to wear in different ways. I’m using a soft blush pink color to give the finished accessory a feminine, fresh look. Whether you’re comfortable with basic crochet stitches or just starting your crochet journey, I’ll walk you through the construction, row increases, decorative edging, and ties so you can make your own beautiful bandana.
A Sweet Granny Triangle Bandana to Make and Wear
This granny-style crochet bandana is a fun, wearable project that combines simple stitches, a growing triangular shape, and a pretty finished border.
Materials Needed
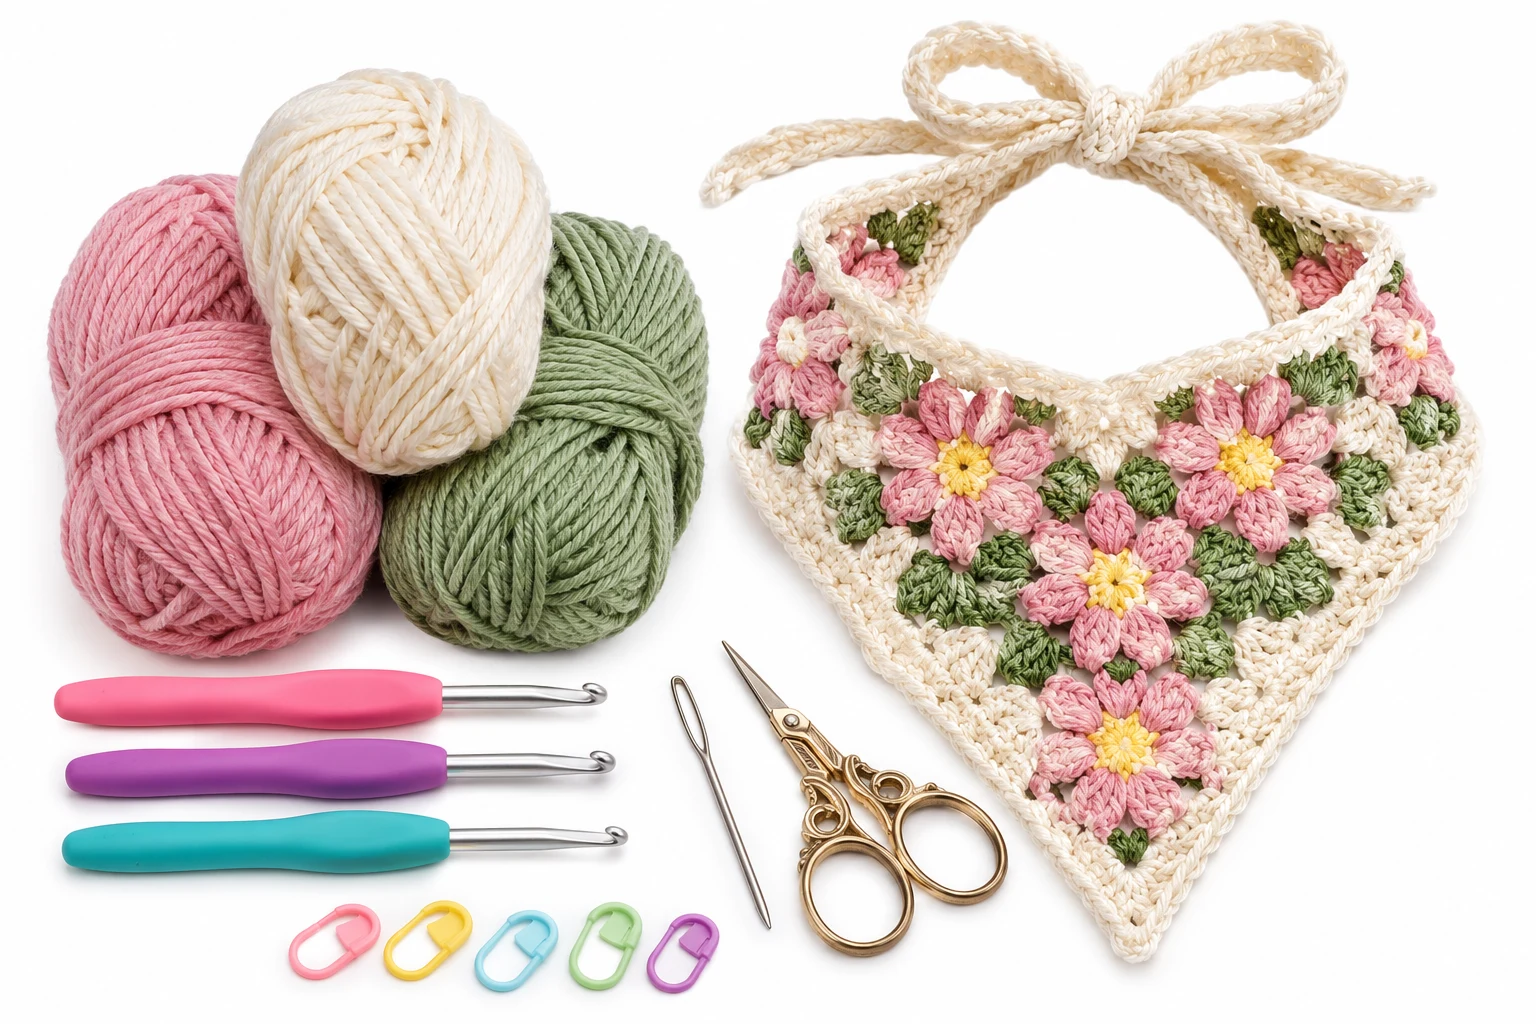
- Yarn: Approximately 100–120 g (220–265 yards) of DK-weight, category 3 cotton or cotton-blend yarn.
- Color: Blush pink. Use the same blush pink yarn throughout the entire bandana, including the edging and ties.
- Crochet hook: 4.0 mm (US G/6) crochet hook, or the size needed to achieve the desired drape.
- Scissors: Small, sharp yarn scissors.
- Yarn needle: Blunt tapestry needle for weaving in ends.
- Stitch markers: 2 removable stitch markers to identify the center chain space and important edge positions.
- Measuring tape: For checking the triangle width and depth.
- Blocking supplies: Rustproof blocking pins and a blocking mat.
- Gauge (Approximate): 18 double crochet stitches and 9 rows measure approximately 4 × 4 inches (10 × 10 cm) in the granny-style fabric. Gauge is approximate because the spaces between clusters affect the finished measurement.
- Quantity: 1 bandana consisting of 15 progressively larger granny-triangle rows, 3 edging sections, and 2 crochet ties. Approximately 100–120 g of yarn for an adult-sized version.
- Color: Blush pink throughout, with no color changes.
Abbreviations / Terms Used
- ch: Chain stitch.
- ch-sp: Chain space.
- sl st: Slip stitch.
- sc: Single crochet.
- dc: Double crochet.
- st: Stitch.
- sts: Stitches.
- sk: Skip.
- sp: Space.
- rep: Repeat.
- RS: Right side of the work.
- WS: Wrong side of the work.
- granny cluster: A group of 3 double crochet stitches worked into the same space.
- turn: Rotate the work to begin the next row from the opposite side.
- increase: Add stitches or clusters to expand the triangular fabric.
What You Should Keep in Mind
- Keep your tension relaxed: Granny clusters need a little breathing room. Tight stitches can make the bandana stiff and cause the triangle to curl.
- Watch the center carefully: The center chain space creates the triangular point. Always work the increase into the correct center space.
- Count your clusters: Each new row expands the triangle. Check both sides before turning so the bandana stays symmetrical.
- Use consistent yarn: Keep the same blush pink yarn and hook throughout the body, border, and ties for a uniform finish.
Free Pattern: bandana crochet tutorial
This free bandana crochet tutorial follows the same general construction as the 15-row granny triangle project in Make by Masha’s beginner video. The written instructions below provide a consistent, beginner-friendly interpretation of the construction, with a three-part border and crocheted ties. The supplied video description does not specify exact stitch counts, yarn brand, or border stitches, so those details are pattern specifications rather than verified measurements from the video.
Pattern construction: Start at the triangle’s top point, build the granny-stitch triangle in 15 rows, finish its three edges, and add two ties.
Main triangle pattern
The following instructions use US crochet terminology. Work the granny clusters as groups of 3 dc, with chain spaces separating the groups. The center increases create the two sloping sides.
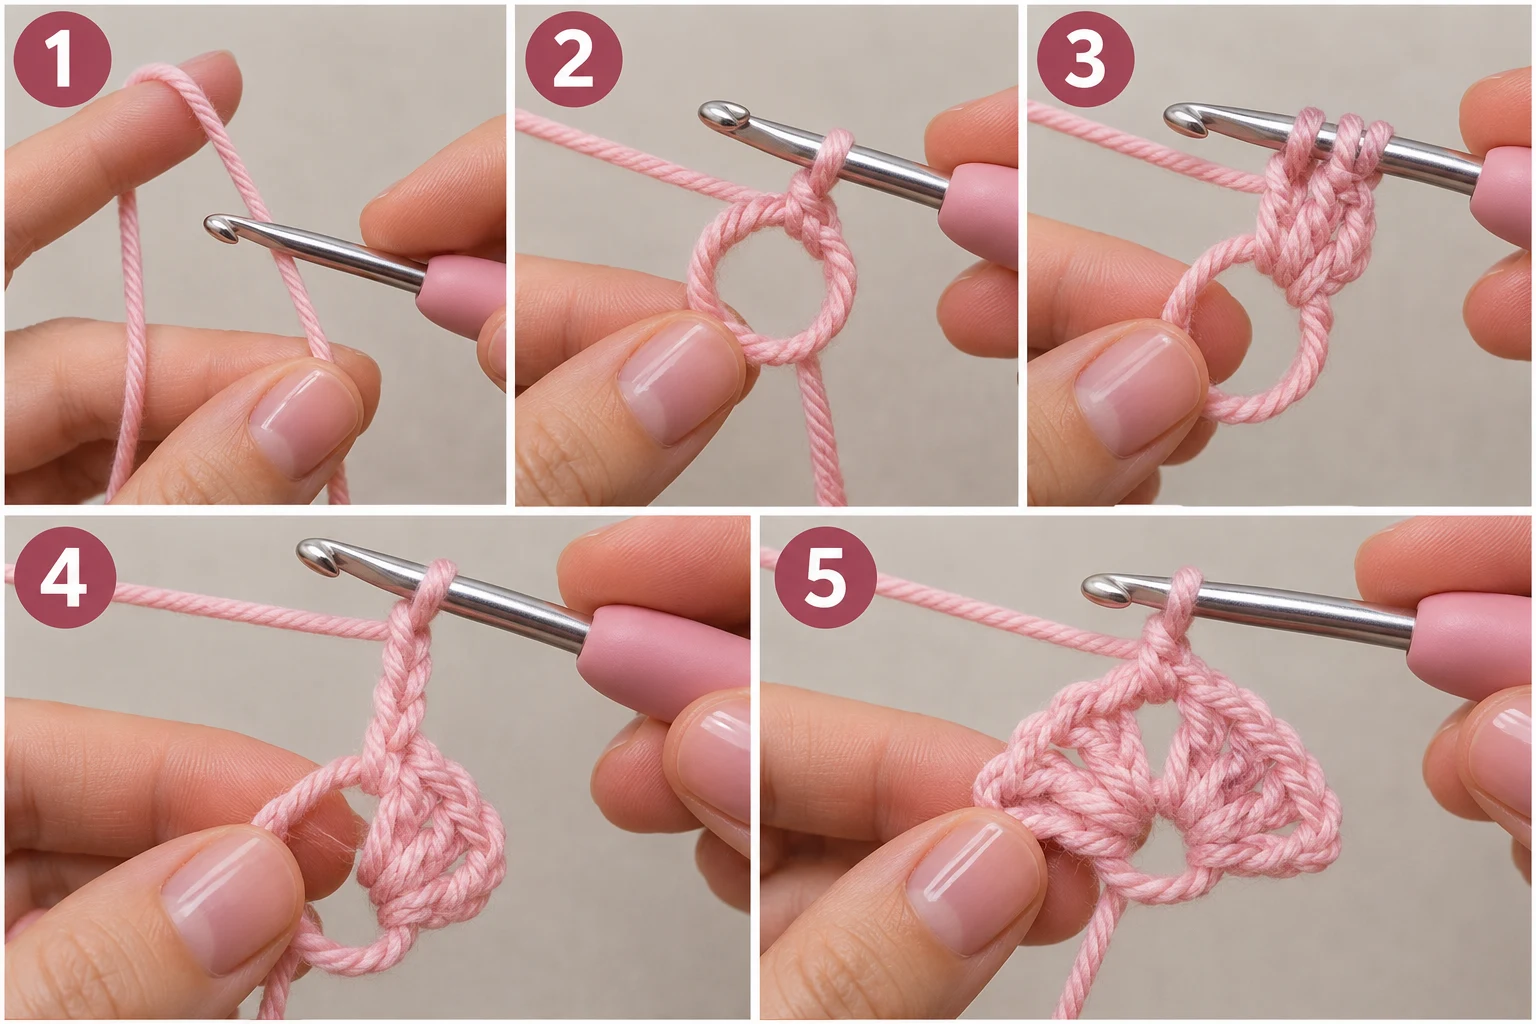
1. Create the Starting Ring — bandana
Action: Form a small adjustable starting ring for the first granny clusters.
Detailed instructions: Make a slip knot and chain 4. Insert your hook into the first chain you made, yarn over, and pull the yarn through both the chain and the active loop to form a ring. Keep the center opening loose enough to accommodate the first clusters.
Expected result: A small blush pink chain ring with one active loop on the hook.
Check yourself: The four-chain foundation should form a closed circle with a visible center opening.
2. Work the First Granny Cluster
Action: Crochet the first group of 3 double crochet stitches into the starting ring.
Detailed instructions: Yarn over once, insert your hook through the center of the ring, yarn over, and pull up a loop. You should have 3 loops on your hook. Yarn over and pull through 2 loops, then yarn over and pull through the remaining 2 loops. Repeat this process twice more in the same ring. You now have 3 dc stitches forming one granny cluster.
Expected result: One compact group of 3 double crochet stitches attached to the starting ring.
Check yourself: Count 3 complete double crochet posts in the first cluster.
3. Form the Center Chain Space
Action: Create the chain space that establishes the triangle’s center.
Detailed instructions: With one active loop remaining on your hook after the first cluster, yarn over and pull through the loop 3 times to make ch 3. Keep the chains relaxed and avoid pulling the working yarn too tightly.
Expected result: One 3-chain space extending from the first cluster.
Check yourself: You should be able to count 3 distinct chain links.
4. Complete the First Row
Action: Work the second granny cluster into the starting ring.
Detailed instructions: Yarn over, insert your hook into the same starting ring, pull up a loop, and complete one dc. Repeat twice more into the same ring. You now have a second cluster of 3 dc on the opposite side of the center chain space. Pull the starting tail gently if needed to close the center opening, then turn your work.
Expected result: Row 1 consists of 2 granny clusters separated by a central chain space.
Check yourself: You should see 6 double crochet stitches in total, arranged as 3 on each side of the center.
5. Build the Second Row
Action: Add the granny clusters and center increase that expand the triangle.
Detailed instructions: Begin with the turning chain required for the row. Work the first edge cluster into the end space, then work the granny clusters into the available chain spaces across the row. At the center, make the increase by placing two 3-dc clusters into the central opening, separated by a chain space. Finish with the corresponding edge cluster. Keep the two halves balanced.
Expected result: A wider triangular section with a clearly defined central increase.
Check yourself: The center should remain open and the left and right halves should have matching cluster arrangements.
6. Expand the Third Row
Action: Add the next complete granny-cluster row to the triangle.
Detailed instructions: Turn the work and begin at the first edge space. Make the required turning chain, then crochet 3-dc granny clusters into the spaces along the row. Maintain the chain spacing between ordinary clusters. At the central opening, make the two-cluster increase, preserving the center chain space. Complete the opposite edge and turn.
Expected result: A visibly wider triangle with another balanced row of granny texture.
Check yourself: The center point should line up vertically with the starting ring.
7. Complete the Fourth Row
Action: Work the fourth row of the granny triangle.
Detailed instructions: Turn the piece and work across the row, placing one granny cluster into each ordinary chain space. When you reach the central opening, work the two-cluster increase while keeping the center chain space open. Work the remaining spaces on the opposite side and finish with the edge cluster.
Expected result: A larger triangle with four rows of consistent granny texture.
Check yourself: Both sloping sides should expand evenly without puckering.
8. Work the Fifth Row
Action: Extend the triangle with its fifth granny row.
Detailed instructions: Turn the work and follow the established granny-cluster sequence. Work into every designated chain space, keeping ordinary clusters consistent and placing the two-cluster increase into the center opening. Make sure the final cluster reaches the outer edge before turning.
Expected result: A wider five-row triangle with evenly distributed granny clusters.
Check yourself: Compare the two sloping sides; neither should have more fabric or a tighter edge than the other.
9. Establish the Repeating Increase for Later Rows
Action: Continue the granny-cluster increase pattern consistently across the growing triangle.
Detailed instructions: After turning the work, begin with the edge cluster and follow the same sequence of ordinary clusters and chain spaces. At the center, place the increase into the designated center space. Check that each cluster sits in a proper chain space rather than accidentally splitting a cluster. This is the repeat used to build the remaining triangle.
Expected result: The sixth row has a larger, balanced shape and the same stitch texture as the first five rows.
Check yourself: The center increase should be easy to identify, with matching fabric on either side.
10. Complete the Seventh Row
Action: Add the seventh granny row while maintaining the center increase.
Detailed instructions: Turn the triangle and crochet the seventh row using the same granny-cluster sequence. Work each 3-dc cluster into its designated space and keep the chain spaces between clusters consistent. At the center, complete the two-cluster increase. Finish the opposite edge and turn.
Expected result: A seven-row triangle with a broader lower edge and clear granny-stitch texture.
Check yourself: The central opening should sit on the same vertical line as the original starting ring.
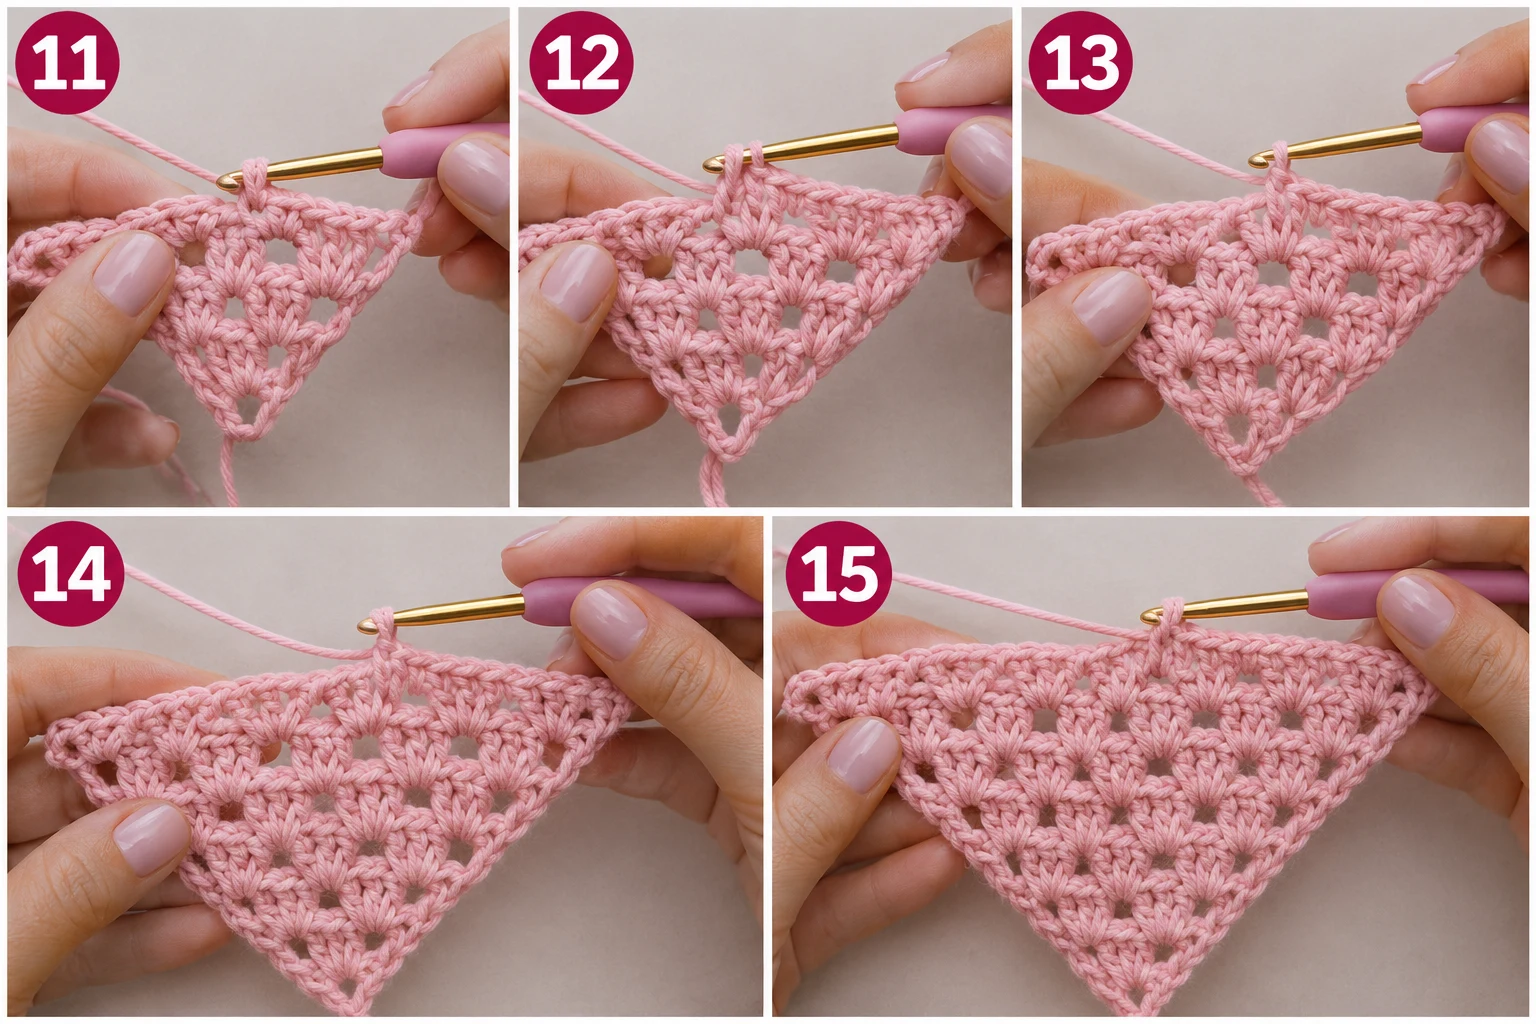
11. Work the Eighth Row
Action: Extend both sloping sides through the eighth row.
Detailed instructions: Turn the fabric and crochet across the eighth row. Make the edge cluster, fill each ordinary space with its granny cluster, and preserve the chain spaces. Work the central increase into the center opening and finish with the final edge cluster.
Expected result: An eight-row triangle with a smooth, even expansion.
Check yourself: The eighth row should reach the same distance on both sides of the center.
12. Complete the Ninth Row
Action: Crochet the ninth row of the triangle.
Detailed instructions: Turn the piece and work the ninth row using the established granny pattern. Keep each 3-dc cluster inside its corresponding chain space. Work the center increase in the middle and make sure the two sides remain equal. Complete the final edge cluster.
Expected result: A larger nine-row granny triangle ready for its final six body rows.
Check yourself: Count nine completed rows from the starting point, including the foundation row.
13. Work Rows Ten Through Twelve
Action: Continue expanding the granny triangle through three additional rows.
Detailed instructions: Turn after each completed row. Work the same granny-cluster sequence across rows 10, 11, and 12. Place each cluster in its corresponding chain space, make the center increase in every row, and keep the turning edges neat. Do not add extra clusters into solid double crochet posts.
Expected result: A twelve-row triangle with a noticeably wider lower edge.
Check yourself: Three new rows should be visible beneath the ninth row, with the center point still aligned.
14. Work Rows Thirteen and Fourteen
Action: Add the final two expansion rows before completing the triangle.
Detailed instructions: Turn the work and repeat the established granny pattern for rows 13 and 14. Work each cluster into the correct chain space and maintain the center increase. Check the outer edges for skipped spaces before turning after each row.
Expected result: A fourteen-row granny triangle with a nearly finished bandana shape.
Check yourself: The two newest rows should have matching cluster placement on both sides.
15. Finish the Fifteenth Row
Action: Complete the final granny row of the main triangle.
Detailed instructions: Turn the triangle and work the fifteenth row using the established cluster sequence. Maintain the center increase and make the last edge cluster in the final available space. Fasten off only if the subsequent border will begin with a new yarn attachment; otherwise leave the working loop ready for the edging.
Expected result: A complete fifteen-row granny triangle with two sloping sides and one wide upper edge.
Check yourself: You should have fifteen completed body rows and a recognizable triangular bandana shape.
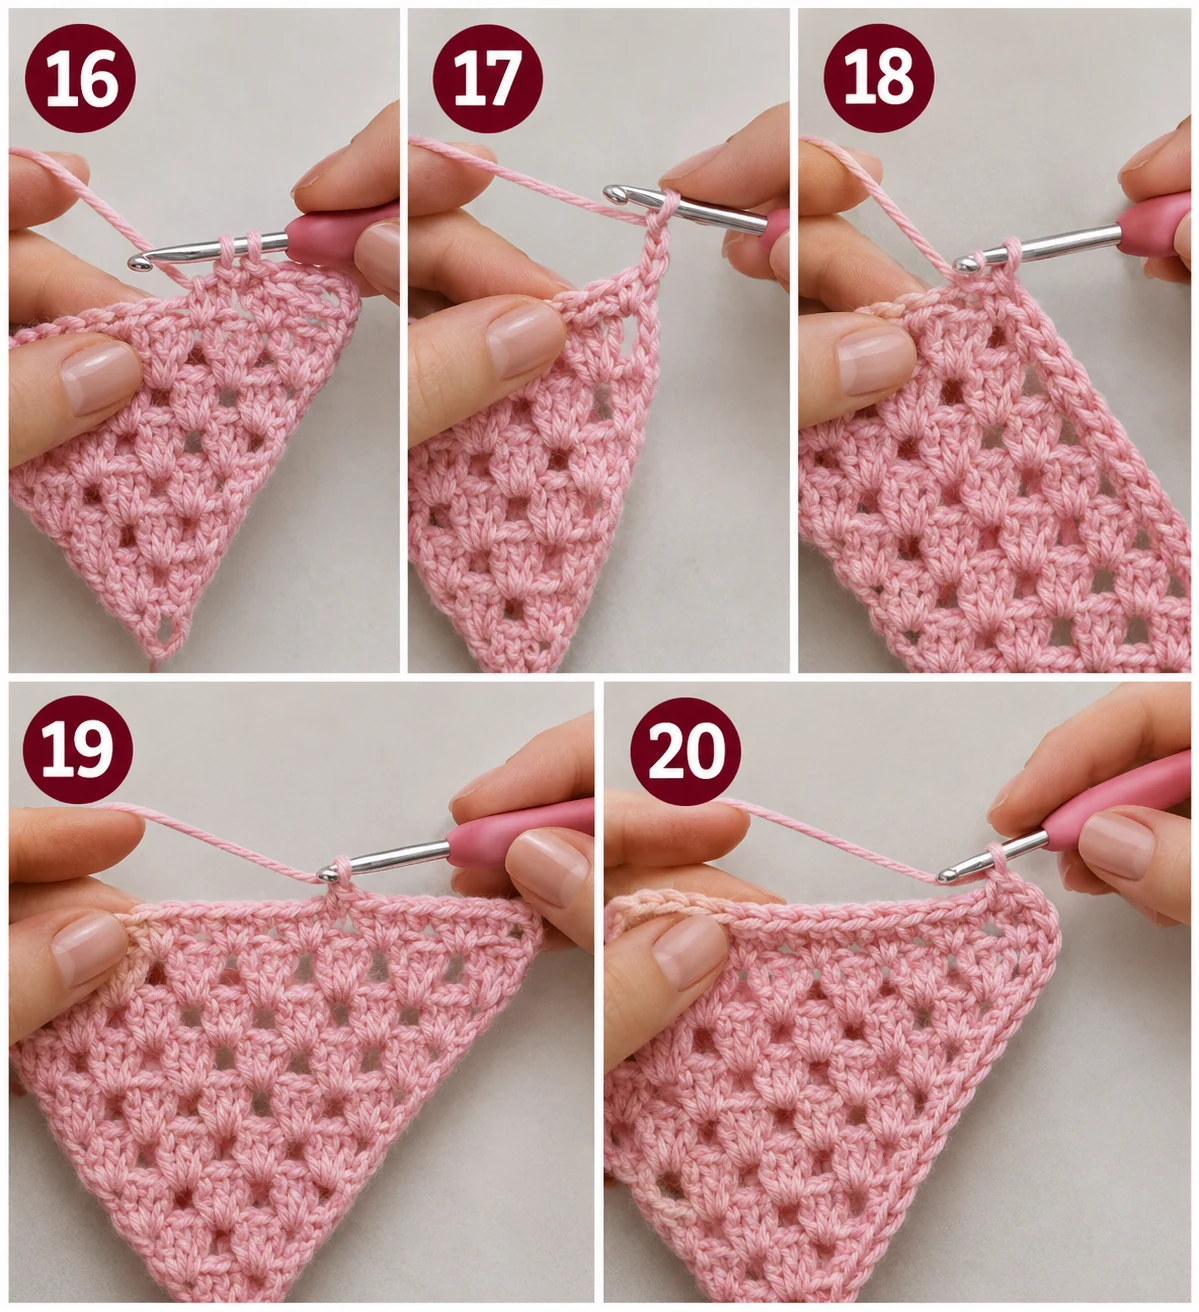
16. Begin the First Edging Section
Action: Attach the yarn to the first sloping side to begin the border.
Detailed instructions: With the right side facing you, locate one lower corner of the triangle. Insert your hook into the first suitable edge space, attach the blush pink yarn, and pull up a loop. Make a securing chain 1, then work single crochet stitches evenly along the first sloping side. Place approximately one sc into each suitable row-end position, adjusting slightly where necessary to keep the fabric flat.
Expected result: A neat first border running along one sloping side.
Check yourself: The edge should look smooth rather than stretched, ruffled, or tightly gathered.
17. Finish the First Sloping Edge
Action: Complete the single crochet border along the first side.
Detailed instructions: Continue inserting the hook into the next available row-end space and making one single crochet. Work evenly toward the triangle’s upper corner. At the corner, add an extra stitch if necessary to keep the edge from pulling inward. Fasten off or continue with the next border section as appropriate.
Expected result: The first sloping side has a consistent, finished border.
Check yourself: Lay the bandana flat; the newly edged side should follow the triangle’s natural outline.
18. Work the Top Edge and Second Side
Action: Crochet the border across the wide top edge and down the opposite sloping side.
Detailed instructions: Attach the yarn at the top edge if necessary. Work single crochet evenly across the top edge, placing stitches into appropriate spaces along the row ends and chain spaces. At the opposite upper corner, transition smoothly onto the second sloping edge. Continue single crochet stitches down the side toward the lower point, keeping the stitch spacing consistent.
Expected result: The top edge and second sloping edge have a continuous border.
Check yourself: The two sloping edges should have a similar thickness and appearance.
19. Complete the Third Edging Section
Action: Finish the remaining border section around the triangle.
Detailed instructions: Work the final edging stitches along the remaining unworked edge, matching the established single crochet spacing. Check the corners and add a stitch where necessary to prevent gaps. Join or fasten off neatly once the border meets its starting point.
Expected result: All three sides of the bandana have a consistent blush pink border.
Check yourself: The entire triangle should have a neat outline with no loose gaps or visibly uneven sections.
20. Crochet the First Tie
Action: Create the first long tie at one upper corner.
Detailed instructions: Attach the blush pink yarn securely at one upper corner of the bandana. Chain approximately 45–55 stitches, depending on your preferred tie length. Keep the chains relaxed and consistent. For a sturdier finish, work a slip stitch back along the chain before fastening off.
Expected result: One long, flexible tie extending from the upper corner.
Check yourself: The tie should be long enough to wrap comfortably around the back of your head.
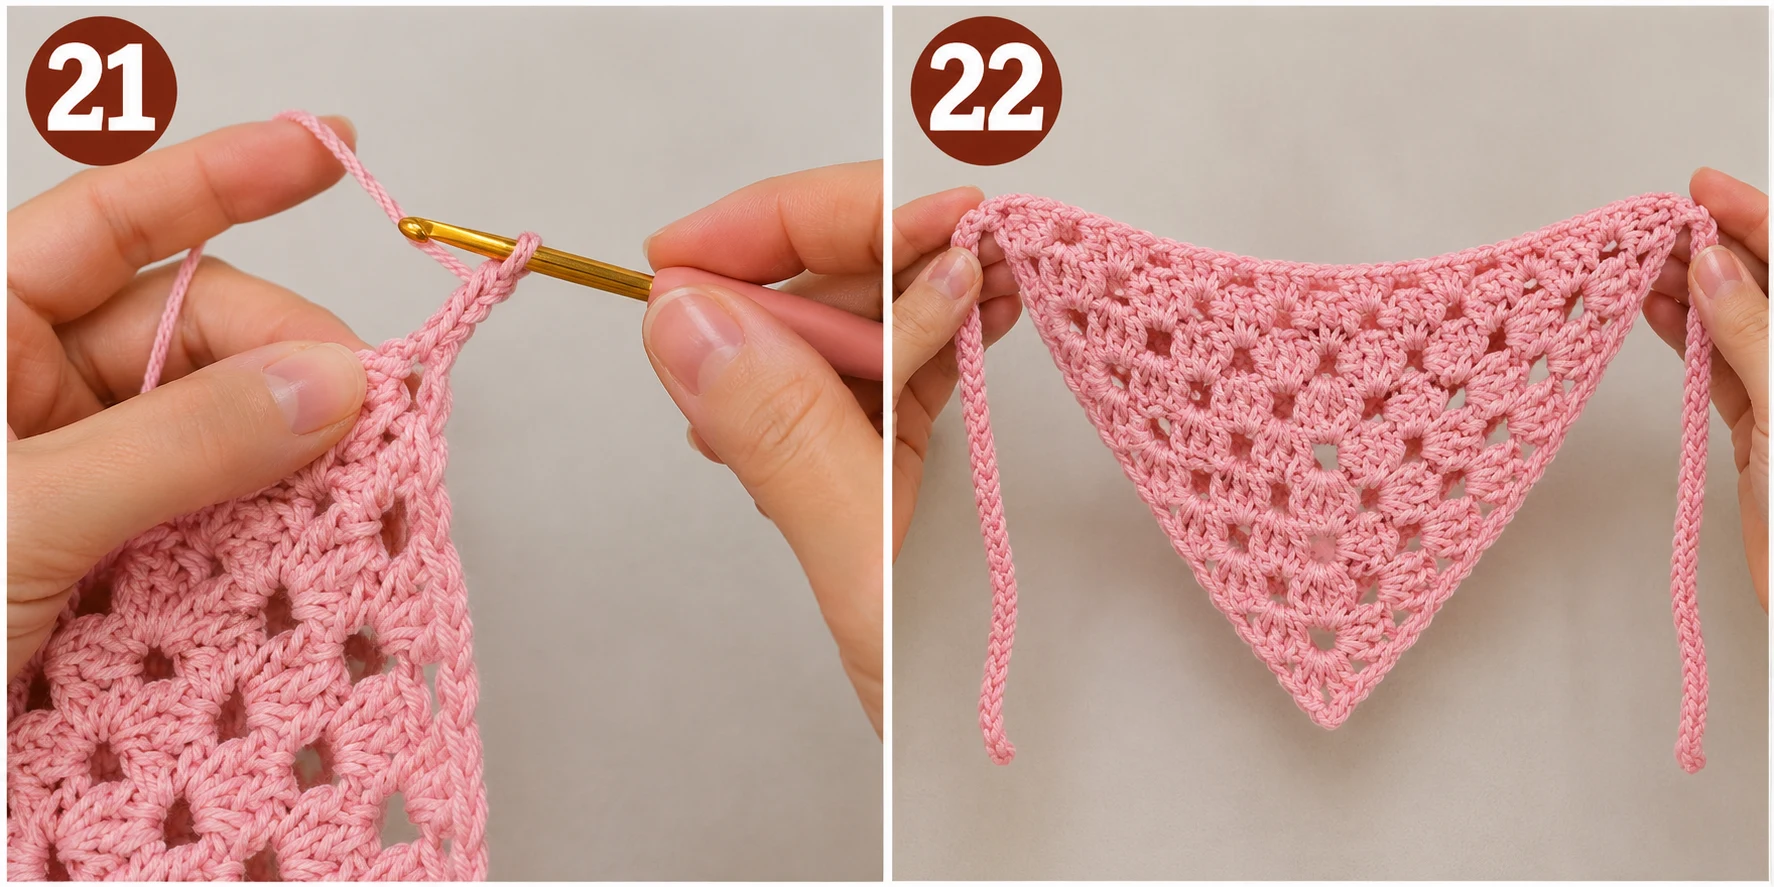
21. Crochet the Second Tie
Action: Add the matching tie to the opposite upper corner.
Detailed instructions: Attach the yarn at the opposite upper corner. Chain the same number of stitches used for the first tie, keeping the chain tension consistent. Work back along the chain with slip stitches if you want a firmer strap. Fasten off and leave a short tail for weaving in.
Expected result: Two matching ties extending from the upper corners of the bandana.
Check yourself: Lay the bandana flat and compare both ties; they should have approximately the same length and thickness.
22. Weave in the Loose Ends
Action: Secure and hide all remaining yarn tails.
Detailed instructions: Thread the tapestry needle with one loose yarn end. Insert it beneath several stitches on the wrong side of the bandana, following the direction of the yarn. Change direction once to secure the tail, then trim the excess carefully. Repeat with the remaining loose ends, including the tails at both ties.
Expected result: A clean bandana with no visible loose yarn ends.
Check yourself: Gently stretch the border and ties; no tail should pull free.
Quick Reference
Use this table to keep track of your progress while following the bandana crochet tutorial.
Section | Row/Count | Main technique |
|---|---|---|
Foundation | 4 chains | Starting ring |
First row | 2 granny clusters | |
Triangle body | Rows 2–5 | Granny clusters and center increases |
Rows 6–9 | Continue increases | |
Rows 10–12 | Repeat granny pattern | |
Rows 13–14 | ||
Final body row | Complete triangle | |
Edge 1 | 1 side | Single crochet edging |
Edge 2 | Top + opposite side | |
Edge 3 | Remaining border | Complete outline |
First tie | 45–55 chains | Crochet chain |
Second tie | Matching crochet chain | |
Finishing | All loose ends | Weave in yarn |
Project checklist
Video companion: The original HOW TO CROCHET Granny Triangle Bandana – Detailed Tutorial for Beginners by Make by Masha is divided into matching construction stages: rows 1–15, three edging sections, and ties.
📺 Watch the Video Tutorial
Final Thoughts
And that’s it! Your blush pink granny triangle bandana is ready to wear! I hope this bandana crochet tutorial has made you feel more confident working with granny clusters, increasing stitches, and creating beautiful accessories from scratch. I especially love how the soft blush pink shade highlights the texture of every little stitch. Before wearing yours, gently steam-block the triangle using an appropriate distance from the iron and allow it to dry completely. I’d absolutely love to see your finished creation, so share a photo and tag your favorite crochet community or blog!
Tips for a Better Experience
1. Keep the center straight: The center increase is the most important part of this bandana crochet tutorial. Mark the center space with a removable stitch marker so you can find it quickly when starting each new row.
2. Make your ties equally long: Count the chain stitches for the first tie and use the same number for the second. This gives your finished accessory a balanced appearance.
3. Adjust the triangle size: If you want more head coverage, add extra granny rows before starting the edging. If you’re making a smaller bandana, stop earlier and adjust the border to suit the new dimensions.
4. Keep your edging relaxed: Single crochet stitches that are too tight can pull the sides inward. Spread your stitches evenly along the row ends to help the triangle lie flat.
FAQ
What is a bandana crochet tutorial for beginners?
A bandana crochet tutorial for beginners teaches you how to make a triangular crochet headscarf using basic stitches. This granny-style version uses double crochet clusters, chain spaces, increases, edging, and two ties.
How much yarn do I need for a crochet granny bandana?
For the adult-sized blush pink version described here, allow approximately 100–120 g of DK-weight yarn. The exact amount depends on your tension, hook size, and tie length.
Why does my crochet bandana curl at the edges?
Curling usually happens when your stitches are too tight or you miss an increase. Check your center chain space, maintain relaxed tension, and block the finished triangle to improve its shape.
Can I find a bandana crochet tutorial on YouTube?
Yes! You can follow Make by Masha’s detailed granny triangle video alongside this written bandana crochet tutorial. It covers the 15 body rows, three edging sections, and ties.
Is this bandana crochet tutorial easy to customize?
📚 You Might Also Like
- Crochet bandana tutorial: 12 Top DIY Ideas for 2026A crochet bandana tutorial is a step-by-step fiber arts guide that teaches crafters how to hook a st…
- Crochet dog bandana: 13 Chic DIY Ideas for 2026A crochet dog bandana is a handmade fabric accessory designed to add personality, color, and comfort…
- Crochet bandana hairstyles: 12 Ultimate DIY IdeasCrochet bandana hairstyles are versatile, handmade hair accessory styling methods that combine vinta…
- Crochet hair bandana free pattern: 12 Perfect DIY IdeasCrochet hair bandana free patterns are popular handmade wearable accessories designed to protect str…
- Bandana crochet pattern free: 12 Stunning DIY IdeasFinding a reliable bandana crochet pattern free of charge is the ultimate way to refresh your handma…
🛍️ Shop the Look — Best Sellers for bandana crochet tutorial
Our handpicked Amazon best sellers curated specifically for bandana crochet tutorial:
As an Amazon Associate I earn from qualifying purchases.