
Cream White Crochet Handbag That Looks Store-Bought
crochet bag tutorial handbags are one of my favorite projects when I want something practical that still feels beautifully handmade, and this cream white handbag is such a satisfying make. I’m so excited to share this free pattern because it uses simple single crochet, a firm oval base, and a stylish lobster/kiss-lock clasp to create a structured everyday bag. The construction follows the same general approach as the accompanying Mary Crochet video tutorial, including the continuous spiral construction, shaped handle openings, and clasp finishing. Grab your supplies and let’s make a handbag you’ll actually want to carry!
A Chic crochet bag tutorial handbags Project to Make This Weekend
This crochet bag tutorial handbags project is worth making because the simple stitch pattern creates a surprisingly polished, structured handbag with a professional-looking metal clasp.
Materials Needed
- T-shirt yarn: approximately 380 g, suitable for a 6 mm crochet hook
- Color: cream white
- 6 mm crochet hook for the main bag
- 3.5 mm crochet hook for weaving in ends
- 17 cm-wide aluminum lobster/kiss-lock clasp or frame, approximately 18 cm tall
- 7 stitch markers
- Measuring tape
- Sharp scissors
- Approximately 1 m cream white t-shirt yarn for covering/working around the clasp; adjust slightly if your clasp is different
- Fabric or liquid silicone adhesive suitable for securing the clasp covering
- Personalized handmade tag if desired
- Tapestry/yarn needle for finishing
- Gauge (Approximate): with the 6 mm hook and cream white t-shirt yarn, aim for approximately 10 single crochets and 9–10 rounds per 10 cm, depending on yarn thickness and tension. For this project, finished measurements and clasp fit are more important than matching a rigid swatch gauge.
- Quantity: 380 g cream white t-shirt yarn, one 17 cm clasp, and approximately 1 m additional cream white yarn for clasp work.
- Color: cream white
The original video uses a 6 mm main hook, 3.5 mm finishing hook, seven stitch markers, measuring tape, scissors, a clasp measuring about 17 cm inside, and approximately 380 g of t-shirt yarn for the finished bag.
Abbreviations / Terms Used
- ch — chain
- sc — single crochet
- inc — increase; 2 sc worked into the same stitch
- sl st — slip stitch
- st/sts — stitch/stitches
- rnd — round
- MR — marker; a stitch marker used to identify a point in the work
- working loop — the active loop currently on the hook
- continuous rounds/spiral — rounds worked without joining at the end of each round
- turning chain — the initial chain used to begin the foundation; here it is included in the starting chain count
- oval base — the flat foundation formed by crocheting around both sides of the starting chain
What You Should Keep in Mind — crochet
- Keep your single crochet tension firm and even. Loose stitches can make the handbag floppy and can make the clasp difficult to fit.
- Don’t stretch the foundation chain when measuring it against the clasp. It should sit naturally from end to end.
- Use your stitch markers consistently around the increases. This makes the oval base much easier to count and keeps both ends symmetrical.
- Because the body is worked in a spiral, do not join each round after the first foundation round. The original tutorial uses continuous rounds for the body.
Free Pattern: crochet bag tutorial handbags
This crochet bag tutorial handbags pattern is written so you can work alongside the video while still having exact numbers to check as you go.
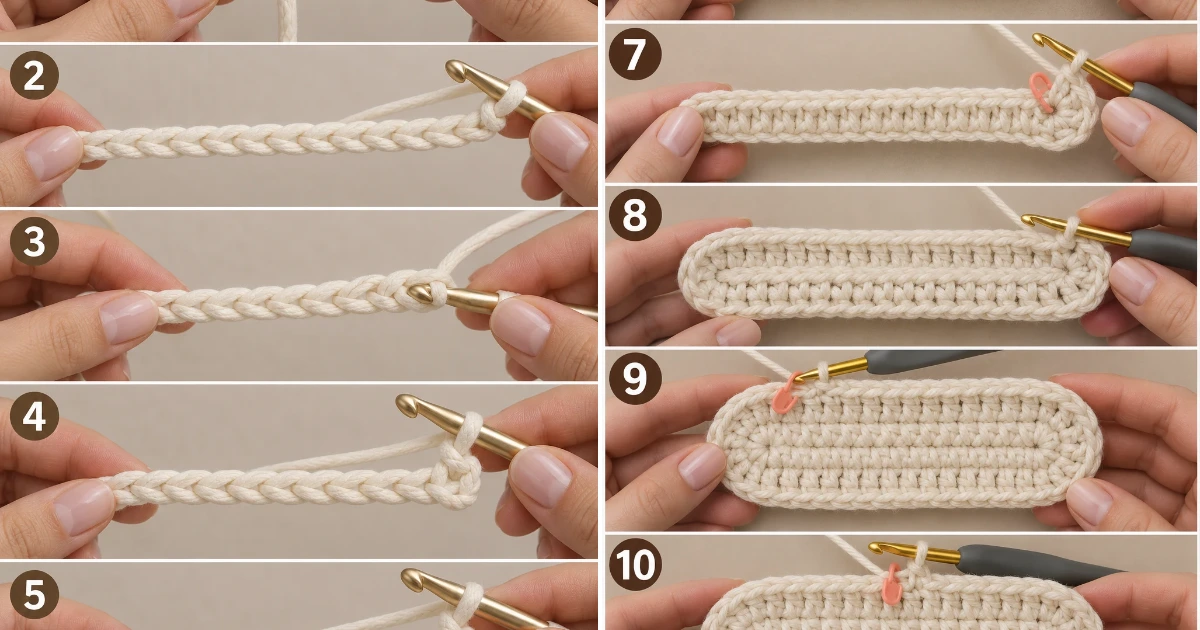
1. Make the Slip Knot
Action: Form a slip knot with the cream white t-shirt yarn and place it on your 6 mm hook.
Detailed instructions: Make a standard adjustable slip knot, slide the loop onto the hook, and gently tighten it until the loop moves freely but is not loose. Keep the working yarn behind the hook.
Expected result: You should have one adjustable working loop on your hook with the yarn tail hanging behind it.
Check yourself: The loop should slide along the hook without becoming tight or falling off.
2. Chain 19 Stitches
Action: Chain 19 stitches to create the foundation for the oval base.
Detailed instructions: Yarn over and pull through the active loop to make each chain, repeating until you have exactly 19 linked chains. Keep the chains relaxed rather than pulling them tightly.
Expected result: You should have one straight foundation chain containing 19 visible chain stitches.
Check yourself: Count the V-shaped chain stitches and confirm there are exactly 19.
3. Insert Into Chain 18
Action: Insert the hook into the 18th chain from the hook to begin the first single crochet.
Detailed instructions: Skip the chain currently holding the active loop because it functions as the turning chain, then insert the hook through the top loop of chain 18. Keep the foundation chain facing upward so the chain V is easy to identify.
Expected result: The hook should pass cleanly through the top loop of chain 18 while the remaining foundation chain hangs below.
Check yourself: There should be exactly one foundation chain stitch between your hook and the active loop.
4. Complete the First Single Crochet
Action: Work 1 sc into chain 18.
Detailed instructions: With the hook inserted through chain 18, yarn over and pull up a loop so that two loops are on the hook. Yarn over again and pull through both loops. This creates the first sc of the project.
Expected result: One cream white single crochet sits at the beginning of the foundation chain.
Check yourself: You should see exactly 1 completed sc.
5. Mark the First Stitch
Action: Place a stitch marker through the first completed sc.
Detailed instructions: Open one stitch marker and clip it through the top loops of the first sc without distorting the stitch. This marker identifies the beginning of the base.
Expected result: The first sc remains clearly visible with a marker attached.
Check yourself: The marker should sit through the stitch without pulling the fabric sideways.
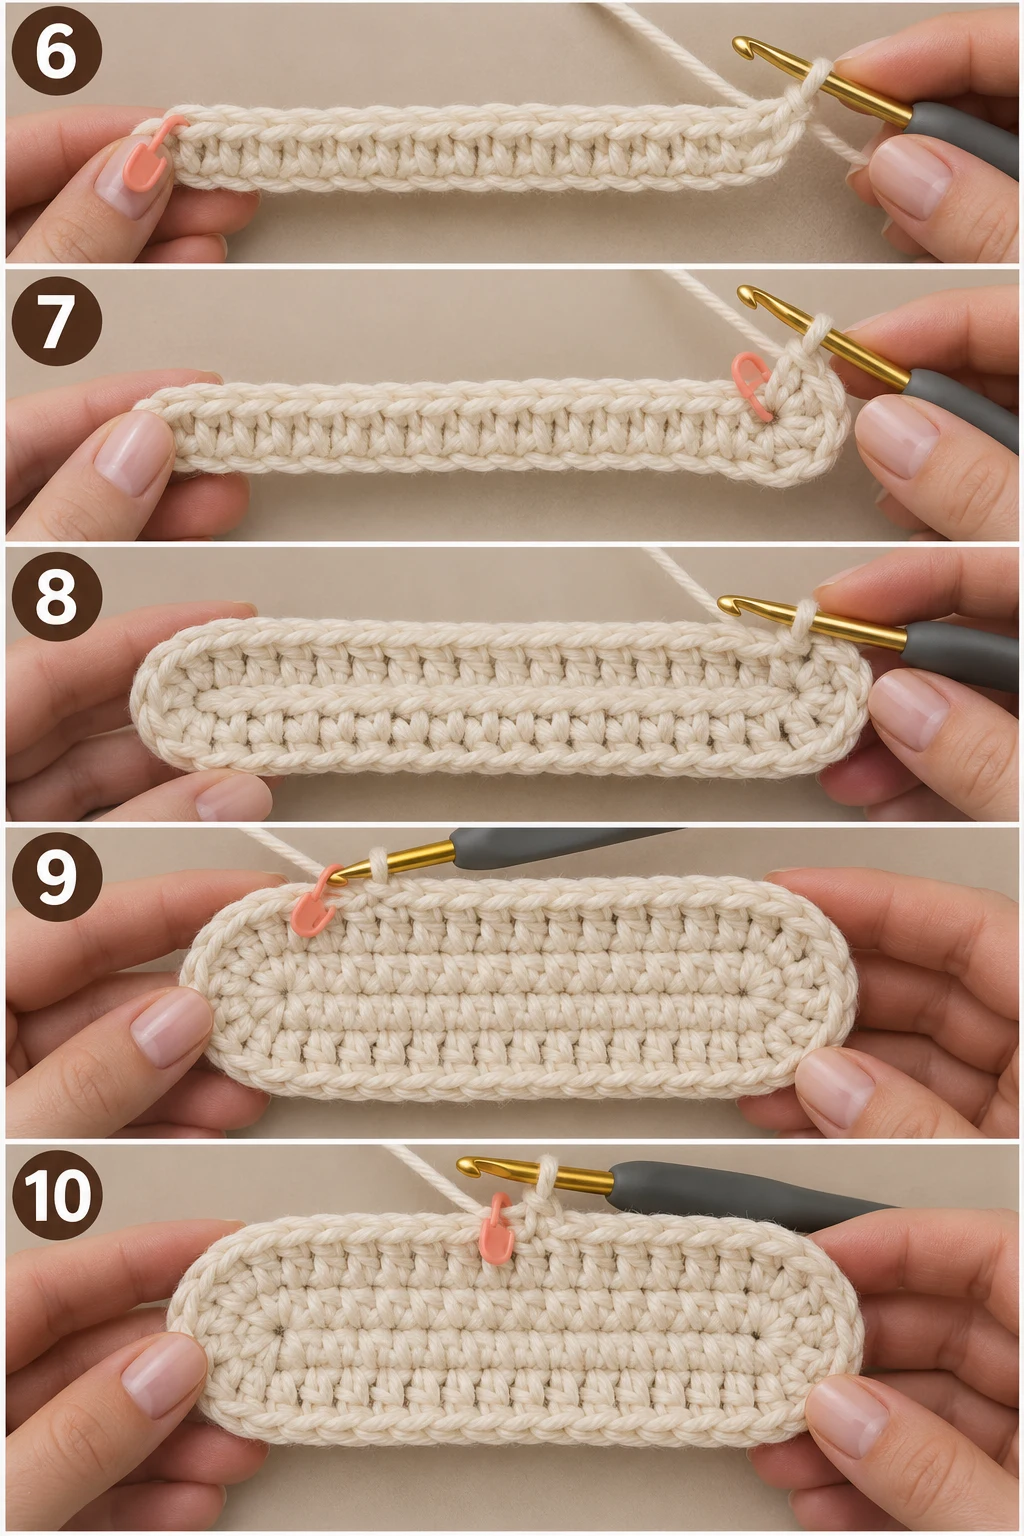
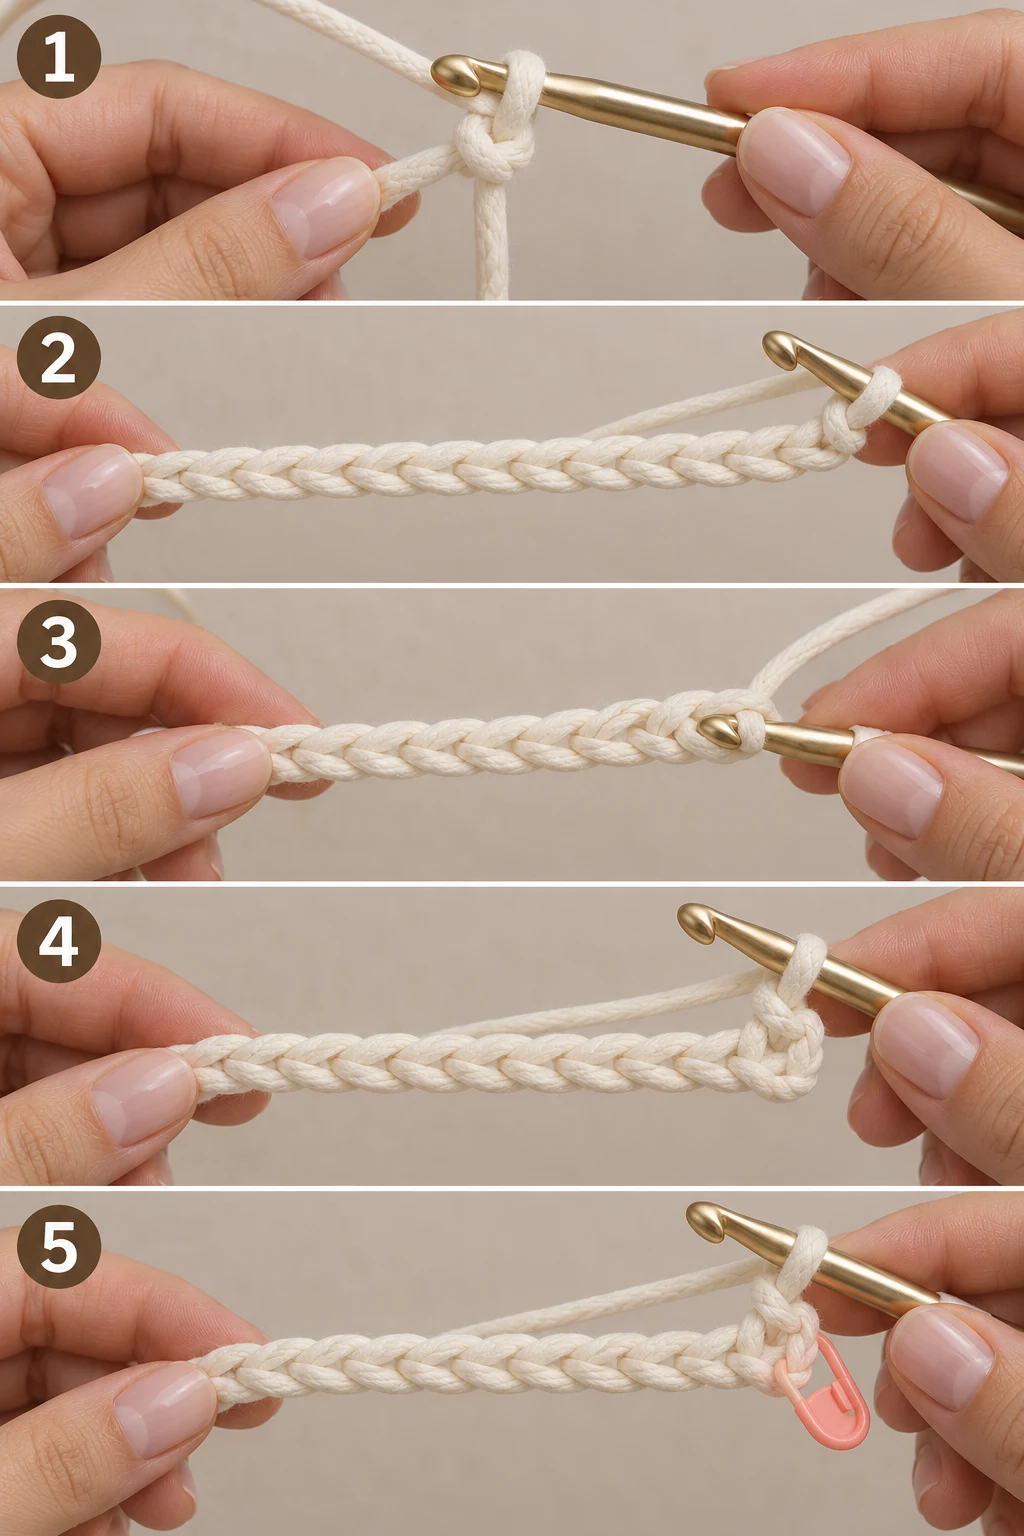
6. Work 16 Single Crochets Along the Chain
Action: Work 16 sc into the next 16 foundation chains.
Detailed instructions: Insert the hook under the top loop of the next chain, yarn over, pull up a loop, yarn over, and pull through both loops. Repeat the same sc sequence across the next 16 chains, producing 16 additional stitches.
Expected result: The straight portion of the base contains 17 sc total, including the marked first stitch.
Check yourself: Count from the marker and confirm that 16 additional sc have been completed.
7. Make the First Corner Increase
Action: Work 3 sc into the final foundation chain to form the first rounded end of the oval.
Detailed instructions: Insert the hook into the final foundation chain and complete one sc. Without moving to another chain, insert the hook into that same final chain again and complete a second sc. Repeat once more for the third sc. Place a marker in the first stitch of these three.
Expected result: Three sc share the same final chain, creating the rounded corner of the oval base.
Check yourself: The corner should visibly contain 3 sc in one chain.
8. Work 16 Single Crochets Along the Back of the Chain
Action: Work 16 sc into the unused loops along the opposite side of the foundation chain.
Detailed instructions: Turn the developing oval so the underside of the foundation chain is accessible. Insert the hook under the corresponding two strands of each remaining chain loop and work 1 sc into each of the next 16 positions.
Expected result: The second straight side contains 16 new sc and the oval base begins to lie flat.
Check yourself: You should have 16 new stitches between the first corner increase and the final corner.
9. Complete the Second Corner and Close Round 1
Action: Work 3 sc into the remaining end chain and close Round 1 with a slip stitch.
Detailed instructions: Work 3 sc into the remaining end chain to mirror the first corner. Remove the beginning marker, insert the hook under the first chain of the round, yarn over, and pull through to make 1 sl st. Replace the marker at the round-start point.
Expected result: Round 1 forms a complete oval containing 38 stitches.
Check yourself: Count 16 straight stitches + 3 corner stitches + 16 straight stitches + 3 corner stitches = 38 sc.
10. Begin Round 2
Action: Start Round 2 with 1 sc in the next stitch and mark it.
Detailed instructions: After the Round 1 slip stitch, move into the next stitch without making another joining slip stitch. Work 1 sc there and place a stitch marker through that new stitch to identify the beginning of the continuous round.
Expected result: Round 2 has begun in a continuous spiral with one new sc.
Check yourself: You should see the marker in the first stitch of Round 2, not in the previous round’s joining stitch.
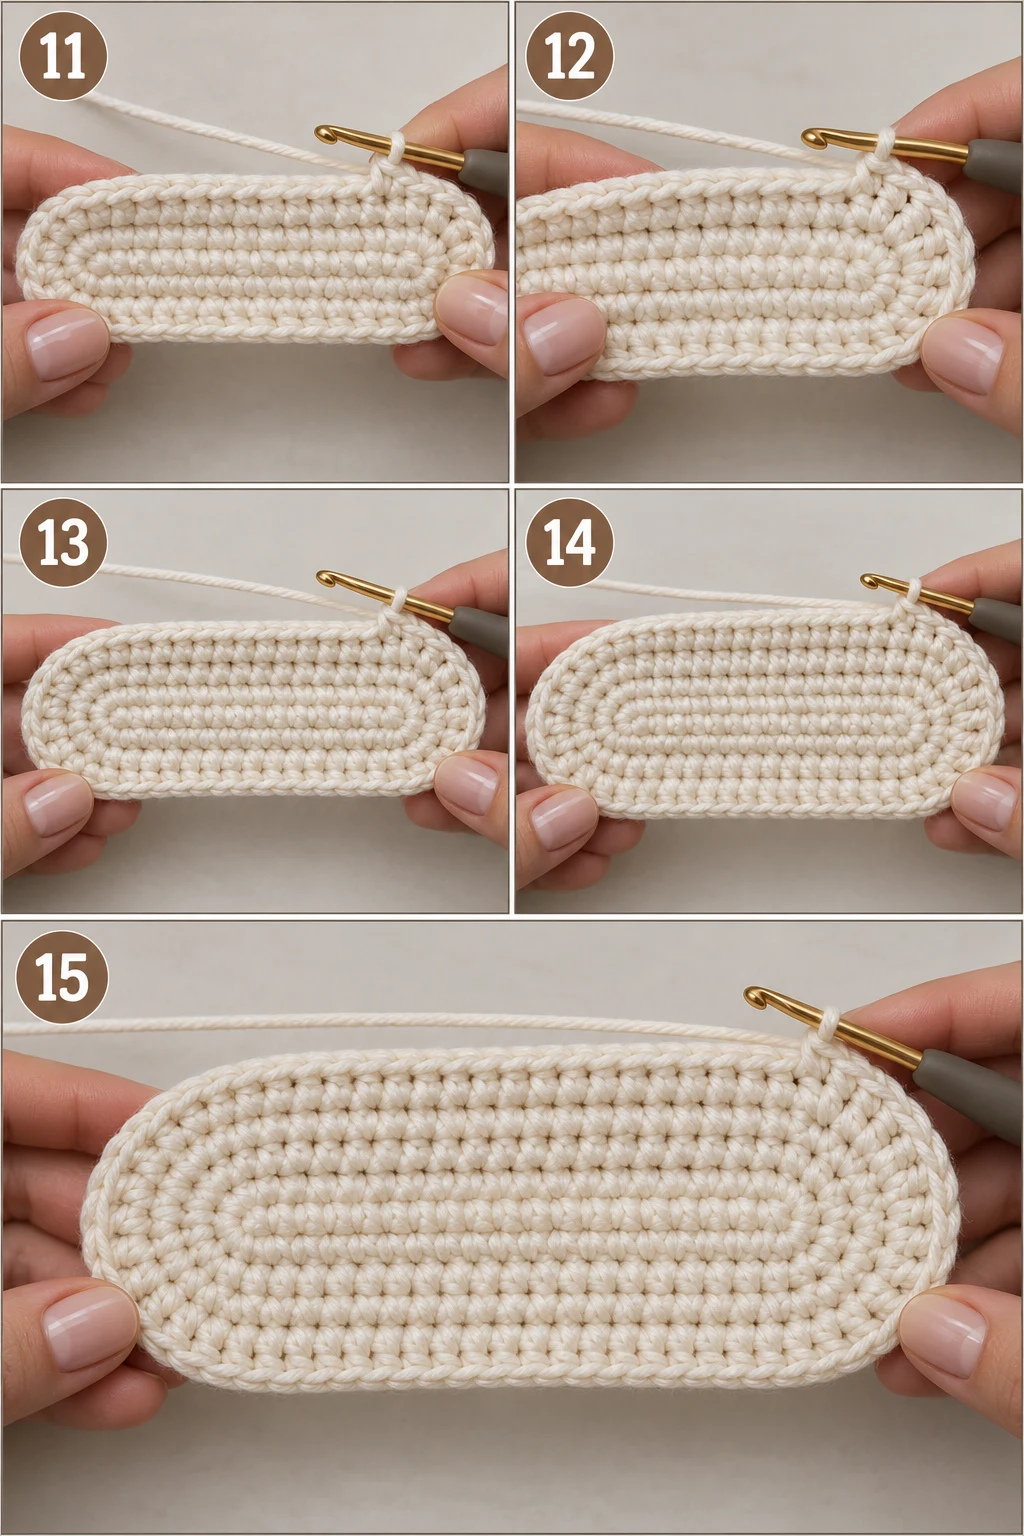
11. Work the 16 Straight Stitches of Round 2
Action: Work 16 sc along the first straight side of Round 2.
Detailed instructions: Continue around the oval with 1 sc in each stitch until you have completed 16 straight stitches before reaching the marked corner area.
Expected result: The first straight section of Round 2 remains flat and contains 16 base stitches before the increase section.
Check yourself: Count 16 Round 2 sc before the first corner increase.
12. Increase Across the First Corner
Action: Work 2 sc in each of the next 3 stitches.
Detailed instructions: In the first corner stitch, work 2 sc into the same stitch. Repeat in the second corner stitch, then repeat in the third corner stitch. This creates 6 stitches from the original 3-stitch corner area.
Expected result: The first corner of Round 2 contains 6 stitches and the oval widens evenly.
Check yourself: Count 6 new sc across the corner increase section.
13. Work the Second Straight Side and Corner
Action: Work 16 sc along the second straight side, then 2 sc in each of the final 3 stitches.
Detailed instructions: Work 1 sc in each of the next 16 stitches. At the opposite end, work 2 sc into each of the final 3 stitches to create the second six-stitch increase.
Expected result: Round 2 contains 44 stitches.
Check yourself: Verify the count as 16 + 6 + 16 + 6 = 44 stitches.
14. Complete Round 3
Action: Work Round 3 using 16 sc, (inc, sc) repeated 3 times, 16 sc, then (inc, sc) repeated 3 times.
Detailed instructions: Continue in the spiral without joining. Work 16 sc along the first straight section. At the corner, repeat an increase followed by 1 sc three times. Work 16 sc across the second straight section. Finish the opposite corner with the same increase/sc sequence three times. This adds 6 stitches, bringing the round to 50 stitches.
Expected result: The oval base is wider and contains exactly 50 stitches.
Check yourself: Confirm the corner sections contain 9 stitches each and the total is 50.
15. Complete Round 4 and Finalize the Base
Action: Work the final base round using 16 sc, (2 sc, inc) repeated 3 times, 16 sc, then (2 sc, inc) repeated 3 times.
Detailed instructions: Work 16 sc on the first straight section. At the corner, repeat 2 sc followed by an increase three times, creating 12 stitches in that corner. Work 16 sc on the opposite straight section, then repeat the same 2-sc/increase sequence three times at the final corner. The completed round contains 56 stitches.
Expected result: The oval base is complete, flat, firm, and contains 56 stitches.
Check yourself: Count 16 + 12 + 16 + 12 = 56 stitches.
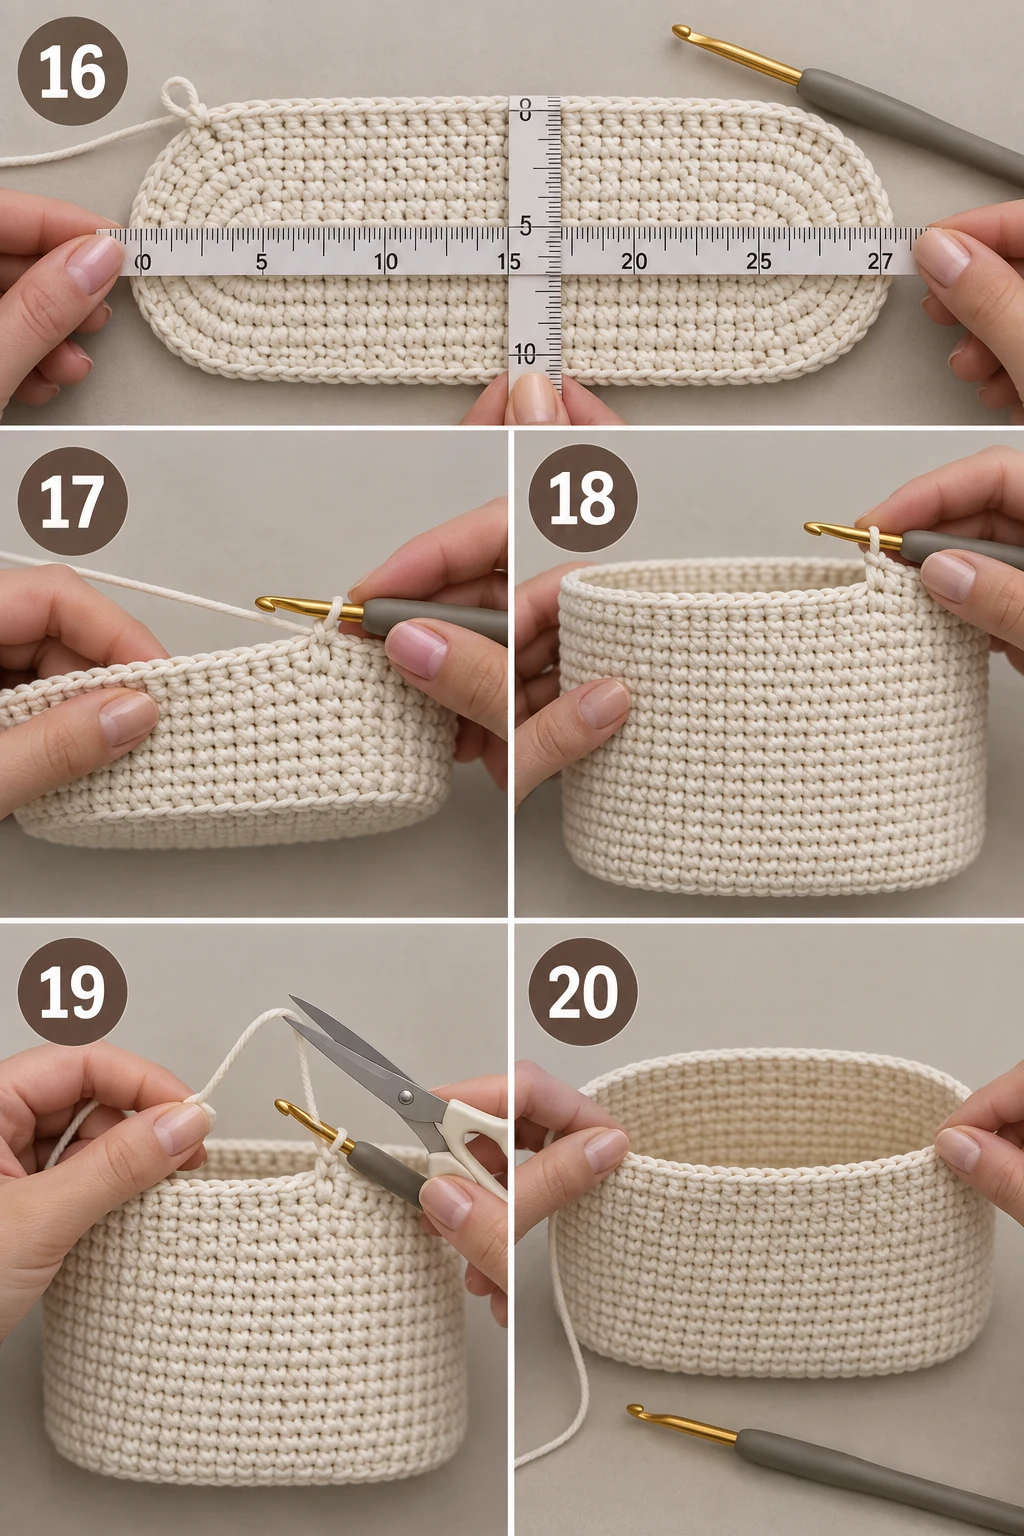
16. Measure the Finished Base
Action: Measure the completed 56-stitch base before building the height.
Detailed instructions: Lay the cream white base flat without stretching it and measure from end to end and across its widest point. The target is approximately 27 cm long by 10 cm wide, with roughly 3–3.5 cm of base visible beyond each side of the 17 cm clasp.
Expected result: The base should be approximately 27 cm long and 10 cm wide.
Check yourself: Place the clasp centered over the base and confirm there is about 3–3.5 cm of base extending beyond each clasp side.
17. Begin the Bag Body
Action: Work the first body round with 56 sc, using the existing stitch count without increases.
Detailed instructions: Starting at the marked stitch, work 1 sc into every stitch around the oval. Do not increase or decrease. Continue directly into the next stitch rather than joining the round.
Expected result: The edge of the oval begins turning upward to form the handbag wall.
Check yourself: Count 56 stitches around the round and confirm the fabric is beginning to rise.
18. Build the Bag Height Through 11 Rounds
Action: Continue 11 consecutive rounds of 56 sc, worked continuously in a spiral.
Detailed instructions: Work 1 sc in every stitch of every round without increasing or decreasing and without joining. Replace the stitch marker at the beginning of each round so you can track your progress. After 11 body rounds, the bag should have 15 total rounds including the four base rounds.
Expected result: The handbag body stands approximately 14 cm above the base, with a total height of about 19 cm including the base.
Check yourself: You should have completed 11 body rounds and counted 56 stitches around the final body round.
19. Finish the Bag Body
Action: Fasten off the final 56-stitch body round.
Detailed instructions: Cut the cream white working yarn, leaving a generous tail. Pull the yarn completely through the active loop to secure the final stitch, then leave the tail ready for the invisible finish and weaving.
Expected result: The 56-stitch bag body is closed at the top with a clean edge.
Check yourself: The yarn should be securely fastened and the top edge should not unravel when gently handled.
20. Shape the Top Opening
Action: Fold and flatten the top edge to locate the two center handle openings.
Detailed instructions: Lay the bag flat and align the side seams visually. The finished body has 56 stitches around the opening, so divide it into two halves and identify the two corner/end areas where the clasp will sit.
Expected result: The opening is flattened and the positions for the clasp and handle spaces are clearly identifiable.
Check yourself: The two sides should align evenly with no twist in the bag.
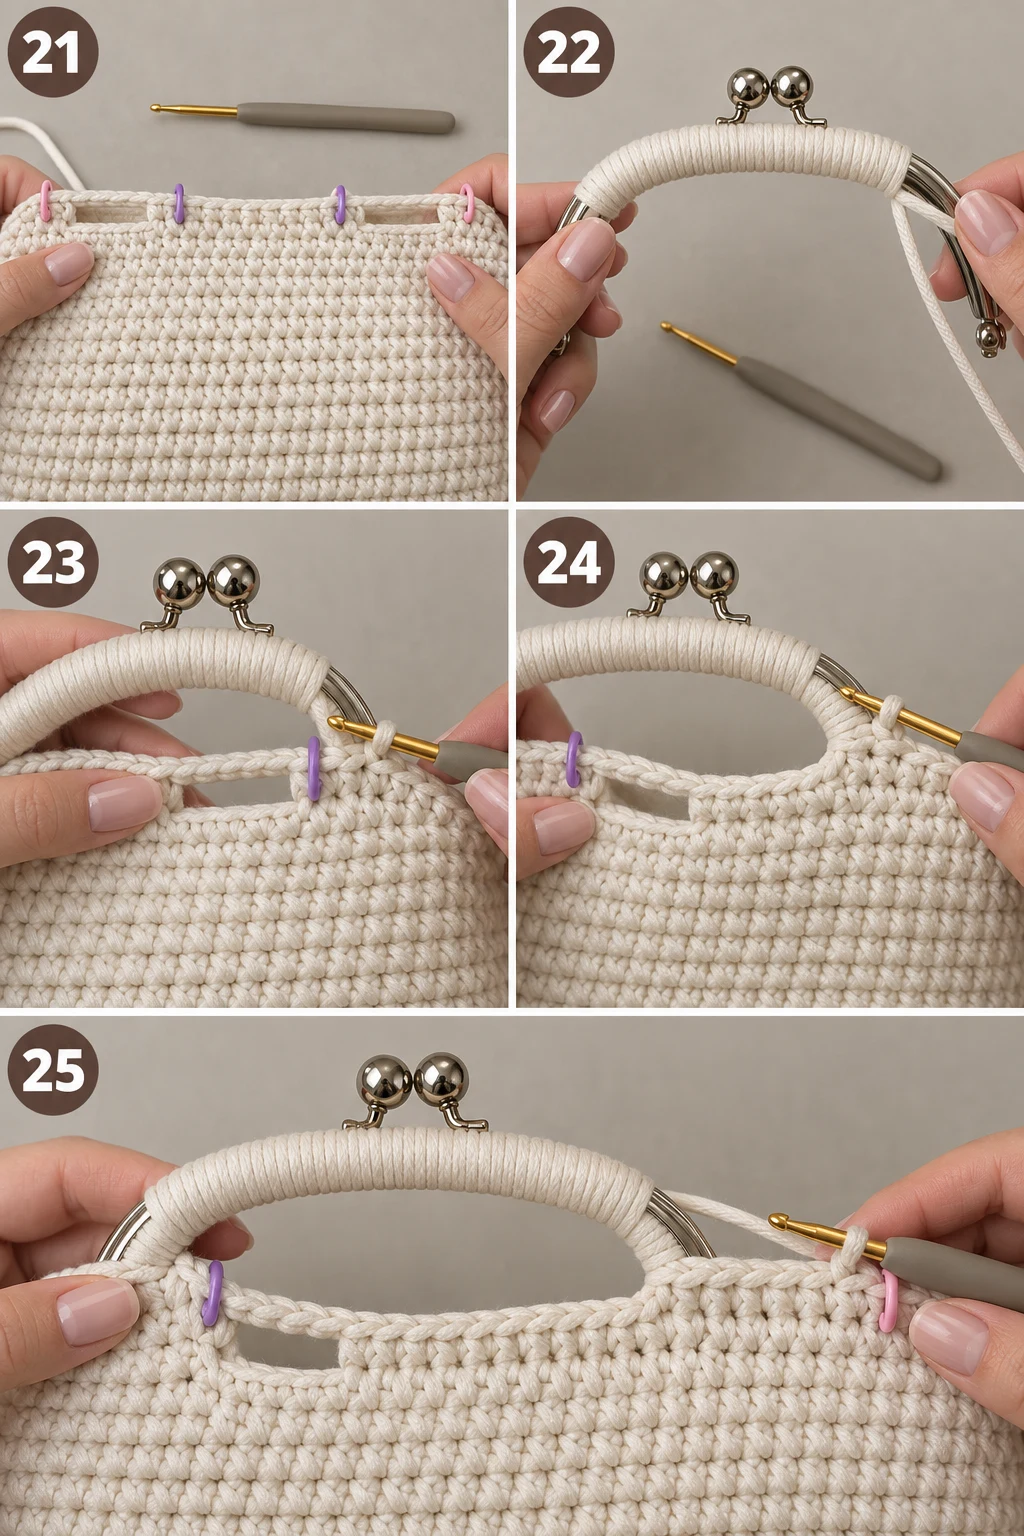
21. Mark the Handle Sections
Action: Place markers around the handle-opening sections, leaving 10 free stitches in the center of each handle opening.
Detailed instructions: From the selected corner/end points, count 8 stitches toward each handle area and mark the boundaries. For the standard 56-stitch version, the handle opening leaves 10 free stitches between its marked sides. Repeat the same positioning on the opposite side.
Expected result: Two matching handle openings are marked symmetrically, each with 10 free stitches.
Check yourself: Count the center opening and verify that it contains exactly 10 free stitches on each side.
22. Prepare the Clasp
Action: Cover the outside edge of the 17 cm clasp with approximately 1 m of cream white t-shirt yarn.
Detailed instructions: Apply a small amount of fabric-safe silicone to the outside of the clasp. Starting at one end, wrap the cream white t-shirt yarn tightly and evenly around the clasp edge, keeping the wraps close together without overlapping excessively. Secure the final end with another small amount of silicone.
Expected result: The clasp has a neat cream white yarn-covered outer edge ready to be joined to the handbag.
Check yourself: The covering should feel snug and should not slide freely along the metal frame.
23. Attach the First Handle Section
Action: Begin crocheting the first handle section with 1 sc after the first marker.
Detailed instructions: Attach the cream white yarn at the marked starting point and work 1 sc into the first stitch of the handle-side section. Keep the clasp aligned with the top edge while you work.
Expected result: The first small section of crochet begins securing the bag opening to the clasp.
Check yourself: The first sc should sit immediately beside the marked handle boundary.
24. Shape the First Clasp Curve
Action: Work the first handle-side increase sequence: 2 sc, inc, 3 sc, inc, then 2 sc.
Detailed instructions: Continue from the first attachment stitch. Work 2 sc in the next two stitches, place an increase in the following stitch, work 3 sc across the next three stitches, make another increase, and finish the section with 2 sc. Keep the stitches snug against the covered clasp.
Expected result: The crochet edge curves smoothly around the clasp while preserving the handle opening.
Check yourself: You should see two visible increase points creating a gentle curve rather than a straight, stretched edge.
25. Complete the First Handle Side
Action: Work 10 sc across the straight section leading to the opposite marker.
Detailed instructions: After the shaped section, work 1 sc in each of the next 10 stitches until you reach the second marker. Keep the stitches even and do not add additional increases along this straight visible section.
Expected result: The first handle side is securely attached and the center opening remains open.
Check yourself: Count exactly 10 straight sc between the shaping area and the next marker.
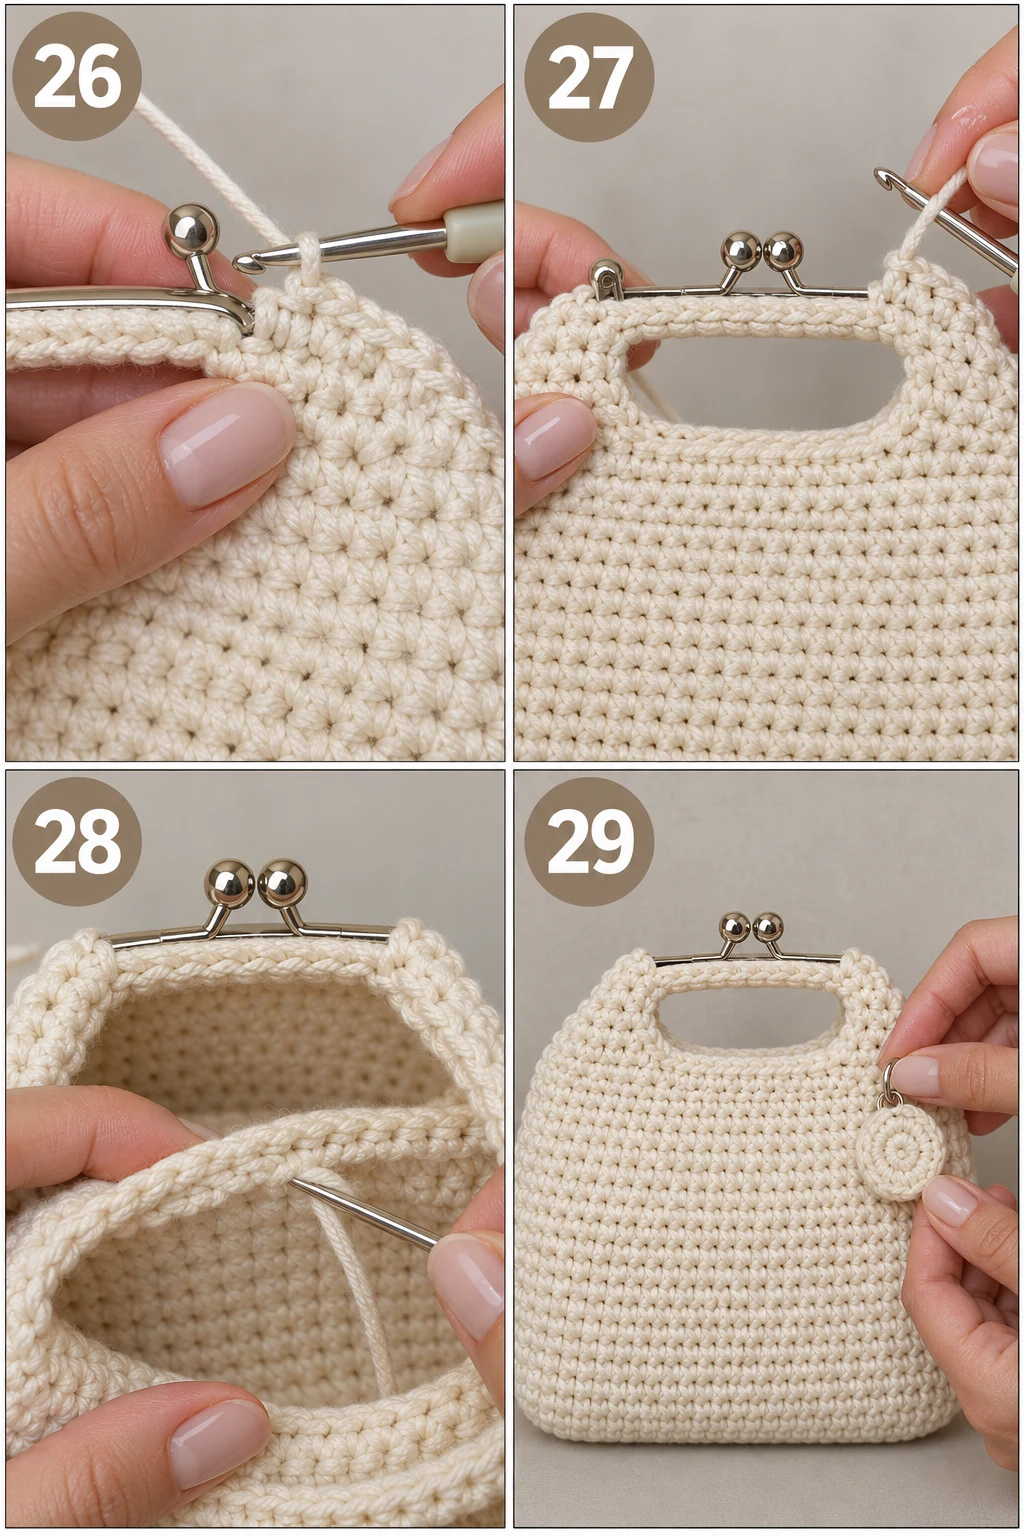
26. Secure the First Clasp Hinge
Action: Work 2 slip stitches at the clasp hinge beside the markers.
Detailed instructions: Remove the marker at the hinge point. Insert the hook into the next stitch, yarn over, and pull directly through the stitch and active loop to make a slip stitch. Repeat once in the adjacent hinge stitch so the metal closure remains unobstructed.
Expected result: Two flat slip stitches secure the hinge area without filling the moving clasp mechanism.
Check yourself: The clasp should still open and close freely without crochet sitting inside the hinge.
27. Repeat the Shaping on the Opposite Side
Action: Repeat the same clasp-side shaping sequence on the opposite handle area.
Detailed instructions: Begin after the opposite marker with 2 sc, work an increase, make 3 sc, work a second increase, and finish with 2 sc. Then work the corresponding 10-stitch straight section toward the opposite hinge, maintaining the same spacing and tension as the first side.
Expected result: Both sides of the handbag have matching curved clasp attachments and matching handle openings.
Check yourself: Compare both sides and confirm the increase points are symmetrical.
28. Finish and Hide the Yarn Ends
Action: Fasten off the final clasp stitches and weave all remaining cream white yarn ends securely into the wrong side of the bag.
Detailed instructions: Cut the yarn, pull it through the final loop, and use the 3.5 mm hook or tapestry needle to weave the tail under several neighboring stitches on the inside. Repeat with the remaining tails, trimming only after they are securely buried.
Expected result: The clasp is firmly attached, both handle openings are symmetrical, and no loose yarn tails remain visible.
Check yourself: Open and close the clasp several times and gently lift the bag by the clasp to make sure the attachment feels secure.
29. Add the Optional Bag Tag
Action: Attach a personalized handmade tag to the finished cream white handbag.
Detailed instructions: Position the tag on the exterior of the bag where it will not interfere with the clasp or handle opening, then secure it according to the tag’s attachment method.
Expected result: The handbag has a neat optional personalized finishing detail.
Check yourself: Confirm that the tag does not catch on the clasp or restrict the handle opening.
Quick Reference
Here is the condensed crochet bag tutorial handbags checklist I keep beside me when making this style of bag.
| Section | Stitch Count | Main Instruction | Finished Measurement |
|---|---|---|---|
| Foundation | 19 ch | Turning chain included | Fits clasp width |
| Round 1 | 38 sc | 16 + 3 + 16 + 3 | Oval base |
| Round 2 | 44 sc | 16 + 6 + 16 + 6 | Oval widens |
| Round 3 | 50 sc | 16 + 9 + 16 + 9 | Oval widens |
| Round 4 | 56 sc | 16 + 12 + 16 + 12 | Final base |
| Body Rounds 5–15 | 56 sc each | No increases | Approx. 14 cm body height |
| Total rounds | 15 | 4 base + 11 body | Approx. 19 cm total |
| Base size | 56 sts | Flat oval | Approx. 27 × 10 cm |
| Clasp | — | 17 cm frame | Approx. 21.5 cm total finished height |
| Handle opening | 10 free sts | Symmetrical | Approx. 12 cm opening |
For anyone following a crochet bag tutorial step by step, the most important numbers are 19 starting chains, 38 → 44 → 50 → 56 stitches across the four base rounds, then 11 rounds of 56 sc. Those numbers are the backbone of this particular construction and match the measurements and stitch progression demonstrated in the video.
📺 Watch the Video Tutorial
Final Thoughts
And there you have it—a finished crochet bag tutorial handbags project in cream white that looks wonderfully structured without requiring complicated stitches. I really love how the simple single crochet lets the clasp become the star of the design. If you’ve followed along, give yourself a big pat on the back! Before using your bag, gently shape the body with your hands and let it rest flat so the stitches settle. For care, spot-clean the cream white fabric rather than soaking the finished handbag, especially around the metal clasp. I’d absolutely love to see your finished bag, so share it and tag the blog!
Tips for a Better Experience
- Measure the clasp before changing the foundation chain. For this crochet bag tutorial handbags pattern, the 19-chain foundation is designed around a clasp approximately 17 cm wide; if your clasp differs substantially, adjust the starting chain before beginning the base.
- Keep the 56-stitch body consistent. If you accidentally add an extra stitch during the height rounds, the top edge can become uneven and make clasp attachment harder.
- Make the handle openings symmetrical. Mark both sides before crocheting around the clasp. The 10-stitch openings are much easier to reproduce accurately when the markers are placed first.
- Customize the height without changing the base. For a taller crochet handbag, simply add more continuous 56-stitch body rounds before fastening off. The original video also notes that additional spiral rounds can be added to increase the bag’s height.
FAQ
What is this crochet bag tutorial handbags pattern made with?
This crochet bag tutorial handbags pattern uses approximately 380 g of cream white t-shirt yarn, a 6 mm hook, and a 17 cm aluminum clasp. The construction relies primarily on single crochet.
How difficult is this crochet bag tutorial handbags project?
This crochet bag tutorial handbags pattern is beginner-friendly because the main body uses single crochet and simple increases. The clasp attachment takes a little more attention, but the step-by-step construction makes it manageable.
How do I make a simple bag with this crochet bag tutorial handbags pattern?
To learn how to crochet handbags using this construction, start with the 19-chain foundation, build the oval through four increase rounds, work 11 rounds of 56 sc for the height, then shape and attach the clasp. The accompanying youtube crochet bag tutorial follows the same general construction and demonstrates the clasp finishing visually.
The finished project follows the referenced Mary Crochet tutorial’s documented construction: single crochet throughout the main body, an oval base built with increases, continuous spiral rounds, a clasp/handle finishing section, and a metal clasp.
📚 You Might Also Like
- Easy Crochet Bag Tutorial: 13 Beginner-Friendly DIY
An easy crochet bag tutorial is a beginner-friendly guide that explains how to turn yarn and basic c…
- 15 Crochet Hand Bag Ideas to Make This Season
Crochet hand bags are handmade bags created by stitching yarn into a structured or flexible design t…
- 15 Bag Charms Crochet Ideas to Make Your Handbag More
Bag charms crochet are small handmade crochet accessories that decorate handbags, totes, backpacks,…
- 15 Crochet Shoulder Bag Ideas to Make This Season
A crochet shoulder bag is a handmade bag worked with yarn and a crochet hook, designed with a strap…
- Bag strap crochet: 7 Ultimate DIY Ideas for 2026
10 Bag Strap Crochet Ideas for Stylish Handmade Bags Bag strap crochet is the art of creating sturdy…
🛍️ Shop the Look — crochet bag tutorial handbags
Our handpicked Amazon picks curated specifically for crochet bag tutorial handbags:
As an Amazon Associate I earn from qualifying purchases.
✨ For more inspiration, check out The Spruce Crafts and Martha Stewart Crafts — our go-to sources for the latest trends.