
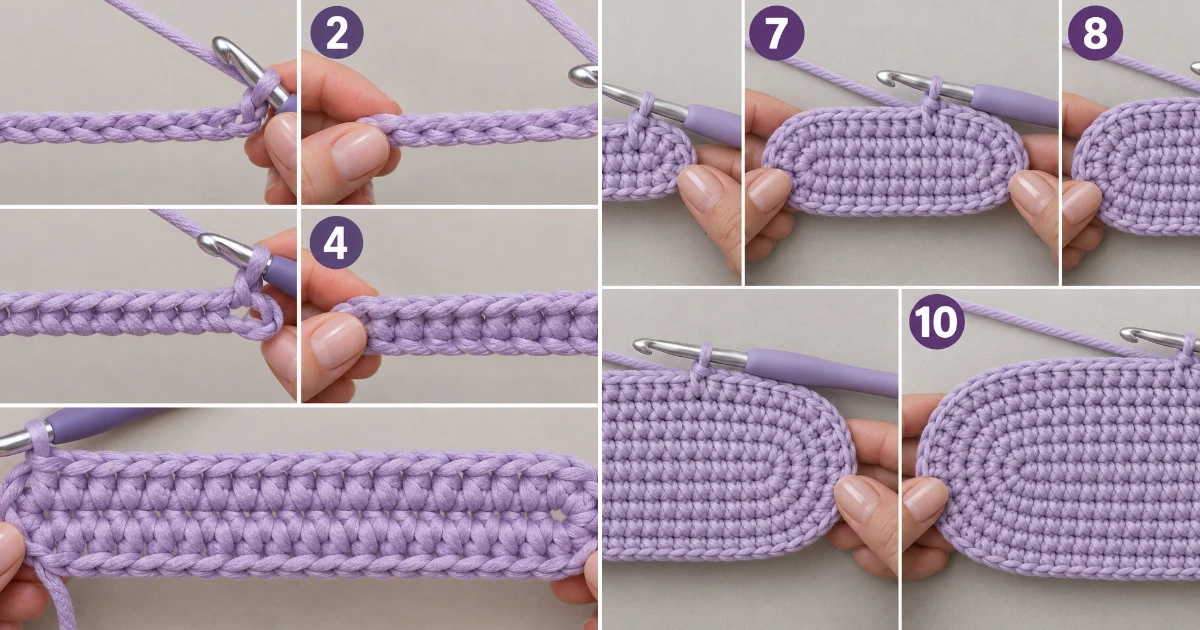
Chunky Crochet Bag That’s Quick & Beginner-Friendly
If you love crochet bag tutorials, this simple T-shirt-yarn purse is one of my favorite quick makes because it turns a handful of chunky stitches into a sturdy, useful bag in no time. I’m so excited to share this free pattern with you! The construction is wonderfully straightforward: you’ll crochet an oval base, build the sides upward in single crochet, then create two integrated handles right into the top. The finished bag has a soft, modern shape and works beautifully as an everyday purse. Grab your supplies and let’s get started!
Playful Crochet Bag Tutorial to Make This Weekend
This beginner-friendly crochet bag tutorial creates a sturdy oval-bottom purse with two comfortable crocheted handles and minimal finishing.
Materials Needed
- T-shirt yarn: approximately 250–300 g of chunky T-shirt/ribbon yarn in soft lavender
- Crochet hook: 10 mm (US N/P-15), suitable for chunky T-shirt yarn
- Stitch marker: 1, preferably locking
- Tapestry needle: 1 large-eye needle suitable for bulky yarn
- Scissors: 1 sharp pair for cutting T-shirt yarn
- Measuring tape
- Gauge (Approximate): 8 single crochet stitches × 8 rows = approximately 4 × 4 in (10 × 10 cm) in T-shirt yarn; gauge is approximate because T-shirt yarn varies considerably in stretch and thickness
- Quantity: 1 finished medium bag, approximately 10 in (25 cm) wide × 8 in (20 cm) tall, with two integrated handles
- Color: soft lavender throughout
This crochet bag tutorials project is intentionally written around a single-color chunky construction so the stitches stay easy to see while you learn.
Abbreviations / Terms Used
- ch: chain
- sc: single crochet
- inc: increase; work 2 sc into the same stitch
- BLO: back loop only
- sl st: slip stitch
- st/sts: stitch/stitches
- rnd: round
- rep: repeat
- sk: skip
- pm: place marker
- working loop: the active loop currently sitting on the crochet hook
What You Should Keep in Mind — crochet
- T-shirt yarn can be stretchy, so keep your single crochet tension firm but relaxed. Pulling extremely tightly makes a 10 mm hook surprisingly difficult to use.
- Keep the oval base flat while you work the increases. If the edges curl upward, check your stitch count before continuing.
- Because T-shirt yarn varies in thickness, your finished dimensions may differ slightly while the crochet bag tutorial stitch counts remain the same.
- Use a stitch marker in the first stitch of each continuous round. It makes the beginning and end of your rounds much easier to identify.
Free Pattern: crochet bag tutorials
The pattern below follows the simple T-shirt-yarn construction of the accompanying crochet bag tutorial YouTube video: oval base, straight sides, and two integrated handles.
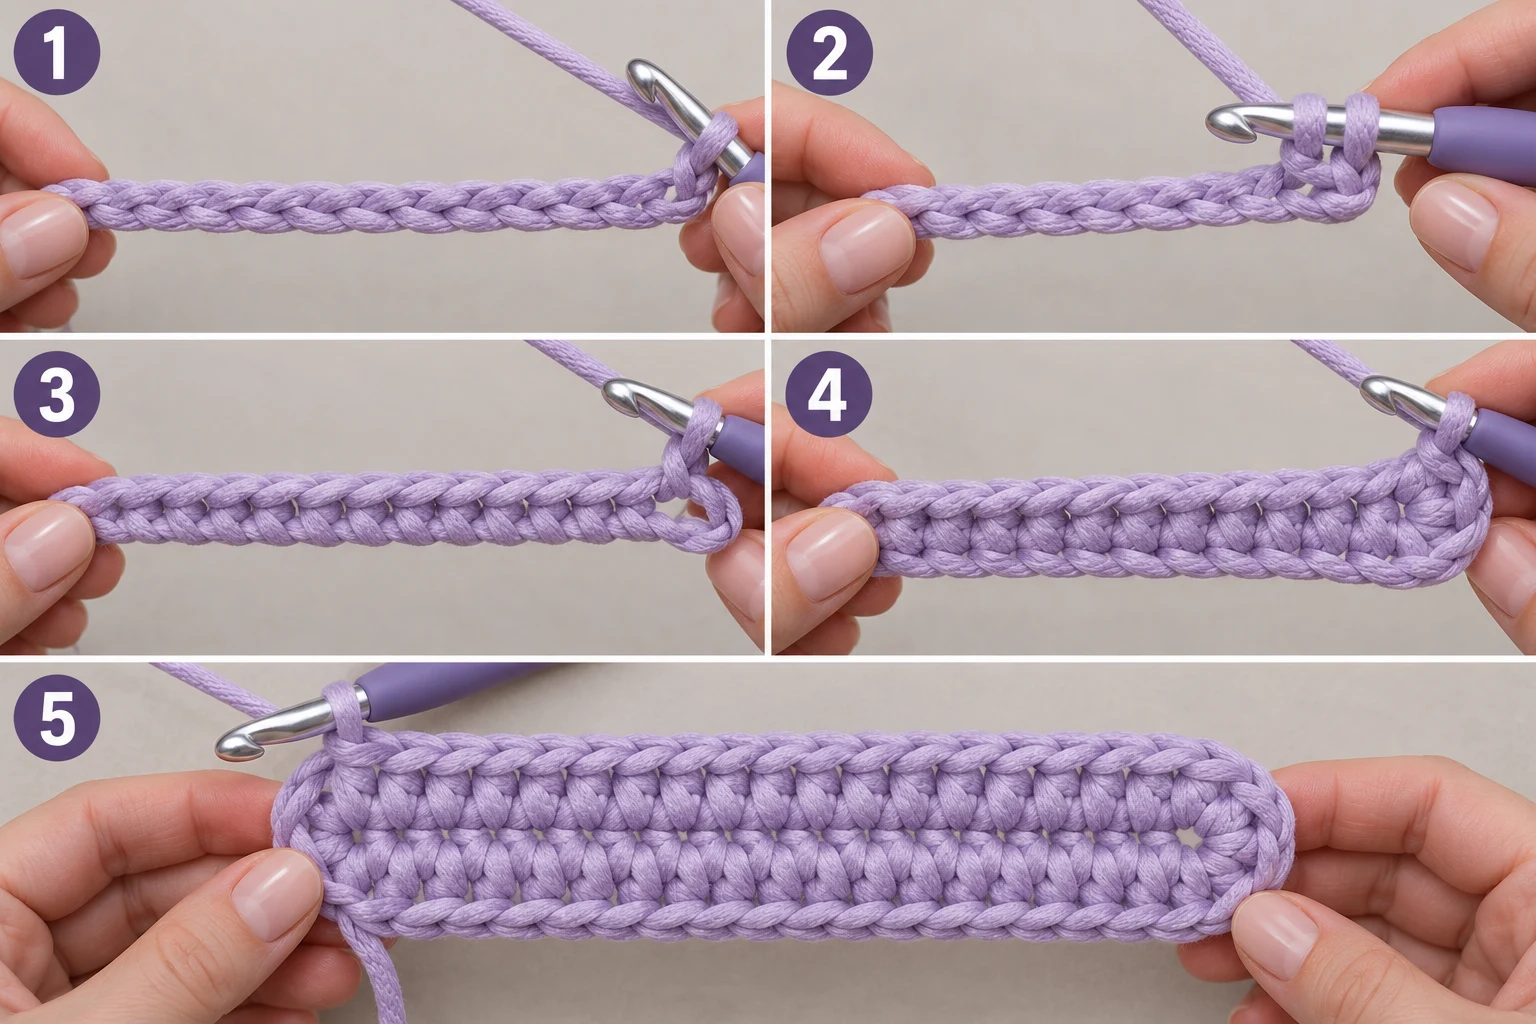
1. Make the Foundation Chain
Action: Chain 15 stitches with the soft lavender T-shirt yarn.
Detailed instructions: Make a slipknot and place it on your 10 mm hook. Yarn over with the working yarn and pull through the loop on the hook to create the first chain. Repeat the same chain motion until you have exactly 15 chain stitches. Keep the chains loose enough that the hook can pass through them comfortably.
Expected result: You have one flexible foundation chain containing 15 clearly defined chain stitches.
Check yourself: Count the V-shaped stitches along the top of the chain; there should be exactly 15.
2. Work the First Single Crochet
Action: Work 1 sc into the second chain from the hook.
Detailed instructions: Insert the hook into the second chain from the hook, passing under the top loops of the chain. Yarn over and pull up one loop through the chain so two loops are on the hook. Yarn over again and pull through both loops. This creates the first sc of Round 1.
Expected result: One compact sc sits in the second chain, while the first chain remains as the turning space at the beginning.
Check yourself: You should have one completed sc immediately below the hook.
3. Complete the Straight Side of Round 1
Action: Work 12 sc across the next 12 foundation chains.
Detailed instructions: Insert the hook into the next unused foundation chain, yarn over and pull up a loop, then yarn over and pull through both loops. Repeat this exact sc motion in each of the next 11 foundation chains. You will have 13 sc total along the first straight side when counting the sc from Step 2.
Expected result: A straight row of 13 compact sc runs along one side of the foundation chain.
Check yourself: Count the completed stitches along this side; the total should be 13 sc.
4. Build the First Rounded End
Action: Work 3 sc into the final foundation chain.
Detailed instructions: Insert the hook into the final foundation chain of the original 15-chain foundation. Work one sc into that chain, then insert the hook into the same chain twice more, completing a total of 3 sc in that single chain. These three stitches form the first curved end of the oval.
Expected result: The end of the foundation curves around into a small three-stitch fan.
Check yourself: You should see 3 sc sharing the same final foundation chain.
5. Crochet Back Along the Chain
Action: Work 12 sc into the unused loops along the opposite side of the foundation chain.
Detailed instructions: Turn the work so the underside of the foundation chain faces you. Insert the hook into the next unused chain loop immediately beside the three-stitch curve. Work 1 sc there and continue with 1 sc in each of the next 11 unused chain loops. This creates the second straight side of the oval.
Expected result: The foundation chain is now bordered by sc along both long sides.
Check yourself: You should have 28 sc before finishing the final curved end.
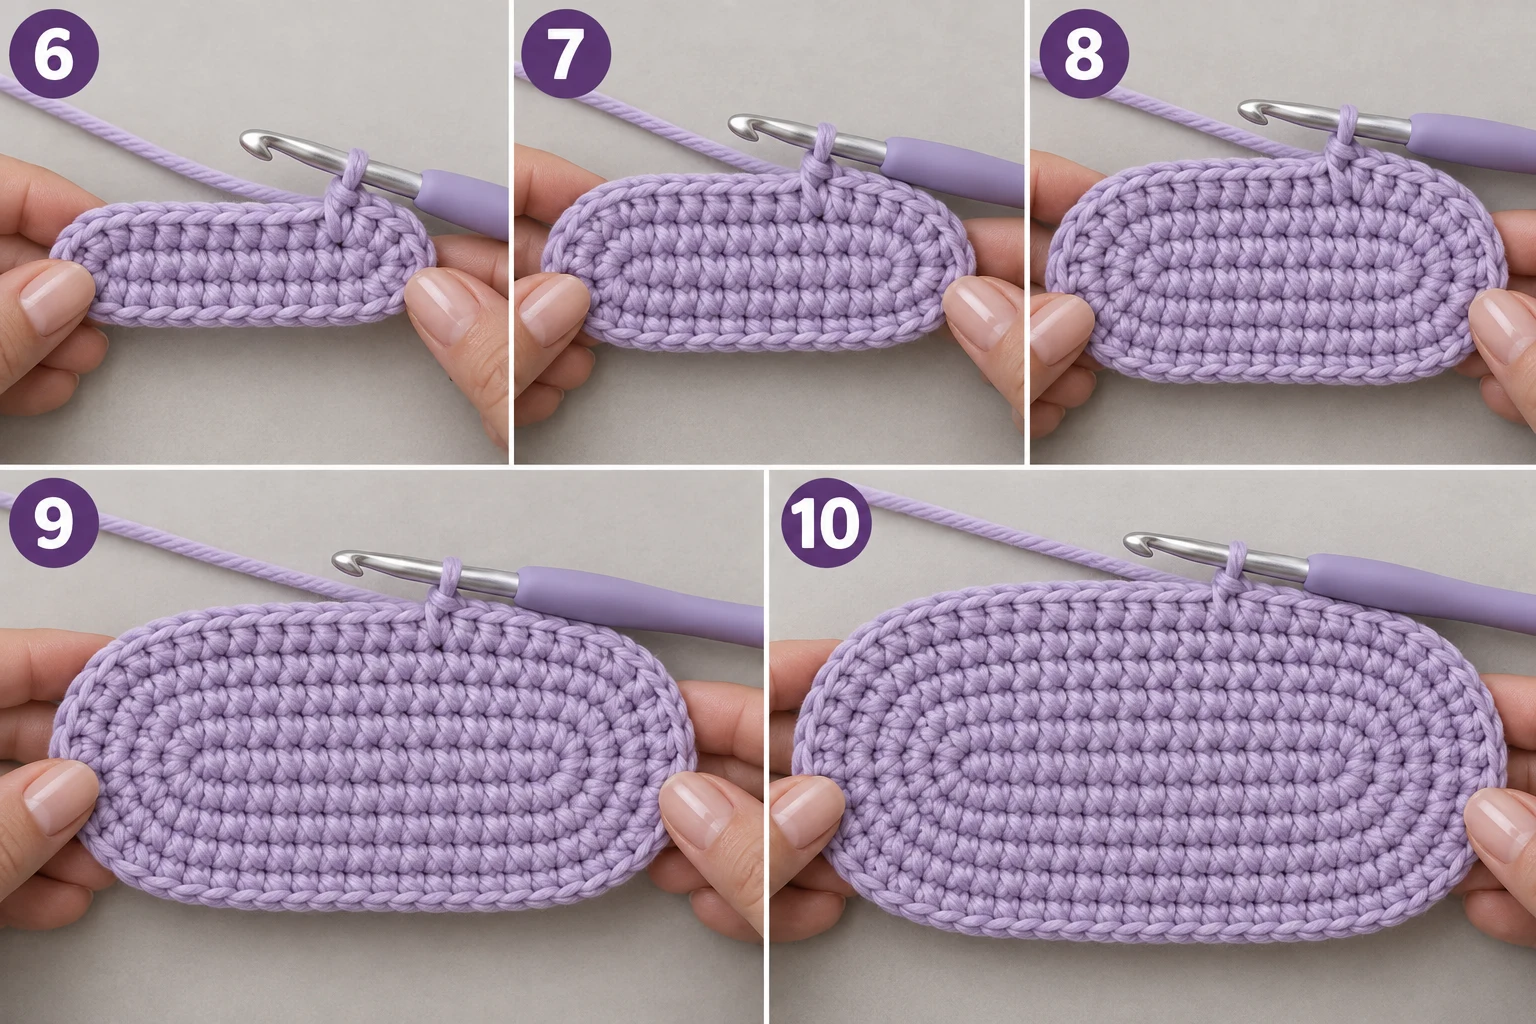
6. Close the Second Curve
Action: Work 2 sc into the final unused starting-chain loop.
Detailed instructions: Locate the unused loop at the beginning of the original foundation chain. Insert the hook into that loop and work 1 sc. Insert the hook into the same loop a second time and work another sc. These 2 stitches complete the second curved end, giving Round 1 a total of 30 stitches.
Expected result: The foundation chain is completely surrounded by crochet, forming a flat oval.
Check yourself: Count the entire round; you should have exactly 30 sc.
7. Increase Around the Oval
Action: Work Round 2 with the increase sequence that raises the count from 30 to 36 stitches.
Detailed instructions: Starting at the marked first stitch, work 2 sc in the first stitch, then 1 sc in each of the next 12 stitches, then 2 sc in each of the next 3 stitches around the first curve. Continue with 1 sc in each of the next 12 stitches, then 2 sc in each of the final 2 stitches. Do not join; place the marker in the first sc and move it upward as you begin each new round. This round contains 36 sc.
Expected result: The oval becomes slightly wider and remains flat.
Check yourself: You should have exactly 36 stitches after Round 2.
8. Increase Round 3
Action: Work Round 3 using the alternating single-crochet-and-increase sequence.
Detailed instructions: Work 1 sc in the first stitch, inc in the next stitch, then 1 sc in each of the next 12 stitches. Around the first curve, repeat (sc in next stitch, inc in next stitch) 3 times. Work 1 sc in each of the next 12 stitches, then repeat (sc in next stitch, inc in next stitch) twice around the final curve. The completed round contains 42 sc.
Expected result: The oval becomes broader while remaining smooth along both curves.
Check yourself: Your stitch marker should now sit beside a round containing exactly 42 sc.
9. Increase Round 4
Action: Work Round 4 using 2 sc between each increase on the curved ends.
Detailed instructions: Work 2 sc, inc at the beginning, then 12 sc along the straight side. Around the first curve, repeat (2 sc, inc) 3 times. Work 12 sc along the second straight side, then repeat (2 sc, inc) twice around the final curve. This adds 6 stitches and brings the total to 48 sc.
Expected result: The base is noticeably wider and still lies comfortably flat.
Check yourself: Count 48 stitches around the completed oval.
10. Finish the Oval Base
Action: Work Round 5 with 3 sc between each increase.
Detailed instructions: Work 3 sc, inc at the beginning, then 12 sc along the first straight section. Around the first curve, repeat (3 sc, inc) 3 times. Work 12 sc along the opposite straight section, then repeat (3 sc, inc) twice around the final curve. You will finish with 54 sc. Keep the base flat as you work.
Expected result: You now have the complete 54-stitch oval base for the bag.
Check yourself: Lay the base on a flat surface; it should sit flat without major rippling or cupping.
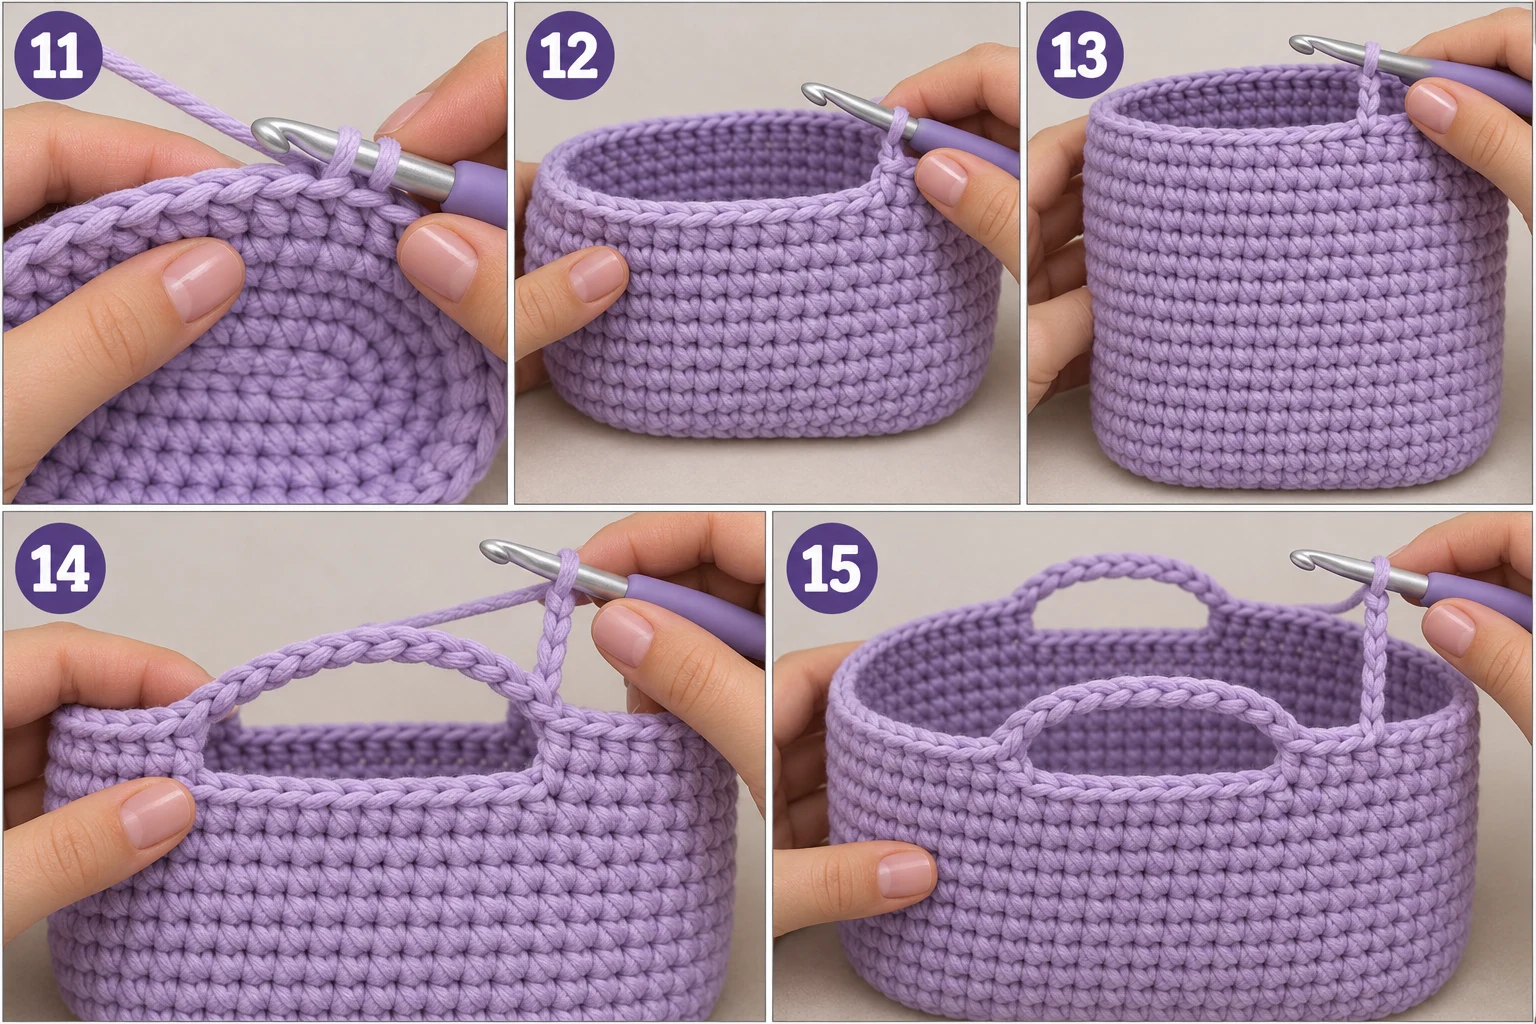
11. Create the Turning Ridge
Action: Work 1 sc in the BLO of every stitch around the 54-stitch oval.
Detailed instructions: Insert the hook under only the back loop of the next stitch rather than under both top loops. Yarn over, pull up one loop, yarn over again, and pull through both loops. Repeat around all 54 stitches. Do not increase. This back-loop-only round creates a crisp ridge where the base turns upward into the bag body.
Expected result: A subtle horizontal ridge appears around the edge of the oval, with the fabric beginning to turn upward.
Check yourself: You should still have exactly 54 stitches, with a visible ridge separating the base from the side wall.
12. Build the Lower Bag Body
Action: Work Rounds 7 through 11 in regular sc with no increases.
Detailed instructions: Work 1 sc in every stitch around each round, maintaining 54 sc per round. Continue in continuous rounds, moving the stitch marker into the first stitch of each new round. Do not add or remove stitches. Five identical rounds will build the lower wall of the bag.
Expected result: The sides rise evenly from the oval base, creating the beginning of the purse shape.
Check yourself: After Round 11, count 54 stitches around the top edge and check that the sides are standing evenly.
13. Add the Upper Body
Action: Work Rounds 12 through 14 in regular sc.
Detailed instructions: Continue with 1 sc in every stitch around, keeping the stitch count at 54 for each round. Move the marker after each completed round. These three additional rounds raise the bag to approximately 8 inches (20 cm) tall before the handles are formed.
Expected result: The purse body reaches its full height while the top edge remains even.
Check yourself: You should have 54 stitches around the top after Round 14.
14. Form the First Handle Opening
Action: Chain 12 stitches across the first marked handle opening.
Detailed instructions: Lay the bag flat and identify the first 12-stitch handle section. When you reach the first marked starting point, stop working into the body stitches. Yarn over and pull through the active loop repeatedly until you have 12 chain stitches. These chains create the first handle bridge.
Expected result: A 12-chain arch extends upward from the first side of the bag.
Check yourself: Count exactly 12 chain stitches in the first handle loop.
15. Create the Second Handle Opening
Action: Create the second 12-chain handle bridge on the opposite side.
Detailed instructions: Continue around the top edge until you reach the second marked 12-stitch handle section. Stop working into the body, then make 12 chains in the same way as the first handle. The two handle openings are positioned opposite each other, with 15 body stitches between the first handle opening and the second and 15 stitches completing the remaining side.
Expected result: Two matching 12-chain arches now rise from opposite sides of the bag.
Check yourself: Both handle bridges should contain exactly 12 chains and sit symmetrically when the bag is laid flat.
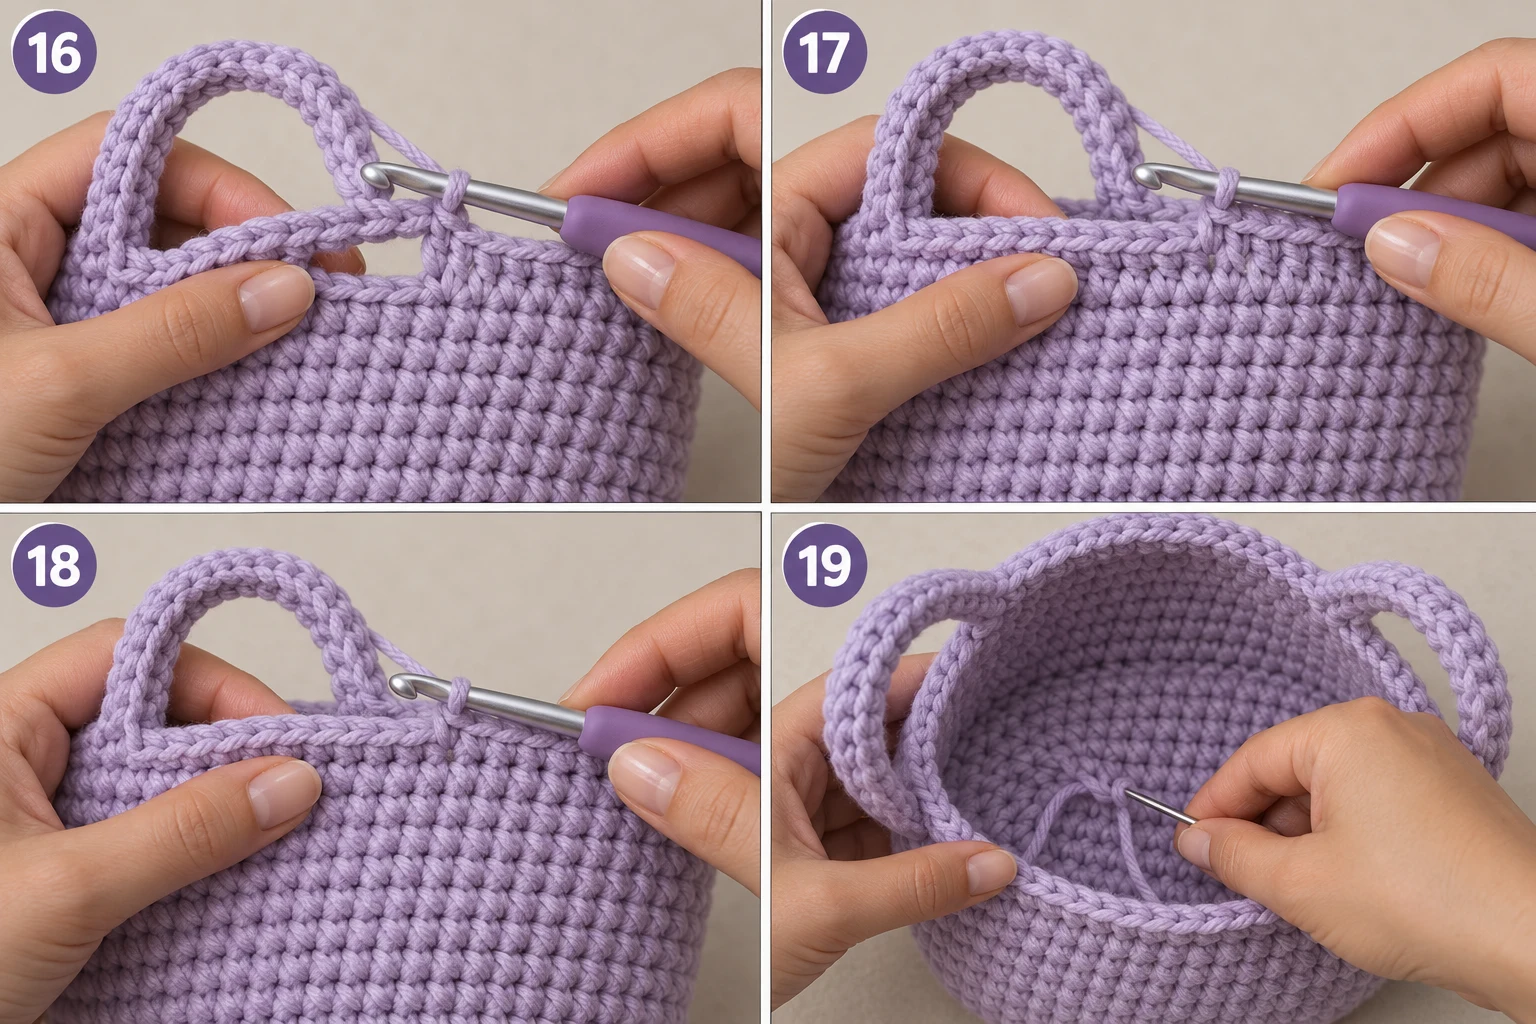
16. Reinforce Both Handles
Action: Work one sc into every top-edge stitch and one sc into each handle chain around the entire opening.
Detailed instructions: Starting at the marked first stitch, work 1 sc into each of the 15 body stitches leading to the first handle. For the first handle, work 1 sc into each of its 12 chain stitches. Continue with 15 body sc, then 12 sc across the second handle chain. This restores the complete top-edge count to 54 sc.
Expected result: Both 12-chain arches become sturdy crocheted handles, and the top edge is continuous again.
Check yourself: Count 54 stitches around the complete top edge after this round.
17. Firm Up the Top Edge
Action: Work one additional round of sc around all 54 stitches.
Detailed instructions: Insert the hook into the next stitch of the reinforced top edge and work 1 sc. Continue with 1 sc in every stitch around, including every stitch across both handles. Do not increase or decrease. Finish with exactly 54 sc.
Expected result: The top edge and both handles become thicker and more stable.
Check yourself: The handles should feel noticeably firmer than the original chain arches.
18. Finish the Top Edge
Action: Work a slip stitch into every stitch around the top edge.
Detailed instructions: Insert the hook into the next top-edge stitch, yarn over, and pull the yarn directly through the stitch and the active loop in one motion to make a sl st. Repeat in every stitch around all 54 stitches. Keep the slip stitches relaxed so the rim does not contract.
Expected result: A neat, low-profile finished edge surrounds the bag opening and handles.
Check yourself: The top rim should look clean and even without pulling inward.
19. Secure the Final Yarn Tail
Action: Fasten off and weave the remaining soft lavender yarn tail securely into the inside of the bag.
Detailed instructions: Cut the working yarn, leaving approximately 8 inches (20 cm). Pull the cut tail completely through the final active loop to secure it. Thread the tail onto the tapestry needle and weave it back and forth through several dense stitches on the inside of the bag. Change direction at least twice before trimming the excess close to the fabric.
Expected result: The bag has no loose working tail, and the inside looks neat and secure.
Check yourself: Gently tug the finished edge; the final stitch should not loosen.
Quick Reference
Here’s the quick-count version I keep nearby when working through crochet bag tutorials like this one:
| Section | Round(s) | Stitch Count | Main Action |
|---|---|---|---|
| Foundation | — | 15 ch | Starting chain |
| Oval Base | 1 | 30 sc | Work around both sides |
| Oval Base | 2 | 36 sc | Increase around curves |
| Oval Base | 3 | 42 sc | Increase around curves |
| Oval Base | 4 | 48 sc | Increase around curves |
| Oval Base | 5 | 54 sc | Final increase round |
| Turning Ridge | 6 | 54 sc | BLO sc |
| Lower Body | 7–11 | 54 sc each | Regular sc |
| Upper Body | 12–14 | 54 sc each | Regular sc |
| Handle Formation | 15 | 54 positions | Two 12-ch handle bridges |
| Handle Reinforcement | 16 | 54 sc | 12 sc across each handle |
| Top Reinforcement | 17 | 54 sc | Regular sc |
| Top Edging | 18 | 54 sl st | Slip-stitch finish |
| Finished Size | — | — | Approx. 10 × 8 in (25 × 20 cm) |
The most important numbers to remember from these crochet bag tutorials are 54 stitches around the body, 12 chains for each handle opening, and 54 stitches around the finished top edge.
📺 Watch the Video Tutorial
Final Thoughts
And there you have it—your very own chunky T-shirt-yarn bag! I love how quickly this project comes together, especially when you’re looking for crochet bag tutorials that don’t require complicated motifs or lots of sewing. Give your finished soft lavender bag a gentle hand-shaping before using it, according to Martha Stewart Crafts. If the yarn label allows it, a very light steam from a distance can help relax uneven stitches, but don’t press the hot tool directly against T-shirt yarn. I’d love to see your finished bag, so share it and tag the blog so I can cheer you on!
Tips for a Better Experience
- Keep the oval flat: If the base starts ruffling during the increase rounds, recount before moving on. A stitch accidentally added to one curved end can make the entire bag lean.
- Mark the handles before crocheting them: Place markers 15 stitches apart around the 54-stitch top so both soft lavender handles land directly opposite each other.
- Make the handles sturdier: The two reinforcing sc rounds are especially important with stretchy T-shirt yarn. They give the handles a much more substantial feel.
- Resize the bag easily: For a wider bag, add another increase round to the oval before beginning the body. For a taller bag, simply add more 54-stitch body rounds before creating the handles.
FAQ
What makes these crochet bag tutorials beginner-friendly?
This crochet bag tutorial uses chunky T-shirt yarn, basic sc stitches, a simple oval base, and two integrated handles, so there are no complicated motifs or seams to assemble.
How do I follow this crochet bag tutorial step by step?
Work through the numbered crochet bag tutorial steps in order while watching the matching crochet bag tutorial video alongside the written stitch counts.
Why use T-shirt yarn for crochet bag tutorials?
T-shirt yarn works especially well for this style because its chunky structure creates a substantial fabric quickly, making this crochet bag tutorial a practical crochet bag tutorial for beginners as well as an easy weekend project.
📚 You Might Also Like
- How to Make Crochet pillow patterns free (Free Pattern)
Easy Round Crochet Pillow Pattern for Cozy Style crochet pillow patterns free are exactly what I rea…
- Ideas a crochet granny square pattern: 20 Ultimate DIY
ideas a crochet granny square pattern can turn a few balls of yarn into everything from a colorful b…
- Crochet Applique Patterns Free Unicorn: 7 Magical Ideas You’ll Want to Stitch Today
Crochet applique patterns free unicorn are decorative crocheted unicorn motifs that can be attached…
- Crochet market bag: 15 Best DIY Ideas for 2026
15 Crochet Market Bag Ideas That Make Grocery Runs More Fun Crochet market bag ideas are handmade, r…
- Crochet Outfit Ideas Free Pattern: 12 Top DIY Ideas
Crochet Outfit Ideas Free Pattern: 17 Stylish DIY Looks Crochet Outfit Ideas Free Pattern are wearab…
🛍️ Shop the Look — crochet bag tutorials
Our handpicked Amazon picks curated specifically for crochet bag tutorials:
As an Amazon Associate I earn from qualifying purchases.