
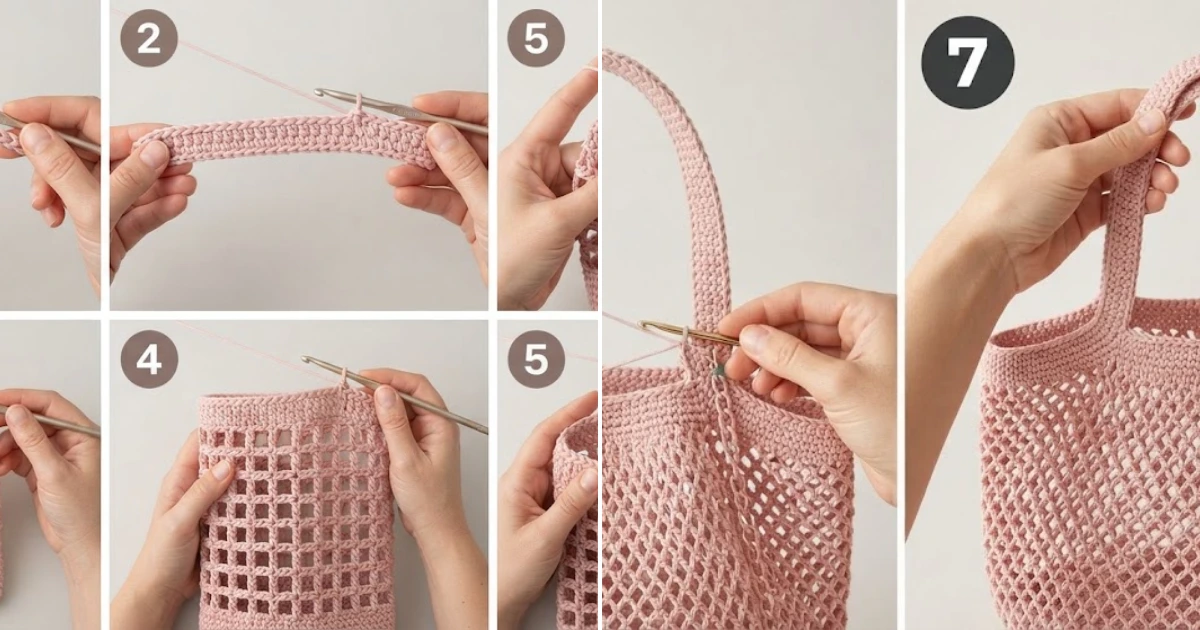
Easy Mesh Crochet Tote Bag Pattern for Beginners
If you have ever wanted to learn how to crochet a tote bag that is both practical and stylish for your everyday errands, you are in the exact right place! I am so excited to share this beginner-friendly mesh design with you today. It works up quickly, folds up small for your purse, and has just the right amount of stretch for your farmers market trips or beach days, according to The Spruce Crafts. Grab your hook and your favorite yarn, and let us dive right into creating your new favorite handmade accessory!
Playful How to Crochet a Tote Bag to Make This Weekend
This airy, lightweight mesh bag is sturdy enough for daily use yet simple enough to master over a single weekend.
Materials Needed
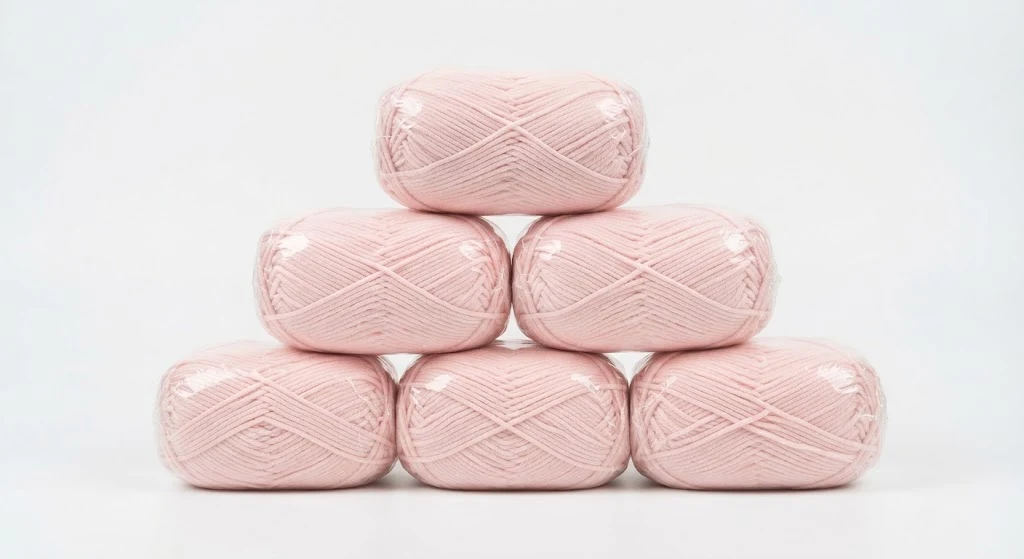
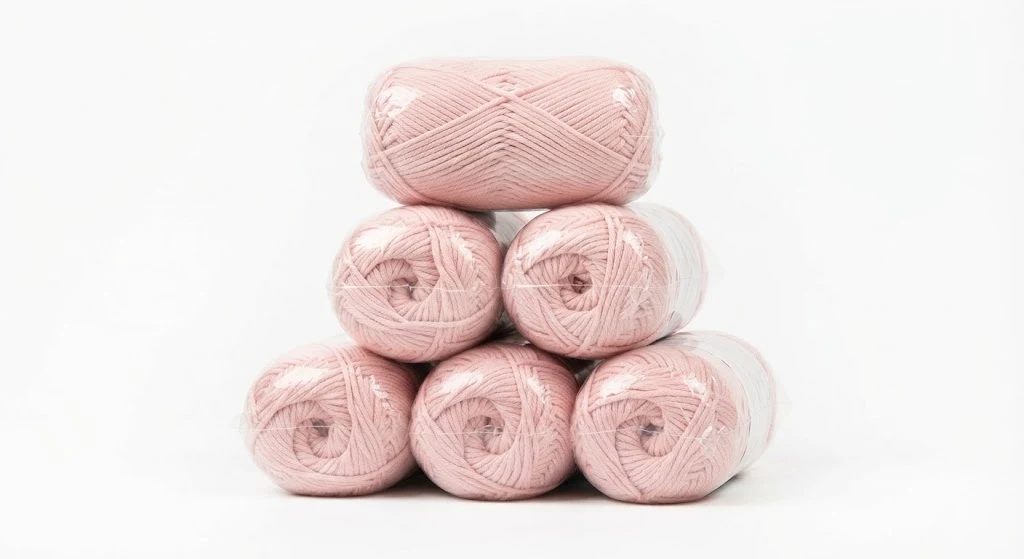
- Yarn: 150g milk cotton yarn (50g per skein, approx. 3 balls) in blush pink
- Hook: 4.5 mm crochet hook
- Notions: Stitch markers, yarn needle, scissors
- Gauge (Approximate): 4 mesh blocks x 4 rows = approx. 4 inches square in net stitch pattern
- Quantity: 3 skeins (approx. 150g total) to complete the base, body, and handles at standard size
- Color: blush pink (Lilthings Yarn)
Abbreviations / Terms Used
- ch: chain
- sc: single crochet
- dc: double crochet
- sl st: slip stitch
- sk: skip
- sp: space
- st(s): stitch(es)
What You Should Keep in Mind — how
- Maintain a consistent, even tension when working your chain spaces so the mesh grid looks neat and symmetrical throughout the bag body.
- When working the base rounds, do not pull your slip stitches too tightly or the bottom of the bag will pucker instead of laying flat.
- Count your stitches at the end of every round of the base to ensure your foundation circle is even before you transition up into the mesh sides.
- Use stitch markers to clearly denote your beginning of the round so you never accidentally lose your place in the spiral or joined rounds.
Free Pattern: How to Crochet a Tote Bag
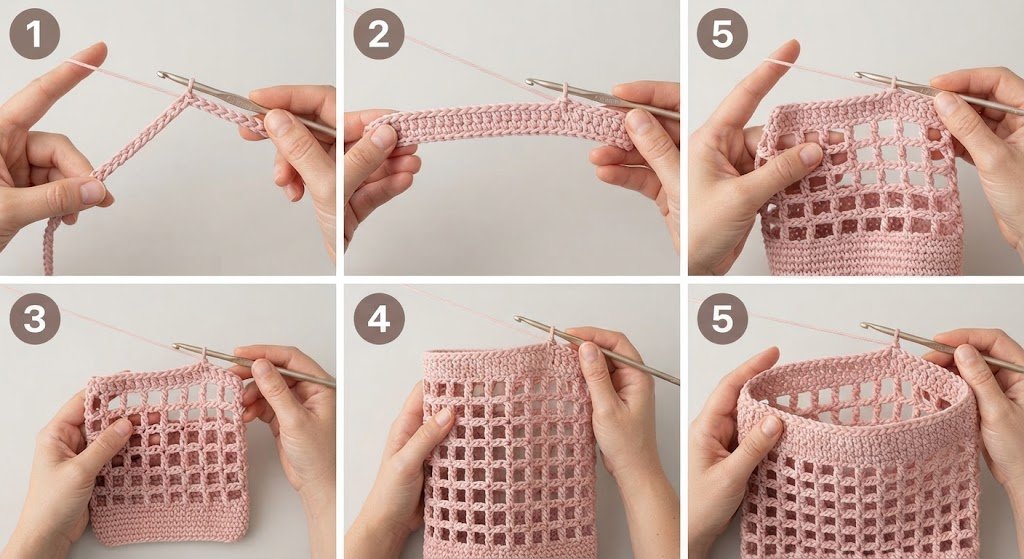
1. Make the Slip Knot and Foundation Chain
Action: Create a slip knot on your 4.5 mm hook and work a starting foundation chain of 41 chains.
Detailed instructions: Wrap the blush pink milk cotton yarn around your fingers to form a loop, pull the working yarn through to create a slip knot, and place it securely on your 4.5 mm hook. Yarn over and pull through the loop on your hook for your first chain. Continue chaining evenly until you have a total of 41 chains. The chain should lie straight and flat without twisting.
Expected result: A neat, uniform chain of 41 stitches in blush pink measuring approximately 12 inches long.
Check yourself: You should be able to count 41 distinct V-shaped chain loops along the top edge of your foundation line.
IMAGE_PROMPT: Ultra-realistic macro crochet/craft tutorial photography showing making the slip knot and foundation chain. The project is currently at this exact stage: the very beginning of the project with just the hook and the initial chain string. Show 41 chains clearly visible. The hook/needle is holding the active loop at the end of the chain. It is inserted into the final chain loop. The working yarn/thread is tensioned over the index finger. The active loop is a single smooth loop on the hook. The hands are holding the chain gently on both ends, fingers never covering the worked stitch, the insertion point, the active loop, or any important stitch. The image must clearly show the individual chain V-formation and the 4.5 mm hook. Do NOT show any future step’s result, and not the finished project. Same yarn color (blush pink), same yarn weight, same hook, same hands, same neutral background, same soft even lighting, same camera angle and zoom level, same project orientation as every other step image in this tutorial — this is one continuous project evolving step by step, never restarted, never a different color or shape than the previous step implies. Photorealistic macro photography, extremely detailed fiber/thread texture, sharp stitches, professional instructional craft photography, clean neutral background, soft natural lighting, high resolution, no decorative props, no flowers, no lifestyle objects, no text in the image, no watermark, no logo, no extra fingers, no deformed hook, no incorrect anatomy.
2. Work the First Row of the Bag Base
Action: Work single crochet stitches across the foundation chain to establish the solid base of your tote bag.
Detailed instructions: Skip the first chain from the hook. Insert your hook into the back bump of the second chain, yarn over, pull up a loop, yarn over again, and pull through both loops on the hook to complete your first single crochet. Work one single crochet into each remaining chain across the entire length of the foundation row, giving you 40 single crochets total. Turn your work to prepare for working along the opposite side of the foundation chain.
Expected result: A sturdy, solid strip of single crochet stitches forming the firm bottom foundation row of your bag.
Check yourself: You should count exactly 40 single crochet stitches across the straight row.
IMAGE_PROMPT: Ultra-realistic macro crochet/craft tutorial photography showing working the first row of the bag base. The project is currently at this exact stage: the foundation chain has a completed row of single crochets worked across it. Show 40 single crochet stitches clearly visible along the line. The hook/needle is positioned at the end of the row, ready to turn. It is inserted into the final single crochet top loops. The working yarn/thread is trailing from the working stitch. The active loop is secure on the hook. The hands are holding the ends of the base strip, fingers never covering the worked stitch, the insertion point, the active loop, or any important stitch. The image must clearly show the dense texture of the blush pink single crochet row. Do NOT show any future step’s result, and not the finished project. Same yarn color (blush pink), same yarn weight, same hook, same hands, same neutral background, same soft even lighting, same camera angle and zoom level, same project orientation as every other step image in this tutorial — this is one continuous project evolving step by step, never restarted, never a different color or shape than the previous step implies. Photorealistic macro photography, extremely detailed fiber/thread texture, sharp stitches, professional instructional craft photography, clean neutral background, soft natural lighting, high resolution, no decorative props, no flowers, no lifestyle objects, no text in the image, no watermark, no logo, no extra fingers, no deformed hook, no incorrect anatomy.
3. Transition to Mesh Body Rounds
Action: Chain 4 and begin working the open filet mesh pattern around the oval base.
Detailed instructions: Chain 4 (counts as 1 double crochet and 2 chain spaces). Skip the next 2 stitches on the base row, then work 1 double crochet into the next stitch. Repeat the sequence of (ch 2, sk 2 sts, dc in next st) all the way around the oval base, seamlessly transitioning from the bottom foundation into the body of the bag. Join with a slip stitch to the 2nd chain of your initial turning chain.
Expected result: A continuous round of open square mesh windows encircling the solid blush pink bag base.
Check yourself: You should see evenly spaced square mesh holes surrounding the entire perimeter of the bag base.
IMAGE_PROMPT: Ultra-realistic macro crochet/craft tutorial photography showing transition to mesh body rounds. The project is currently at this exact stage: the solid base has its first open mesh round built on top of it. Show the chain-2 spaces and double crochets forming a grid clearly visible. The hook/needle is positioned at the corner join. It is inserted into the joining slip stitch space. The working yarn/thread is held taut by the left hand. The active loop is on the hook. The hands are holding the base and the new mesh round, fingers never covering the worked stitch, the insertion point, the active loop, or any important stitch. The image must clearly show the open square mesh pattern in blush pink. Do NOT show any future step’s result, and not the finished project. Same yarn color (blush pink), same yarn weight, same hook, same hands, same neutral background, same soft even lighting, same camera angle and zoom level, same project orientation as every other step image in this tutorial — this is one continuous project evolving step by step, never restarted, never a different color or shape than the previous step implies. Photorealistic macro photography, extremely detailed fiber/thread texture, sharp stitches, professional instructional craft photography, clean neutral background, soft natural lighting, high resolution, no decorative props, no flowers, no lifestyle objects, no text in the image, no watermark, no logo, no extra fingers, no deformed hook, no incorrect anatomy.
4. Rows 4 Through 25 (Continue Mesh Body)
Action: Work consecutive rounds of the filet mesh pattern to build up the height of your tote bag.
Detailed instructions: Chain 4, work 1 double crochet into the top of the next double crochet from the previous round, and chain 2. Repeat this pattern (dc in dc, ch 2) over every mesh block around the entire round. Join each round with a slip stitch into the 2nd chain of the beginning ch-4. Continue this identical repeating mesh round for 22 consecutive vertical rounds until the bag body reaches a functional depth of approximately 14 inches.
Expected result: A tall, flexible, net-like cylindrical pouch with consistent square mesh openings in blush pink.
Check yourself: You should have a total of 22 identical mesh rounds stacked neatly above the base transition round.
IMAGE_PROMPT: Ultra-realistic macro crochet/craft tutorial photography showing rows 4 through 25 (continue mesh body). The project is currently at this exact stage: a tall cylindrical mesh body is formed, showing multiple rows of stacked open squares. Show the grid pattern with consistent height clearly visible. The hook/needle is working near the top edge of the mesh body. It is inserted into the top of a double crochet post. The working yarn/thread is pulled up from the stitch. The active loop is active on the hook shaft. The hands are cupping the side of the cylindrical bag, fingers never covering the worked stitch, the insertion point, the active loop, or any important stitch. The image must clearly show the tall mesh texture in blush pink. Do NOT show any future step’s result, and not the finished project. Same yarn color (blush pink), same yarn weight, same hook, same hands, same neutral background, same soft even lighting, same camera angle and zoom level, same project orientation as every other step image in this tutorial — this is one continuous project evolving step by step, never restarted, never a different color or shape than the previous step implies. Photorealistic macro photography, extremely detailed fiber/thread texture, sharp stitches, professional instructional craft photography, clean neutral background, soft natural lighting, high resolution, no decorative props, no flowers, no lifestyle objects, no text in the image, no watermark, no logo, no extra fingers, no deformed hook, no incorrect anatomy.
5. Work the Reinforced Top Edging
Action: Crochet a solid round of single crochet stitches around the entire top rim of the mesh body.
Detailed instructions: Chain 1. Work 1 single crochet into the top of the first double crochet, then work 2 single crochets into each ch-2 mesh space across the top edge. Continue working single crochets evenly around the entire perimeter of the bag opening to create a clean, non-stretching upper border. Join with a slip stitch to the first single crochet.
Expected result: A firm, solid band of single crochets framing the upper opening of your mesh tote.
Check yourself: The top rim should look crisp and opaque compared to the open mesh body underneath.
IMAGE_PROMPT: Ultra-realistic macro crochet/craft tutorial photography showing work the reinforced top edging. The project is currently at this exact stage: the open mesh top is now bordered by a solid row of single crochets. Show the dense single crochet border clearly visible. The hook/needle is positioned at the rim. It is inserted into the top loop of the single crochet border st. The working yarn/thread is held steady. The active loop is on the hook. The hands are holding the upper rim of the bag, fingers never covering the worked stitch, the insertion point, the active loop, or any important stitch. The image must clearly show the transition from mesh holes to solid single crochets in blush pink. Do NOT show any future step’s result, and not the finished project. Same yarn color (blush pink), same yarn weight, same hook, same hands, same neutral background, same soft even lighting, same camera angle and zoom level, same project orientation as every other step image in this tutorial — this is one continuous project evolving step by step, never restarted, never a different color or shape than the previous step implies. Photorealistic macro photography, extremely detailed fiber/thread texture, sharp stitches, professional instructional craft photography, clean neutral background, soft natural lighting, high resolution, no decorative props, no flowers, no lifestyle objects, no text in the image, no watermark, no logo, no extra fingers, no deformed hook, no incorrect anatomy.
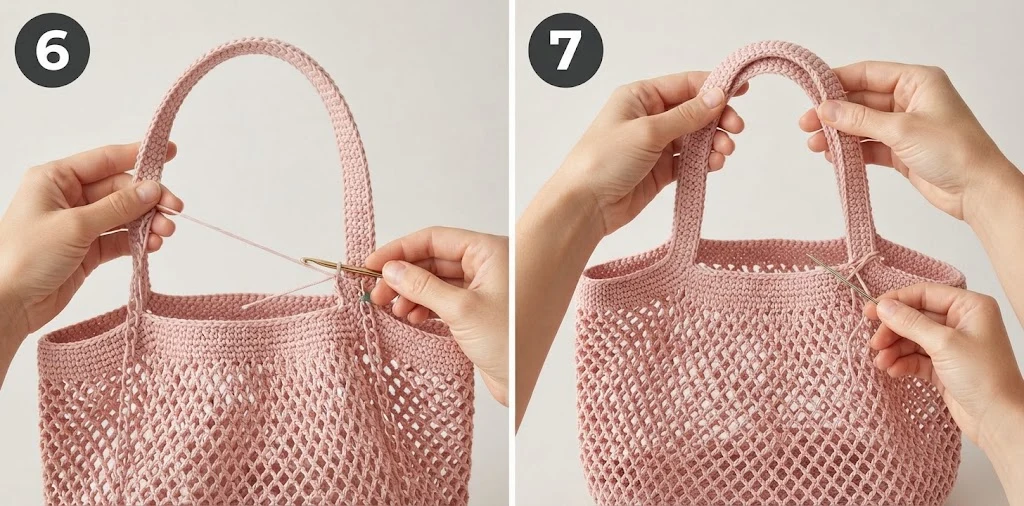
6. Create the First Shoulder Handle
Action: Chain 65 stitches to form the first shoulder strap and anchor it securely to the opposite side of the bag rim.
Detailed instructions: From your current position on the top rim, chain 65 sturdy chains for the strap length. Count across the top rim to locate the corresponding symmetrical placement point on the opposite side of the bag. Insert your hook firmly into that designated stitch, secure it with a slip stitch, and work a second row of slip stitches right back down the underside of the chain to reinforce the strap strength.
Expected result: A long, strong, comfortable strap arched across the top opening of the bag.
Check yourself: The chain strap should be free of twists and securely anchored on both ends.
IMAGE_PROMPT: Ultra-realistic macro crochet/craft tutorial photography showing create the first shoulder handle. The project is currently at this exact stage: one long chain strap is anchored across the top rim. Show the long arched strap clearly visible. The hook/needle is completing the anchor slip stitch on the bag rim. It is inserted into the edge stitch. The working yarn/thread is pulled tight to lock the strap. The active loop is on the hook. The hands are positioning the long strap curve, fingers never covering the worked stitch, the insertion point, the active loop, or any important stitch. The image must clearly show the connection point of the blush pink handle. Do NOT show any future step’s result, and not the finished project. Same yarn color (blush pink), same yarn weight, same hook, same hands, same neutral background, same soft even lighting, same camera angle and zoom level, same project orientation as every other step image in this tutorial — this is one continuous project evolving step by step, never restarted, never a different color or shape than the previous step implies. Photorealistic macro photography, extremely detailed fiber/thread texture, sharp stitches, professional instructional craft photography, clean neutral background, soft natural lighting, high resolution, no decorative props, no flowers, no lifestyle objects, no text in the image, no watermark, no logo, no extra fingers, no deformed hook, no incorrect anatomy.
7. Create the Second Shoulder Handle and Finish
Action: Chain 65 for the second handle on the opposite side, anchor it, fasten off, and weave in all loose ends.
Detailed instructions: Slip stitch along the top rim to the opposite starting point for the second handle. Chain 65 stitches for the second shoulder strap. Anchor it securely with a slip stitch on the corresponding side of the rim, then work reinforcing slip stitches back down the chain. Fasten off your yarn, leaving a 6-inch tail. Use your yarn needle to weave all loose ends securely into the interior fabric stitches.
Expected result: A fully completed, professional-looking mesh tote bag with dual matching shoulder straps and hidden tail ends.
Check yourself: Both handles should be identical in length, and no loose yarn tails should be visible.
IMAGE_PROMPT: Ultra-realistic macro crochet/craft tutorial photography showing create the second shoulder handle and finish. The project is currently at this exact stage: both handles are fully attached and loose ends are woven in, completing the tote. Show the final bag structure clearly visible. The hook/needle is absent, and the yarn needle is shown weaving in the final tail. It is inserted into an inner seam st. The working yarn/thread tail is being trimmed. The active loop is closed off. The hands are holding the finished handles, fingers never covering the worked stitch, the insertion point, the active loop, or any important stitch. The image must clearly show the complete, polished blush pink mesh tote bag. Do NOT show any future step’s result, and not the finished project. Same yarn color (blush pink), same yarn weight, same hook, same hands, same neutral background, same soft even lighting, same camera angle and zoom level, same project orientation as every other step image in this tutorial — this is one continuous project evolving step by step, never restarted, never a different color or shape than the previous step implies. Photorealistic macro photography, items completely finished, extremely detailed fiber/thread texture, sharp stitches, professional instructional craft photography, clean neutral background, soft natural lighting, high resolution, no decorative props, no flowers, no lifestyle objects, no text in the image, no watermark, no logo, no extra fingers, no deformed hook, no incorrect anatomy.
Quick Reference
| Section | Stitches / Count | Notes |
|---|---|---|
| Foundation Chain | 41 chs | First row setup |
| Bag Base | 40 sc | Solid oval bottom |
| Mesh Body | 22 rounds | Filet net pattern |
| Top Border | 2 sc per sp | Reinforced upper rim |
| Handles | 65 chs each | Dual shoulder straps |
📺 Watch the Video Tutorial
Final Thoughts
Congratulations on making your very own handmade mesh tote! I hope you enjoyed learning how to crochet a tote bag step by step. This lightweight design is fantastic for carrying groceries, beach gear, or everyday essentials while adding a lovely handmade touch to your outfit, according to Martha Stewart Crafts. When your bag needs a refresh, give it a gentle hand wash in lukewarm water with mild soap, reshape it gently while damp, and lay it flat on a clean towel to air dry. Tag your finished project photos online so I can admire your gorgeous blush pink creation!
Tips for a Better Experience
- Reinforce Your Straps: Slip stitching down the underside of your chain handles prevents them from stretching out and sagging when you fill your bag with heavy items.
- Watch Your Tension: Keep your double crochets relaxed in the mesh body so the bag maintains its airy, flexible drape rather than curling inward.
- Customize the Length: You can easily add or subtract a few vertical mesh rounds in Step 4 if you prefer a deeper or shallower tote bag style.
- Choose Cotton Yarn: Always stick with 100% cotton or milk cotton blends for market bags, as acrylic tends to stretch too much under weight.
FAQ
- What is the best yarn to use for how to crochet a tote bag? Milk cotton or mercerized cotton yarn is ideal because it provides durability, minimal stretch, and holds its shape well over time.
- Can I make the straps longer? Yes, simply adjust the chain count in Steps 6 and 7 to your preferred shoulder drop length before anchoring them.
- How do I keep the mesh grid even? Using stitch markers at the beginning of each round and keeping a consistent hook angle will ensure your windows stay uniform.
📚 You Might Also Like
- Crochet tote bag tutorials — Easy Step-by-Step Tutorial
Easy Crochet Mesh Tote Bag for Everyday Carry Crochet tote bag tutorials are one of my favorite ways…
- Crochet Star Bag Pattern: 15 Easy DIY Ideas for 2026
If you have been searching for a stunning, celestial accessory to elevate your handmade wardrobe, lo…
- Crochet butterfly bag: 15 Chic DIY Ideas for 2026
If you are looking for the ultimate handmade statement piece to elevate your spring and summer wardr…
- Bottle bag crochet: 10 Gorgeous DIY Ideas for 2026
Embarking on a bottle bag crochet project is one of the most rewarding ways to combine zero-waste su…
- 15 best Crochet Camera Bag Ideas
A crochet camera bag is a handmade protective bag designed to carry a camera and small photography e…
🛍️ Shop the Look — how to crochet a tote bag
Our handpicked Amazon picks curated specifically for how to crochet a tote bag:
As an Amazon Associate I earn from qualifying purchases.