
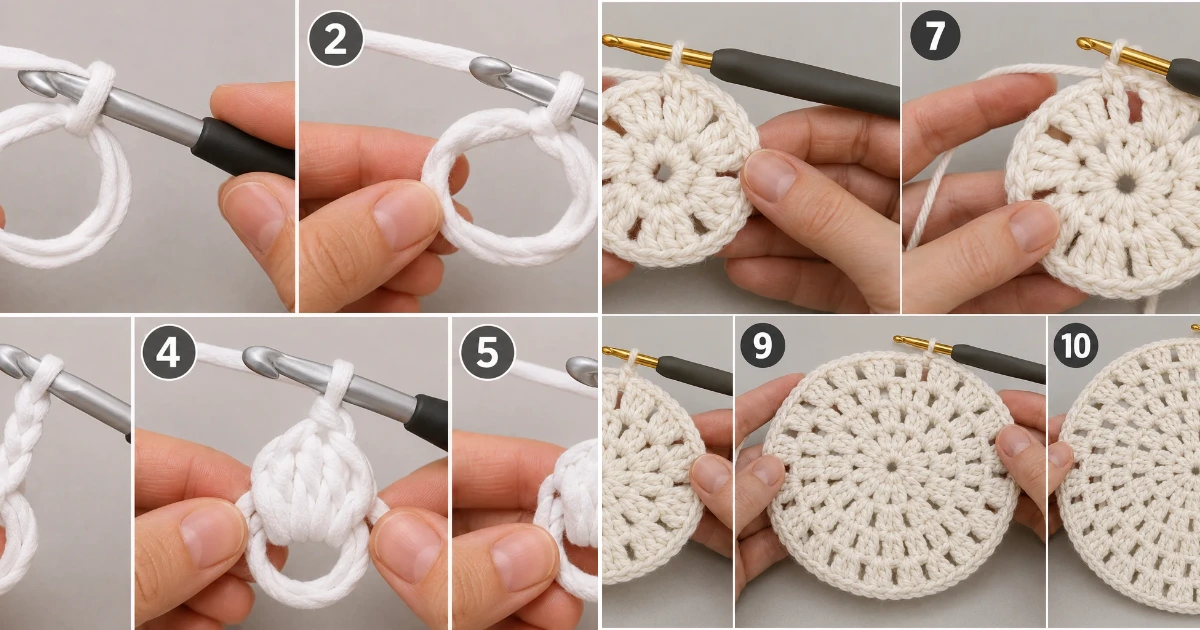
Modern Round Crochet Placemat That Feels Effortlessly Chic
crochet placemat patterns are one of my favorite ways to turn a simple ball of yarn into something genuinely useful, and I’m so excited to share this beginner-friendly round design with you! This is a sturdy, slightly textured placemat made with soft white T-shirt yarn, so it works up quickly and has enough weight to sit beautifully under a dinner plate. I designed this version to be easy to follow alongside the video tutorial, with clear stitch counts after every round, according to The Spruce Crafts. If you’re searching for crochet placemat patterns for beginners, this is a lovely first project because the construction stays flat and repetitive once the center is established.
Playful Crochet Placemat Patterns to Make This Weekend
This round T-shirt-yarn placemat is quick, washable, substantial, and easy to resize when you want a larger table mat.
Materials Needed
T-shirt yarn: approximately 120–140 m (130–150 yd) of smooth, medium-thick recycled cotton T-shirt yarn
Color: soft white
Crochet hook: 6 mm (US J/10) crochet hook
Tapestry needle: blunt-ended, large-eye needle for weaving in the yarn tail
Sharp scissors: for cutting the T-shirt yarn cleanly
Stitch marker: optional, but helpful for marking the beginning of each round
Measuring tape: for checking the finished diameter and maintaining the intended size
Gauge (Approximate): after Round 4, the circle should measure approximately 6 inches (15 cm) across; after Round 8, approximately 11½–12 inches (29–30.5 cm) across. Because T-shirt yarn varies considerably in stretch and thickness, diameter is more useful here than stitches-per-inch gauge.
Quantity: 1 finished round placemat, approximately 11½–12 inches (29–30.5 cm) in diameter, using about 120–140 m (130–150 yd) of yarn.
Color: soft white throughout the entire placemat.
Abbreviations / Terms Used
ch: chain
dc: double crochet
sl st: slip stitch
st: stitch
sp: space
rnd: round
sk: skip
beg: beginning
cluster: a group of 3 double crochets worked into the same chain space
ch-1 sp: the gap created by one chain between crochet clusters
magic ring: an adjustable loop used to begin crocheting in the round
join: connect the end of a round to its beginning with a slip stitch
increase: working an additional cluster into a designated space to keep the circular piece flat
Free Pattern: crochet placemat patterns
Grab your soft white T-shirt yarn and your 6 mm hook, and I’ll walk you through the exact construction one stage at a time.
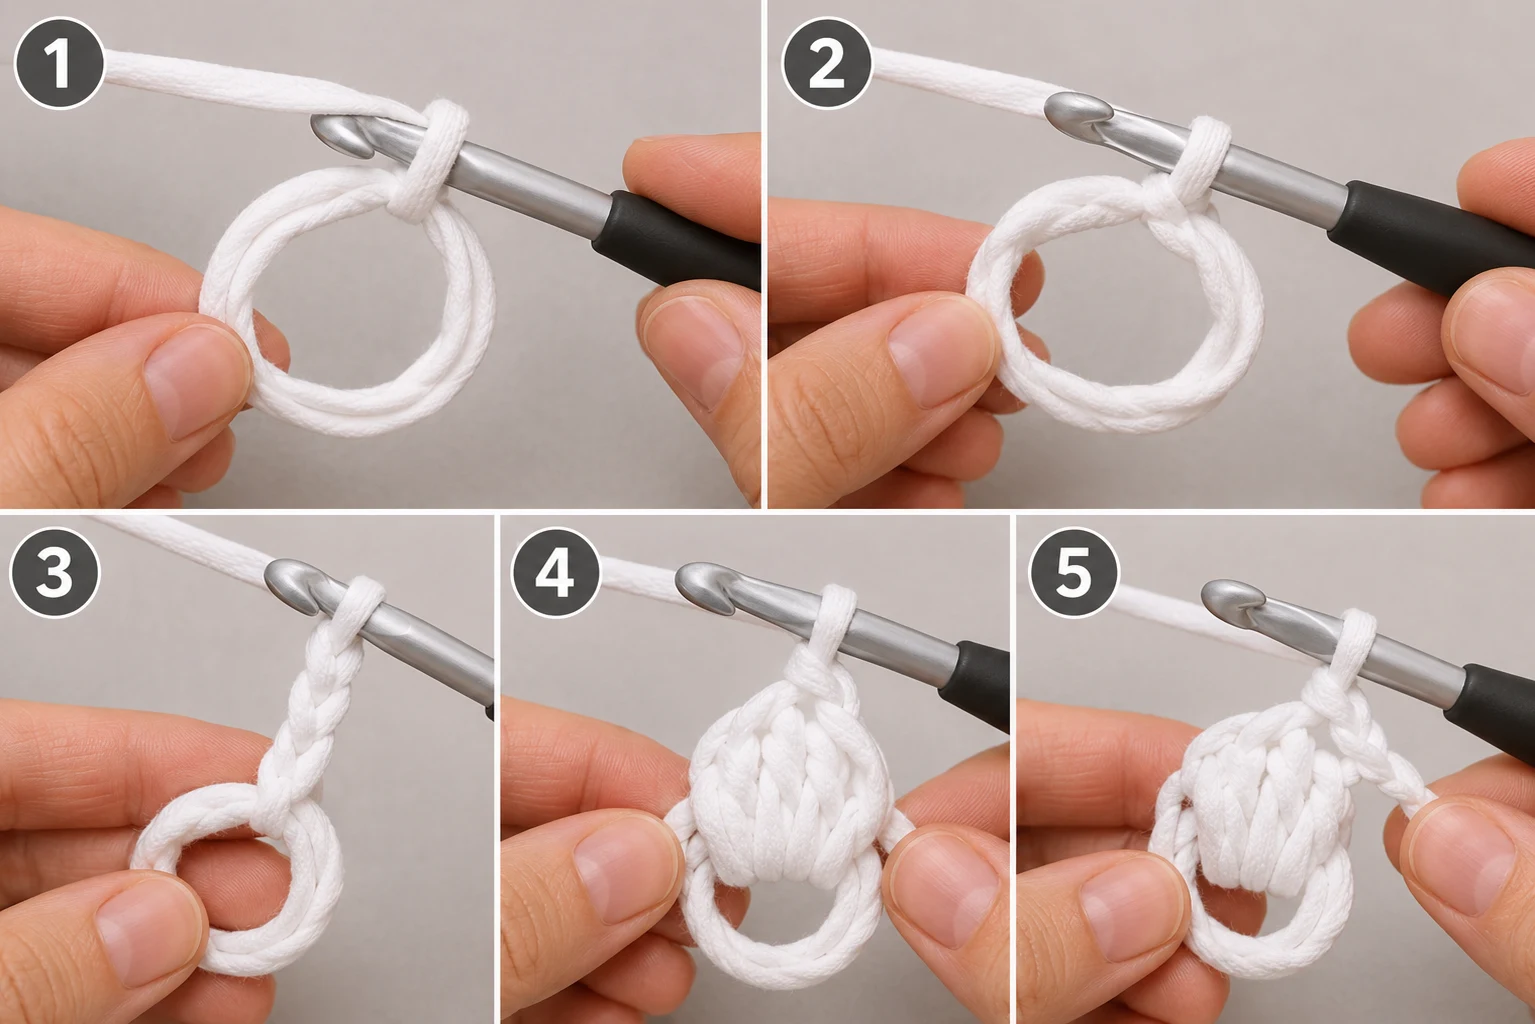
1. Form the magic ring — crochet
Action: Make an adjustable magic ring with the soft white T-shirt yarn.
Detailed instructions: Wrap the working yarn around two fingers to form a loose loop, insert your hook through the loop, and pull a strand of the working yarn through it. Keep the adjustable loop open enough to crochet into. Do not tighten it yet.
Expected result: You have one adjustable yarn ring with your hook holding the active loop.
Check yourself: The ring should be large enough for your hook to enter comfortably several times.
2. Secure the starting loop — crochet
Action: Pull the working yarn through the magic ring to secure the active loop.
Detailed instructions: With the hook inside the ring, yarn over once and pull the yarn through the ring opening and through the loop already on the hook. Keep the adjustable ring loose enough that you can still work stitches into its center, according to Martha Stewart Crafts.
Expected result: The magic ring is secured, and one active loop remains on the hook.
Check yourself: You should be able to gently pull the yarn tail and see the ring tighten later.
3. Make the first chain — crochet
Action: Chain 3 to establish the height of the first double crochet cluster.
Detailed instructions: Yarn over and pull the working yarn through the active loop three times, creating three chain stitches. Keep the chains relaxed rather than pulling them tightly.
Expected result: Three chain stitches rise from the magic ring.
Check yourself: Count exactly 3 visible chain links before moving on.
4. Work the first double crochet cluster
Action: Work 3 double crochets into the center of the magic ring.
Detailed instructions: Yarn over, insert the hook into the center of the magic ring, yarn over and pull up a loop, yarn over and pull through 2 loops, then yarn over and pull through the remaining 2 loops to complete one double crochet. Repeat the same double crochet action twice more in the ring. These 3 double crochets form the first cluster.
Expected result: One 3-dc cluster sits inside the magic ring beneath the starting chain-3.
Check yourself: You should see 3 completed double crochet posts grouped together at the center.
5. Add the first chain space
Action: Chain 1 after the first cluster.
Detailed instructions: Yarn over and pull the yarn through the active loop once to create a single chain. Leave this chain slightly loose because the next cluster will be worked into the space it creates.
Expected result: One chain-1 space separates the first cluster from the next cluster location.
Check yourself: You should see one small open gap immediately beside the first 3-dc cluster.
6. Complete Round 1
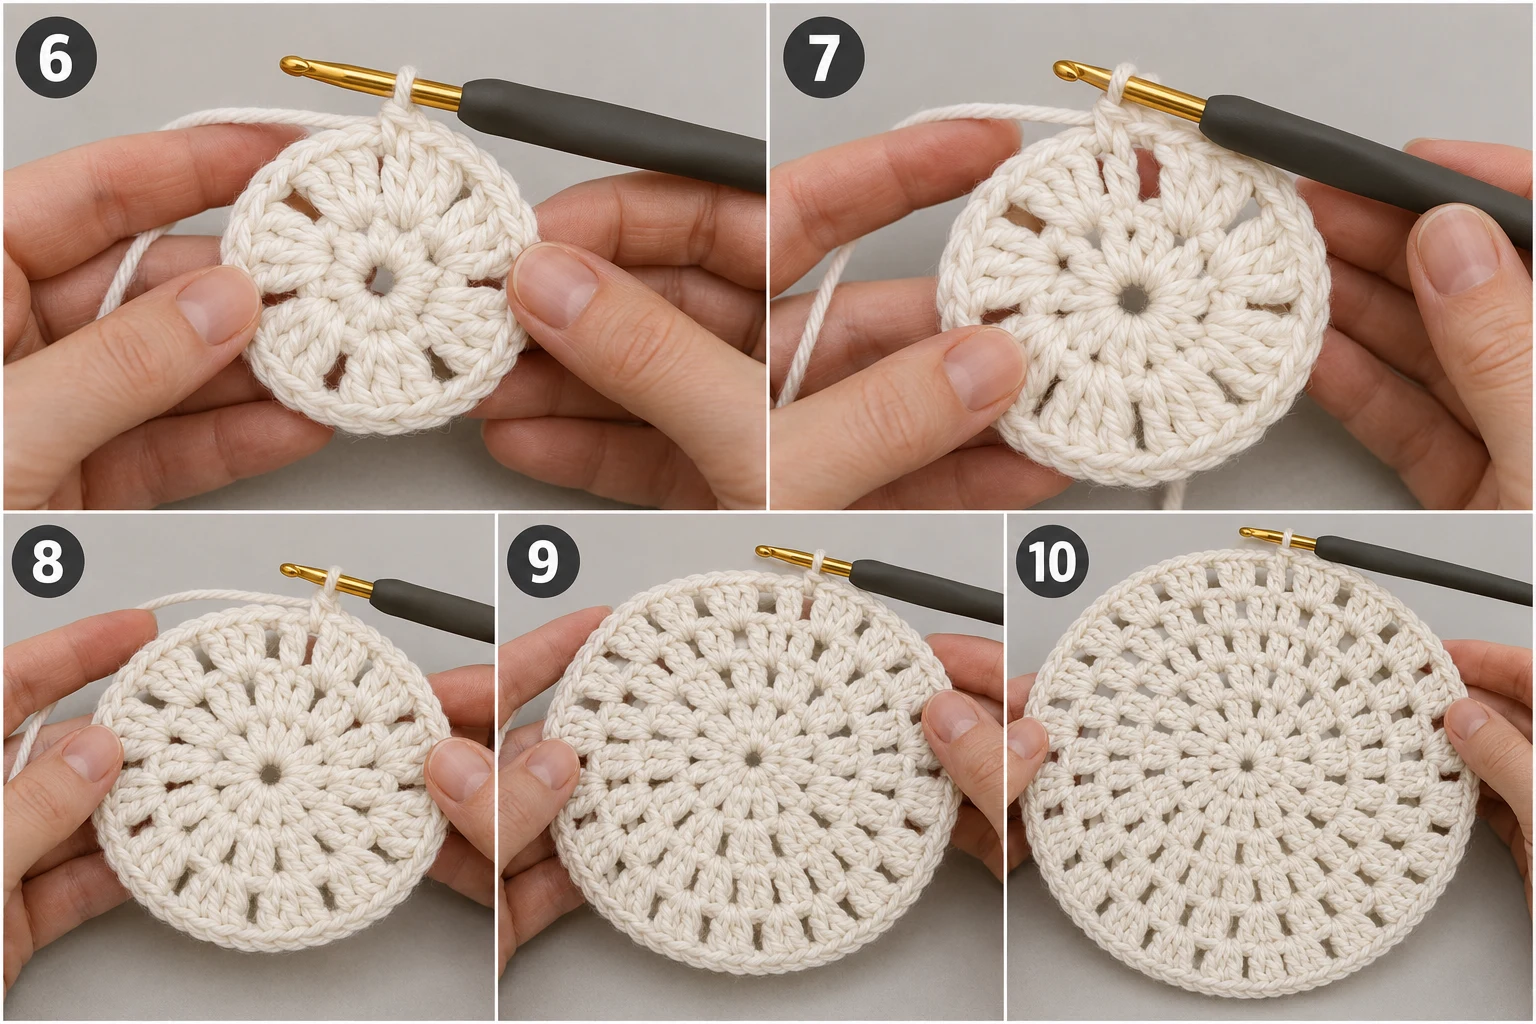
Action: Repeat the 3-dc cluster and ch-1 sequence around the magic ring until you have 8 clusters.
Detailed instructions: For each repeat, work 3 double crochets into the center of the magic ring, then chain 1. Continue around the ring until 8 total clusters and 8 chain-1 spaces are present. After the eighth chain-1, tighten the magic ring by pulling its yarn tail gently so the center closes.
Expected result: Round 1 forms a small eight-petal circular center with 8 clusters, 24 double crochets, and 8 chain-1 spaces.
Check yourself: Count 8 clusters around the center before tightening the ring.
7. Join Round 1
Action: Join the round with a slip stitch into the top of the beginning chain-3.
Detailed instructions: Locate the third chain of the beginning chain-3. Insert the hook through that chain, yarn over, and pull the yarn through the chain and directly through the active loop on the hook. This closes Round 1 without adding height.
Expected result: Round 1 is closed into a neat circle.
Check yourself: The join should sit at the top of the first cluster and should not create an extra visible stitch.
8. Build Round 2
Action: Work 2 clusters into every chain-1 space around the circle.
Detailed instructions: Chain 3 to begin the round, then work 3 double crochets into the first chain-1 space and chain 1. Work a second 3-dc cluster into that same space and chain 1. Repeat this two-cluster sequence in every one of the 8 chain-1 spaces. Finish with 16 clusters, 48 double crochets, and 16 chain-1 spaces, then join with a slip stitch to the beginning chain-3.
Expected result: The circle doubles its cluster count and begins spreading outward evenly.
Check yourself: There must be exactly 16 clusters around the outside edge of Round 2.
9. Increase evenly for Round 3
Action: Work Round 3 with one cluster in each space and a second cluster in every second space.
Detailed instructions: Chain 3 to begin. Work 1 cluster in the first chain-1 space, chain 1, then work 2 clusters in the next chain-1 space, chain 1. Continue alternating one cluster and two clusters around the round. The 2-cluster spaces create 8 evenly distributed increases. Join with a slip stitch to the beginning chain-3.
Expected result: Round 3 contains 24 clusters and 72 double crochets, with 24 chain-1 spaces.
Check yourself: You should have exactly 8 spaces containing 2 clusters and 16 spaces containing 1 cluster.
10. Increase evenly for Round 4
Action: Work Round 4 with one cluster in each space and a second cluster in every third space.
Detailed instructions: Begin with chain 3. Work one cluster into each chain-1 space, chaining 1 between clusters, but whenever you reach every third space, work 2 clusters into that space instead. Repeat this rhythm around the entire circle. Join with a slip stitch to the beginning chain-3.
Expected result: Round 4 has 32 clusters, 96 double crochets, and 32 chain-1 spaces.
Check yourself: Count 8 increase spaces, each containing 2 clusters.
11. Increase evenly for Round 5
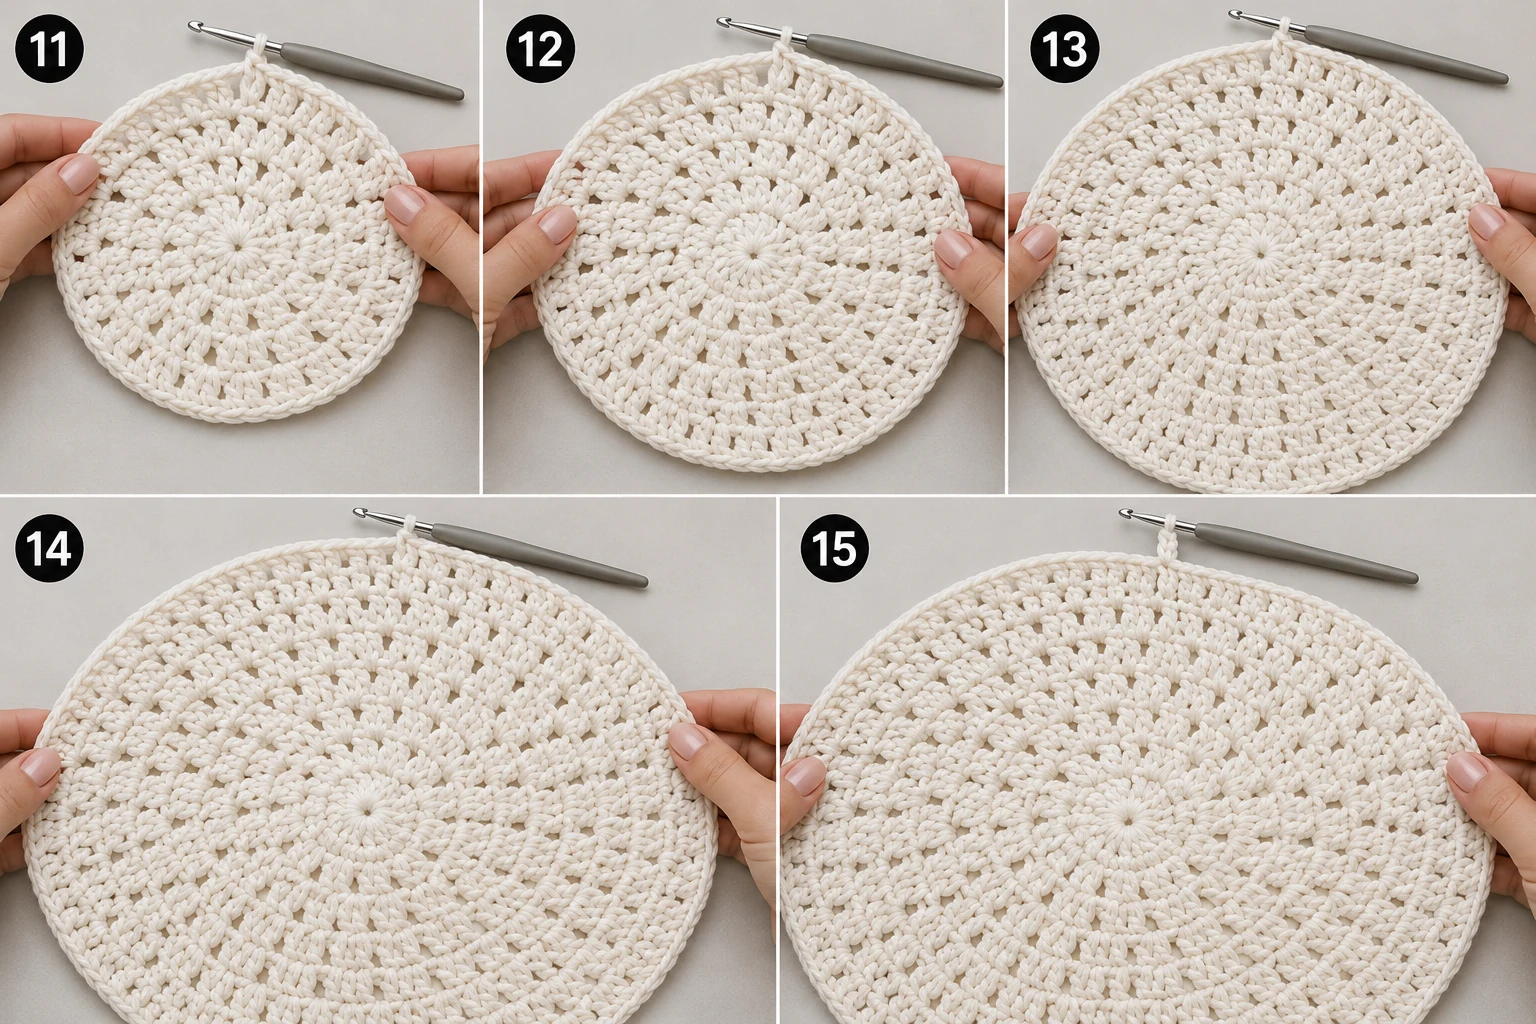
Action: Work Round 5 with one cluster in each space and a second cluster in every fourth space.
Detailed instructions: Chain 3, then place one 3-dc cluster in each chain-1 space with chain 1 between clusters. In every fourth chain-1 space, place 2 clusters instead of 1. Continue the same rhythm around the circle and join with a slip stitch to the beginning chain-3.
Expected result: Round 5 contains 40 clusters, 120 double crochets, and 40 chain-1 spaces.
Check yourself: You should find 8 increase spaces, evenly distributed around the round.
12. Increase evenly for Round 6
Action: Work Round 6 with one cluster in each space and a second cluster in every fifth space.
Detailed instructions: Start with chain 3. Work one 3-dc cluster into each chain-1 space and chain 1 between clusters. At every fifth chain-1 space, work 2 clusters into that space before chaining 1. Repeat around the full circle and join with a slip stitch.
Expected result: Round 6 has 48 clusters, 144 double crochets, and 48 chain-1 spaces.
Check yourself: There should be 8 increase spaces, with each increase made by adding one extra cluster.
13. Increase evenly for Round 7
Action: Work Round 7 with one cluster in each space and a second cluster in every sixth space.
Detailed instructions: Chain 3 and work one 3-dc cluster into each chain-1 space, adding chain 1 between clusters. In every sixth space, work 2 clusters instead of 1. Continue this pattern around the circle and join with a slip stitch.
Expected result: Round 7 contains 56 clusters, 168 double crochets, and 56 chain-1 spaces.
Check yourself: Count 56 clusters around the outer edge.
14. Complete the final increase round
Action: Work Round 8 with one cluster in each space and a second cluster in every seventh space.
Detailed instructions: Begin with chain 3. Work one 3-dc cluster into each chain-1 space with chain 1 between clusters. In every seventh chain-1 space, work 2 clusters into the same space. Repeat around the entire circumference, then join with a slip stitch to the beginning chain-3.
Expected result: The main body is complete with 64 clusters, 192 double crochets, and 64 chain-1 spaces, measuring approximately 11½–12 inches across.
Check yourself: Lay the placemat on a flat surface; the edge should lie mostly flat rather than forming a bowl or pronounced ruffle.
15. Begin the clean edging
Action: Chain 1 after joining Round 8 to prepare for the edging.
Detailed instructions: Keep the hook in the joined position, yarn over, and pull through the active loop once to make a single chain. This chain does not count as a separate edging stitch; it simply positions the yarn for the border.
Expected result: One small chain sits at the beginning of the final border round.
Check yourself: The chain should be loose enough that the edge does not tighten or curl.
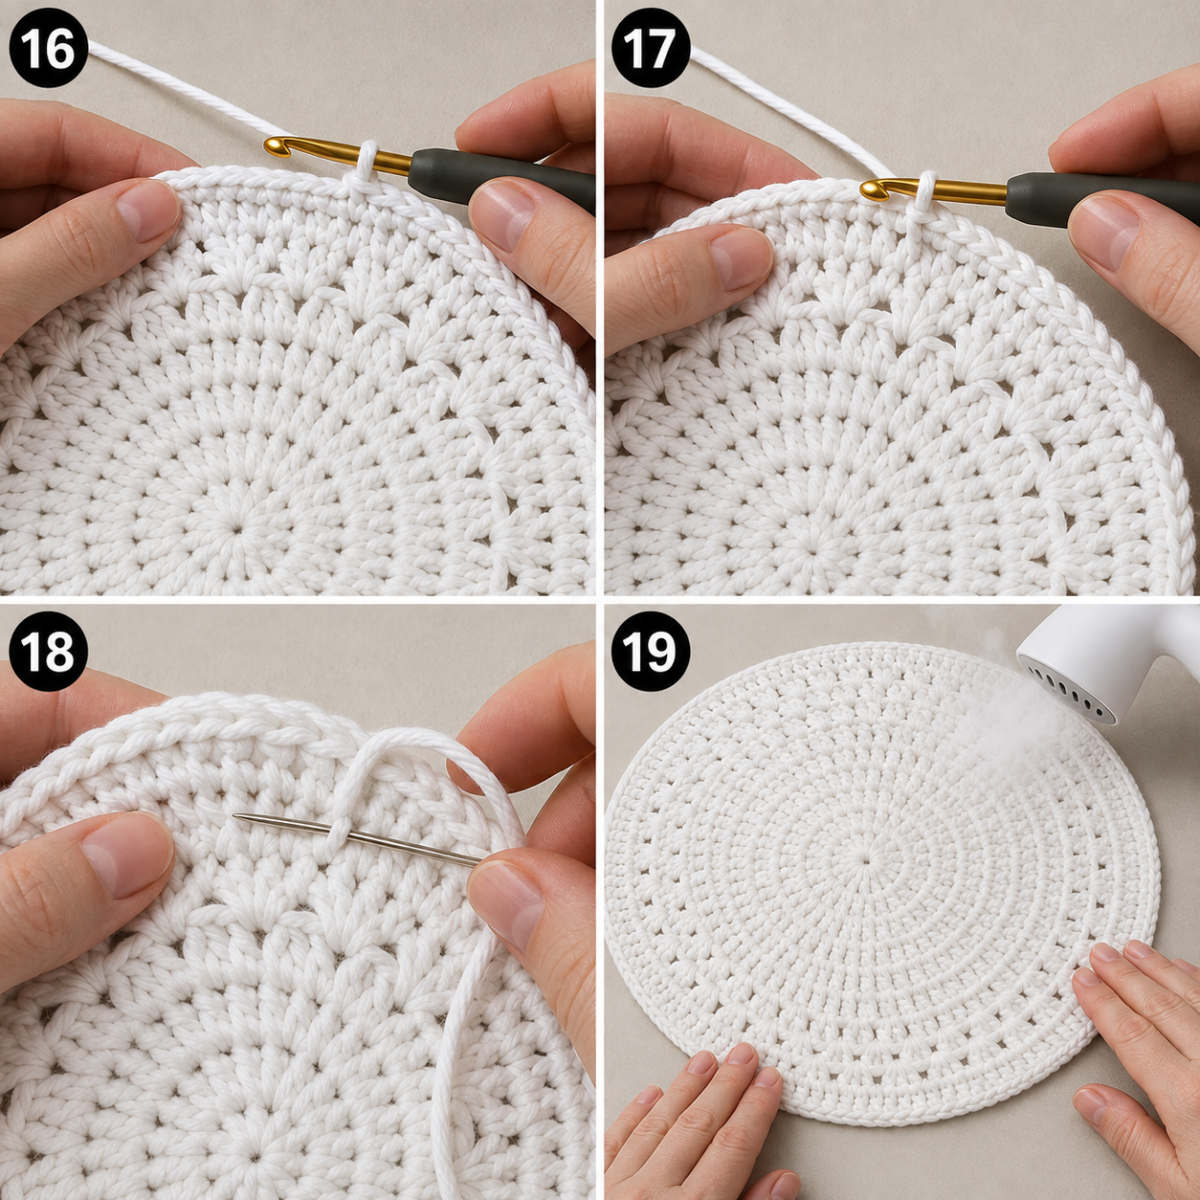
16. Work the reverse single crochet edging
Action: Work reverse single crochet stitches around the entire outer edge.
Detailed instructions: Turn the hook toward the right side of the work and insert it into the next stitch from front to back. Yarn over and pull up a loop, then yarn over and pull through both loops on the hook to complete one reverse single crochet. Continue working one reverse single crochet into each stitch around the outer edge, keeping the tension relaxed so the border does not draw the circle inward. Join the final stitch to the beginning of the edging with a slip stitch.
Expected result: A firm, slightly raised cord-like border surrounds the entire placemat.
Check yourself: The edge should feel defined while the placemat still lies flat on the table.
17. Finish the border
Action: Slip stitch into the first reverse single crochet to close the edging.
Detailed instructions: After completing the final reverse single crochet, insert the hook into the first reverse single crochet of the border, yarn over, and pull the yarn directly through the stitch and the active loop on the hook. Keep the join compact and neat.
Expected result: The raised edging forms one continuous circle around the placemat.
Check yourself: You should not be able to see an obvious gap between the first and final border stitches.
18. Weave in the yarn tails
Action: Weave the beginning and ending yarn tails securely through the wrong side of the placemat.
Detailed instructions: Thread the yarn tail onto the tapestry needle and weave it back and forth through several dense stitches on the wrong side, following the direction of the stitches rather than crossing openly over the chain spaces. Repeat with the beginning tail if it is still visible. Trim the excess close to the fabric without cutting any structural loops.
Expected result: Both yarn tails disappear neatly into the back of the placemat.
Check yourself: Turn the placemat to the front and confirm that no loose tail is visible.
19. Flatten and finish the placemat
Action: Gently steam-block the finished placemat until it lies flat.
Detailed instructions: Place the completed placemat on a clean, heat-safe flat surface. Hold a garment steamer or steam source several inches above the T-shirt yarn without pressing the hot surface directly onto the fabric. Give the piece light, even bursts of steam while gently smoothing the outer edge with your fingers. Allow it to cool and dry completely in its final shape.
Expected result: The placemat relaxes into a smooth, round shape with an even outer edge and defined textured border.
Check yourself: Measure across the center; the finished piece should be approximately 11½–12 inches (29–30.5 cm) in diameter.
Quick Reference
These crochet placemat patterns are easiest to follow when you keep the increase rhythm beside you. The important number is the cluster count: each new round adds exactly 8 clusters, which gradually expands the circle while keeping the edge balanced.
Round Clusters Double Crochets Chain-1 Spaces Increase Rhythm
1 8 24 8 8 starting clusters
2 16 48 16 2 clusters in every space
3 24 72 24 Increase every 2nd space
4 32 96 32 Increase every 3rd space
5 40 120 40 Increase every 4th space
6 48 144 48 Increase every 5th space
7 56 168 56 Increase every 6th space
8 64 192 64 Increase every 7th space
Edging — — — Reverse single crochet around
📺 Watch the Video Tutorial
Final Thoughts
I hope these crochet placemat patterns give you that satisfying feeling of watching a small center turn into a useful piece of home decor. I especially love how the T-shirt yarn gives this placemat enough weight to stay put while the simple cluster texture keeps it interesting. If yours isn’t perfectly flat after crocheting, don’t worry—gentle steam-blocking usually makes a big difference. Once yours is finished, I’d love to see it! Share your finished placemat and tag the blog so I can cheer you on and see your beautiful work.
Tips for a Better Experience
Keep your chain spaces relaxed. T-shirt yarn can tighten quickly, and overly tight chain spaces may pull the outer rounds inward.
Watch the increase rhythm. If the placemat starts curling upward, check whether you missed one of the eight increases in that round.
Use a stitch marker at the beginning. With bulky T-shirt yarn, the joining point can become difficult to spot after several rounds.
Resize from Round 8. For a larger placemat, continue the same construction by adding 8 clusters per round and spacing the 8 increases evenly around the circle.
FAQ
What are these crochet placemat patterns best used for?
These crochet placemat patterns create a sturdy round table mat approximately 11½–12 inches wide. The T-shirt yarn gives the finished piece enough structure for everyday table settings.
How can I make these crochet placemat patterns larger?
Continue adding rounds after Round 8, maintaining eight evenly distributed increases per round. Keep the spacing as even as possible so the placemat remains circular and flat.
Why do crochet placemat patterns sometimes curl?
Curling usually happens when the increases are too few or the yarn tension is too tight. In this pattern, eight evenly distributed increases per round help the circle expand smoothly, while relaxed tension keeps the fabric flat.
📚 You Might Also Like
- Crochet ideas small projects: 11 Stunning DIY Ideas
15 Crochet Ideas Small Projects That Are Quick, Cute, and Useful Crochet ideas small projects are qu…
- Fall Crochet Ideas Free Pattern: 20 Ultimate DIY
Fall Crochet Ideas Free Pattern: 20 Cozy DIY Projects for Autumn Fall Crochet Ideas Free Pattern pro…
🛍️ Shop the Look — crochet placemat patterns
Our handpicked Amazon picks curated specifically for crochet placemat patterns:
As an Amazon Associate I earn from qualifying purchases.